
Hello DIY enthusiasts and home decor lovers!
I’m thrilled to welcome you back as we dive into Part 2 of our exciting journey: creating a stunning, functional, and budget-friendly Pottery Barn-inspired Armoire. If you missed the initial build of the armoire itself, be sure to check out Part 1 for all the details. Today, we’re focusing on a truly game-changing addition: the custom-built drawer insert designed specifically for this versatile piece. This insert transforms the armoire into an organizational powerhouse, perfect for toys, clothes, media, or whatever your heart desires for your little one’s space or any room in your home.
Crafting your own furniture isn’t just about saving money; it’s about building exactly what you need, with a personal touch that store-bought items can’t replicate. This project combines classic style with practical functionality, ensuring your armoire is not only beautiful but also incredibly adaptable to your evolving storage needs. The beauty of this drawer insert lies in its thoughtful design, allowing for easy removal and re-insertion, giving you complete control over how you utilize your armoire’s interior. Imagine the flexibility: a large open space for hanging clothes one day, and a neatly organized drawer system for toys or accessories the next. This adaptability truly sets this DIY project apart.
The Genius of a Removable Drawer Insert
One of the standout features of this armoire customization is undoubtedly the drawer insert’s removable nature. This isn’t just a minor detail; it’s a core design principle that maximizes the functionality and longevity of your furniture piece. In a child’s room, storage needs can change rapidly. What starts as a toy armoire might evolve into a clothes dresser or even a media center for a gaming console or small TV as they grow. Having the ability to simply slide the entire drawer unit out offers unparalleled flexibility.
This design consideration also simplifies potential cleaning or redecoration tasks. You can easily remove the unit to deep clean the armoire interior or to move the piece without the added weight of fixed drawers. Furthermore, for those who love to switch up their decor, this flexibility means the armoire can adapt to various styles and purposes over the years, making it a truly sustainable piece of furniture. It transforms your basic armoire into a dynamic storage solution, ready to meet any challenge your home throws its way.
Gathering Your Resources: Plans, Materials, and Essential Tools
Before diving into the build, preparation is key. While I’ll share some invaluable tips and tricks here, the comprehensive, step-by-step plans for this specific drawer insert are generously provided by the incredible Ana White. Her website, Ana-White.com, is a treasure trove for DIY enthusiasts, offering free, detailed plans that are easy to follow for builders of all skill levels. I highly recommend visiting her site to get the full blueprint for success.
Choosing Your Materials: PureBond Plywood
For the entire frame of this drawer insert, I opted for PureBond Plywood. This material is a fantastic choice for several reasons. Firstly, it’s known for its durability and stability, making it ideal for furniture that needs to withstand daily use. Secondly, PureBond plywood is manufactured without formaldehyde, making it a healthier and more eco-friendly option for your home, especially for pieces going into children’s rooms. But here’s the best part: if you’ve already constructed the main armoire from PureBond plywood, you’ll likely have enough scrap material left over to build this drawer insert, eliminating the need to purchase additional lumber. This is a significant cost-saving advantage that truly embodies the spirit of DIY!
Tools of the Trade: Your Essential Toolkit
Beyond your main materials, having the right tools makes all the difference. For assembling the frame, my go-to tool was the Kreg Jig. This pocket hole system makes joinery incredibly strong and surprisingly simple, even for beginners. You’ll also need a reliable saw for accurate cuts (a circular saw, miter saw, or table saw will work), a drill for screws, measuring tape, and safety gear like eye protection and ear protection. A sander will also be crucial for preparing your wood for finishing. Having these tools ready will ensure a smooth and efficient building process.
Building the Drawer Frame: Precision with the Kreg Jig
The foundation of any good drawer system is a solid, square frame, and the Kreg Jig makes achieving this remarkably straightforward. If you’re new to pocket hole joinery, prepare to be impressed by its simplicity and strength. The Kreg Jig system allows you to drill angled holes into one piece of wood, which then connects securely to another using specialized screws, creating an incredibly sturdy joint without visible fasteners on the exterior.
To begin, set your Kreg Jig to the appropriate thickness of your plywood. Drill pocket holes on the ends of your horizontal frame pieces. When assembling, use wood glue in addition to the Kreg screws for an even stronger bond. It’s crucial to clamp your pieces together tightly before driving the screws to prevent movement and ensure a flush, square connection. Take your time during this phase, checking for squareness frequently with a speed square. A perfectly square frame is essential for your drawers to operate smoothly and look professionally made.
Demystifying Drawer Slide Installation: My “Shanty” Way
For the longest time, the thought of installing drawer slides filled me with dread. They seemed incredibly intimidating, and I would often shy away from projects that required them. However, with a bit of determination and a lot of trial and error, I developed a “shanty” method that, while perhaps not the conventional professional approach, works flawlessly for me every single time. It’s a testament to the idea that sometimes, the simplest solution is the best one, especially when you’re a DIYer tackling a new skill.
My method prioritizes clarity and common sense over complex calculations. The key is to be precise with your measurements and to use readily available items as spacers. While the photos below were taken during a different project, the fundamental technique for attaching drawer slides remains identical. I recommend using ball-bearing drawer slides for their smooth operation and durability. Always separate the two parts of the slide – one attaches to the cabinet (or in our case, the armoire’s interior frame), and the other attaches to the drawer box itself. Crucially, ensure that both slides are perfectly level and parallel to each other. Even a slight discrepancy can lead to binding or uneven drawer movement. Using a level and even temporary wood blocks or shims can help achieve this alignment. Don’t be afraid to pre-drill pilot holes to prevent splitting the wood, and secure the slides with screws that are appropriate for your material thickness. The goal is a smooth, effortless glide, and with a little patience, you’ll master it!
Crafting the Drawer Faces: The Perfect Fit
The drawer faces are what give your drawer unit its polished, finished look. They are essentially decorative panels that attach to the front of your drawer boxes. The final step in the construction process involves precisely cutting these faces to size. My tried-and-true method is to measure each individual drawer opening on your assembled frame. Why each one? Because even with the most careful building, slight variations can occur, and measuring each opening ensures a custom fit for every drawer.
Once you have your measurements, cut your drawer faces approximately 1/8 inch shorter in both length and height than the opening. This small gap is crucial. It provides necessary clearance for the drawers to open and close smoothly without rubbing, accommodates any slight imperfections, and allows for the thickness of paint or stain. When attaching the faces to the drawer boxes, use a combination of wood glue and small finish nails or screws from the inside of the drawer box to avoid visible fasteners on the front. Take your time to center each face perfectly within its opening before final attachment for a seamless and professional appearance.
Here is a shot of the drawer insert base before the addition of edge banding, showcasing the raw plywood edges:
The Magic of Edge Banding: Achieving a Professional Finish
Working with plywood often leaves you with raw, exposed edges that can detract from an otherwise beautiful piece of furniture. This is where edge banding becomes your best friend. Edge banding is a thin strip of material, often made from wood veneer or PVC, with heat-activated adhesive on the back. It’s an incredibly quick and super easy way to cover those rough, unfinished edges of PureBond plywood, MDF, or other sheet goods.
The transformation is remarkable. Edge banding gives your project a clean, finished look, making the plywood appear like solid hardwood on the edges. To apply it, simply cut a piece of edge banding slightly longer than the edge you’re covering. Position it over the raw edge and use a household hot iron (on a medium-high setting, no steam) to activate the adhesive. Slowly glide the iron along the banding, applying firm, even pressure. Once cooled, use a utility knife or a specialized edge banding trimmer to carefully trim any excess material flush with the surface of your plywood. A light sanding with fine-grit sandpaper will then smooth out any rough edges and prepare the surface for staining or painting. This simple step elevates the overall aesthetic of your DIY furniture significantly, making it look much more professional and store-bought.
Adding Style and Function: Stains, Labels, and Custom Touches
With the construction complete, it’s time for the fun part: bringing your drawer insert to life with finishes and personalized details. These final touches are what truly make a DIY project shine and reflect your unique style.
Rich Tones with Wood Stain
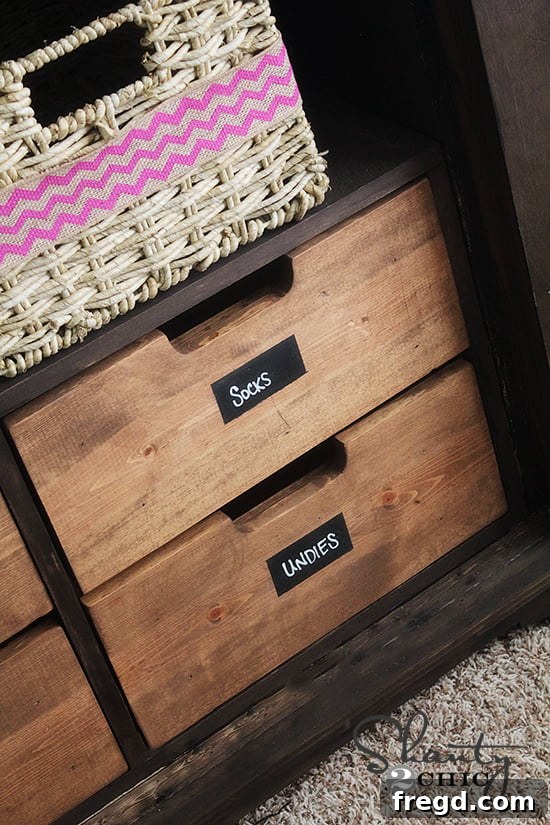
To complement the Pottery Barn aesthetic, I applied a beautiful coat of Rust-Oleum Ultimate Wood Stain in Early American to the drawers. This classic shade provides a warm, rich tone that enhances the natural grain of the wood. Before staining, ensure your wood is thoroughly sanded smooth to a fine grit (220 is usually sufficient) to allow for even stain absorption. Apply the stain following the manufacturer’s instructions, typically with a rag or brush, wiping off any excess after a few minutes. Let it dry completely, usually for 24-48 hours, before moving on to the next step. If desired, you can add a clear topcoat for extra protection and durability, especially for furniture that will see a lot of use.
Chalkboard Labels for Organized Fun
For a touch of whimsy and practical organization, I added chalkboard labels to the front of each drawer. This is a wonderfully creative way to categorize contents and can be easily updated as needs change. To create clean, crisp labels, I used painter’s tape to meticulously mark out perfect rectangles on the drawer fronts. Once the tape was securely in place, I applied several light, even coats of Rust-Oleum Chalkboard Spray Paint within the taped-off areas, allowing adequate drying time between coats. The result is a charming, functional label that encourages interaction and makes tidying up a game for the little ones.
Custom Cut-Outs with a Jigsaw
To give the drawer fronts a truly custom and distinctive look, I decided to add a unique cut-out design. This was effortlessly achieved using my Jigsaw. With a steady hand and a sharp blade, I carefully created an arched or patterned opening on the top edge of each drawer front. This step took no time at all but makes a significant impact, elevating the piece from a simple drawer unit to a bespoke furniture item with character and charm. Remember to trace your design lightly with a pencil first and practice on scrap wood if you’re new to using a jigsaw. Smooth any rough edges with sandpaper after cutting for a professional finish.
Showcasing the Masterpiece: A Final Look
With all the elements in place – the sturdy frame, smoothly gliding drawers, professionally finished edges, and charming decorative touches – your Pottery Barn-inspired drawer insert is now complete. It’s a testament to what can be achieved with a little creativity, some quality materials, and a willingness to learn new skills. This insert not only provides incredible storage and organizational capabilities but also adds a significant aesthetic upgrade to your armoire, making it a true centerpiece in any room.
Take a moment to admire your handiwork. From the initial cuts to the final decorative details, every step contributes to a piece that is uniquely yours. This project is a fantastic example of how DIY can blend functionality with high-end style, all while being incredibly rewarding.
Conclusion: Your DIY Journey Continues
Thank you so much for following along on this creative DIY adventure! Crafting this Pottery Barn-inspired armoire and its versatile drawer insert has been an incredibly rewarding experience, and I hope you feel inspired to tackle your own projects. This armoire is more than just a piece of furniture; it’s a statement of style, functionality, and the incredible satisfaction that comes from building something beautiful with your own hands.
Remember, you can find the detailed plans for the main DIY Armoire HERE, and for this specific drawer insert, head over to Ana-White.com for the full set of free plans. Don’t hesitate to reach out if you have any questions at all about materials, techniques, or any part of the building process. I’m always happy to help fellow DIYers!
Happy building!
~Whitney