
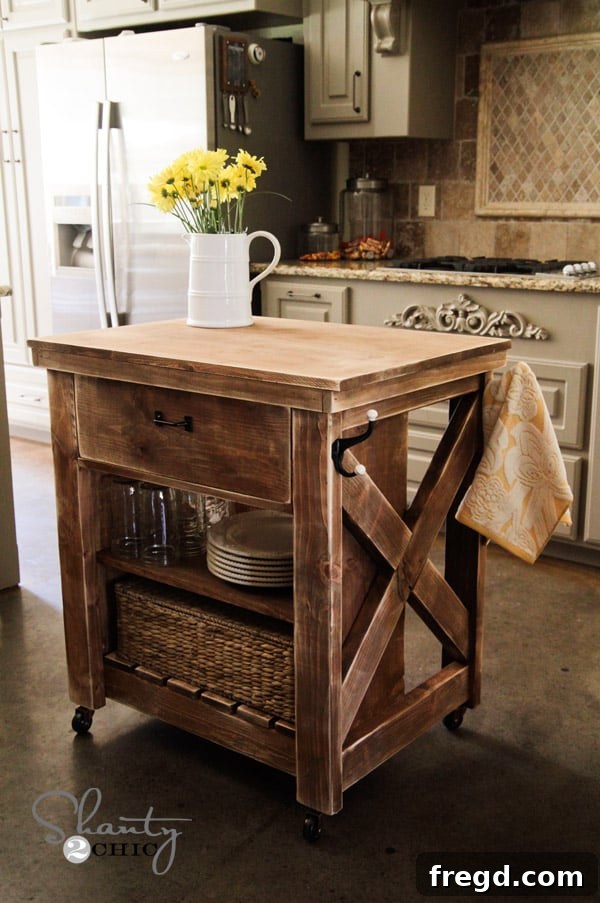
Build Your Dream Kitchen Island: A Stunning Pottery Barn Knockoff for Under $100
What a fantastic week it has been! My kids successfully navigated their first week back at school, and I managed to accomplish a significant amount on my to-do list. Today, I’m absolutely thrilled to share a project that brings me immense joy – my latest Pottery Barn-inspired knockoff! Get ready to be amazed by this incredible DIY Kitchen Island, crafted for an astonishing $85!
This project isn’t just about building a piece of furniture; it’s about transforming your kitchen with functional elegance and saving a substantial amount of money. If you’ve always dreamed of a stylish kitchen island but were deterred by space constraints or prohibitive costs, this mobile, rustic design is your perfect solution. It truly adds character and practicality, breaking up my kitchen space beautifully.
Witness the charm and functionality of my new kitchen centerpiece:
Isn’t it absolutely stunning? I believe it adds so much character and utility to my kitchen. I’ve always yearned for an island, but during our home build, I opted against one due to space considerations. By crafting this one myself, I now have the ultimate flexibility: it can serve as a central prep area or a mobile serving station, and if I ever need more open space, I can simply roll it into the garage. The versatility is truly priceless!
Unlock Kitchen Versatility with Your Own Custom Island
The beauty of a DIY mobile kitchen island extends far beyond its aesthetic appeal. This project empowers you to create a piece that perfectly fits your specific needs and style preferences. Whether you have a compact kitchen that occasionally benefits from extra counter space or a larger area that needs a functional focal point, a rolling island offers unparalleled adaptability.
Unlike a built-in island, this portable design ensures that your kitchen layout remains fluid. Hosting a party? Roll it out for an extra buffet surface. Need more room for an exercise session? Tuck it away. It’s a game-changer for dynamic households and a testament to clever space management. Plus, the rustic X-leg design brings a timeless farmhouse charm that complements a wide range of interior decors, from modern minimalist to classic country.
Achieving High-End Style on a DIY Budget: The Pottery Barn Knockoff
There’s a unique satisfaction that comes with replicating an expensive designer piece for a fraction of the cost. The allure of Pottery Barn designs often lies in their sophisticated simplicity and quality craftsmanship. Our goal with this project was to capture that essence—the robust structure, the elegant lines, and the overall feel of a high-end kitchen island—but through accessible DIY methods and materials.
This $85 kitchen island proves that you don’t need a hefty budget to achieve a luxurious look. It’s about smart material choices, efficient construction techniques, and a touch of creativity. The joy of telling guests that your gorgeous kitchen island is a handmade creation, rather than a store-bought item, is an added bonus. It’s a statement piece that speaks volumes about your DIY prowess and resourcefulness.
To help you embark on this exciting build, I’m going to share some of my invaluable tips and tricks right here. For the comprehensive, step-by-step instructions, make sure to visit my dear friend Ana White’s site. We collaborated on the design of this beautiful piece, and true to her reputation, she has provided an exceptional set of free plans that are incredibly detailed and easy to follow.
You can find the full set of free plans for this rustic X-leg small rolling kitchen island over at Ana White’s amazing site!
Essential Tools for Your DIY Journey: The Kreg Jig Advantage
My first and most crucial piece of advice for this build is this: Do not even think about tackling this project without a Kreg Jig!
Seriously, folks, Ash and I have been championing this tool for years. If you’re serious about DIY woodworking, it’s absolutely time to invest in one. It’s an incredibly affordable tool given the professional-grade results it helps you achieve. For those of you who already own a Kreg Jig but it’s still collecting dust in its box, now is the time to retrieve it and put it to work! The seamless, strong joints it creates are simply unmatched for furniture building. It allows you to create pocket holes that hide screws, resulting in clean, beautiful finishes.
For context, HERE is the specific Kreg Jig model that Ash and I currently use and highly recommend.
If you’re new to the Kreg Jig or simply want a clearer understanding of its capabilities, Ash and I created a quick video tutorial explaining what it is and how we use it HERE. We tried our best to break down its function into simple, easy-to-understand terms. This short clip will demonstrate just how versatile and user-friendly this tool can be, demystifying the process of creating strong, hidden joints for all your woodworking projects.
Throughout the majority of this kitchen island build, I relied on 1.5-inch pocket holes paired with 2.5-inch pocket hole screws. This combination ensures a robust and durable structure, essential for a functional piece like a kitchen island that will see daily use. Understanding the correct pocket hole depth and screw length for your material thickness is key to achieving optimal results with your Kreg Jig.
Step-by-Step: Crafting Your Rustic X-Leg Kitchen Island
Building the “X” Legs: Precision with Pocket Holes
The distinctive “X” legs are a hallmark of this rustic design, and achieving their structural integrity relies heavily on precise pocket hole placement. Here’s a visual guide to where I positioned all my pocket holes for these critical components:
When creating the “X” legs, it’s essential to angle your wood correctly on the Kreg Jig to ensure the pocket holes align perfectly with the main frame. This specific angle allows for flush, strong attachments. Here’s a look at how I set the wood for those angled pocket holes that secure the “X” to the rest of the frame:
I must apologize for this next shot; it’s not my best work! I completely forgot to capture a standalone image of the assembled “X” structure – a common oversight in the midst of a DIY project! However, even with the surrounding elements, you can still clearly discern where all the crucial pocket holes are located in the background, guiding you through this step.
Assembling the Frame and Attaching Side Panels
One of the challenges I encountered during this project was dealing with warped 1×12 boards for the sides. It was quite frustrating to work with material that wasn’t perfectly straight. If I were to build this rustic kitchen island again, I would definitely opt for Purebond Plywood and have it precisely ripped down to the 1×12 dimensions. Plywood offers superior stability and straightness, which would have made this section of the build much smoother and yielded a more flawless finish. This is a crucial tip for anyone looking to build a truly professional-looking piece.
When attaching the 1×12 side panels, I used a specific method to ensure both strength and a clean appearance. I secured the top of the 1×12 with one 3/4-inch pocket hole and a 1.5-inch pocket hole screw. Additionally, for extra reinforcement and stability, I used two traditional wood screws driven into the top of the side piece, as you can see in the image.
For the bottom attachment of the side panels, which connects to the 2×4 bases, I utilized 3/4-inch pocket holes. However, for these connections, I chose longer 2.5-inch pocket hole screws to ensure a secure and robust bond with the thicker 2×4 material. This provides the foundational stability needed for a piece that will bear weight and be moved around frequently.
Crafting and Attaching the Countertop
For the countertop of this rustic kitchen island, I opted for a pre-made project panel, which I sourced from Lowe’s. While convenient, it wasn’t the exact size I needed off the shelf. I had to make a precise cut, removing 4 inches from the 24-inch side to achieve the perfect dimensions for my island. Always remember to measure twice and cut once!
Adding Base Trim and Final Assembly
To attach the base trim pieces, which provide both structural support and a finished look, I turned to my trusty Ryobi AirStrike battery nailer. This tool is a true gem in my workshop; it’s incredibly efficient, easy to use, and eliminates the need for an air compressor. It’s undoubtedly one of the coolest and most practical tools in my garage at the moment, making quick work of trim installation.
The process was straightforward: I applied a bead of Gorilla Wood Glue under each trim piece for a strong, lasting bond, then secured them firmly in place with the nailer. This combination of glue and nails ensures that your base trim is both aesthetically pleasing and exceptionally durable.
Bringing Your Island to Life: Staining and Distressing for Character
The finish is where your DIY kitchen island truly comes to life, reflecting your personal style. For this project, I employed one of my absolute favorite finishing methods to achieve that coveted rustic, worn look. I began by applying Rust-Oleum Ultimate Wood Stain in the rich, classic shade of Early American. This particular stain provides a beautiful depth of color that perfectly complements the rustic aesthetic.
Once the stain was completely dry and cured, I moved on to the distressing phase using one of my go-to tools for achieving a perfectly aged finish. This part of the process is incredibly straightforward, almost therapeutic in its simplicity, especially with the Ryobi 18-Volt ONE+ Corner Cat Finish Sander. I highly recommend adding this versatile tool to your DIY arsenal. It shares the same powerful 18V Lithium-Ion battery as many other Ryobi tools, including our drills, making it a convenient and lightweight addition to your collection. I now use this sander on nearly every wood project I undertake – it’s that good!
To create that desirable worn and unfinished look, I strategically sanded some areas more heavily than others. This technique highlights the wood grain and gives the impression of a piece that has been loved and used for years, adding immense character and depth to your rustic kitchen island. It’s a simple step that yields dramatically beautiful results.
Adding Practicality and Charm: Hardware and Casters
The right hardware can truly elevate the look and functionality of your DIY kitchen island. For mine, I discovered these fantastic hooks on a decorative board at HomeGoods. The board, complete with four hooks, was a steal at $15! I simply unscrewed the hooks from the board and reattached them to the side of my island, providing convenient spots for towels, utensils, or even decorative accents. It’s a small detail that adds both utility and a touch of farmhouse chic.
To ensure the island’s mobility, I installed four casters on the base, which I purchased from Lowe’s. A crucial tip, especially if you have energetic little ones like mine, is to opt for locking casters. This simple feature prevents your beautiful new island from being unintentionally repurposed as a speedy vehicle across your kitchen floor! Locking casters provide stability when the island is in use and easy mobility when you need to reposition it.
Here are a few more captivating shots of the finished rolling kitchen island, showcasing its rustic beauty and functionality from various angles:
Your Journey to a Custom Kitchen: Why DIY Matters
Building your own kitchen island is more than just a home improvement project; it’s a deeply rewarding experience. It fosters a sense of accomplishment, empowers you with new skills, and allows for complete customization that simply isn’t possible with off-the-shelf items. You control the materials, the dimensions, the finish, and ultimately, the character of the piece.
This Pottery Barn knockoff stands as a testament to what’s achievable with dedication and the right guidance. It’s a functional, beautiful, and incredibly affordable solution for anyone looking to enhance their kitchen’s appeal and utility. Plus, the knowledge and confidence gained from completing a project like this are invaluable for future DIY endeavors.
I sincerely hope you adore this DIY portable kitchen island as much as I do! It truly has transformed my kitchen space, offering both aesthetic appeal and practical functionality that I cherish daily.
As a reminder, for all the meticulous details, cut lists, and assembly diagrams, be sure to check out the full set of free plans over at Ana White’s amazing site. Her plans are exceptionally clear and will guide you through every step with ease. If you have any questions at all about the build process, the tools, or the finishing techniques, please don’t hesitate to ask!
I would absolutely love for you to share this project and PIN it with your friends and fellow DIY enthusiasts. Spreading the joy of creative building is what it’s all about!
Thanks again for joining me on this DIY adventure!
~Whitney