
Transform Your Kids’ Closets: DIY Rolling Toy Crates for Ultimate Organization
Every parent knows the struggle: the dreaded kids’ closet. A chaotic cavern where toys, clothes, and forgotten treasures merge into one overwhelming mess. For too long, my children’s closets were exactly that – embarrassing catch-alls, devoid of any real organizational system. It was my oversight, a lack of dedicated storage, that had allowed them to evolve into these disheveled spaces. But that era of clutter is officially over, and I’m thrilled to share how a simple, budget-friendly DIY project turned that chaos into organized bliss.
The Pre-Project Cleanup: A Necessary Evil
Before any organization could begin, a monumental cleanup was in order. I spent a solid two hours just picking up, sorting, and clearing the existing clutter. It felt like an archaeological dig, unearthing toys from forgotten corners and matching stray socks. This initial purge is often the most daunting part of any organizational project, but it’s absolutely crucial. It allows you to see the true scope of what needs to be stored and provides a clean slate for your new system. Take a deep breath, put on some music, and tackle that mess – the reward of a clear space is worth every minute!
Inspiration Strikes: IKEA Prices vs. DIY Savings
My inspiration for these rolling storage crates came from a trip to IKEA. I spotted their sleek, mobile storage solutions and immediately knew they were the answer to my closet woes. The ability to roll crates out, access contents, and then tuck them away neatly was incredibly appealing. However, the price tag was less so. As a passionate DIYer, I was confident I could replicate the functionality and style for a fraction of the cost, primarily by utilizing materials I already had on hand or could source affordably. This realization fueled my determination to build something custom and truly budget-friendly.
Gathering Your Materials: What You’ll Need
One of the best aspects of this project is its flexibility with materials. I started with MDF (Medium-Density Fiberboard) scraps that were lingering in my garage – a true testament to finding new life for forgotten pieces. MDF is an excellent choice for crate bottoms and sides due to its smooth surface and stability, making it easy to cut and assemble. If you don’t have scraps, you can buy a single sheet and have it cut at your local home improvement store.
Essential Materials:
- MDF Scraps: For the crate bases and sides. The amount will depend on your desired crate dimensions.
- 1×4 Lumber: For the decorative front and back slats. I used four pieces per side, per crate.
- Gorilla Glue Wood Glue: For strong, lasting bonds.
- Wood Screws: To secure the MDF panels.
- Casters (Wheels): Four per crate. I found mine affordably at Walmart. Look for small, swiveling casters for easy maneuverability.
- Spray Paint: In your desired color. My son chose his favorite blue!
- 4-Ply Jute or Rope: For sturdy pull handles.
Tools for the Job:
- Measuring Tape: Crucial for accurate cuts.
- Circular Saw or Table Saw: For cutting MDF and 1x4s to size.
- Drill/Driver: For pre-drilling holes and driving screws.
- Nail Gun (Battery-powered recommended): For efficiently attaching the 1×4 slats. A hammer and nails can also work, but a nail gun speeds up the process significantly.
- Drill Bit (Forstner bit or paddle bit): To create clean holes for the jute handles.
- Safety Glasses and Gloves: Always prioritize safety when working with tools.
Step-by-Step Guide: Building Your Rolling Toy Crates
Step 1: Preparing Your Workspace and Materials
After the initial cleanup, I measured my son’s closet space to determine the ideal dimensions for two rolling crates. This step is critical; you want your crates to fit snugly but still be easy to pull out. Once measurements were finalized, I began cutting the MDF scraps. I cut the bottom piece and two side pieces for each crate. Accuracy here will ensure your crates are square and sturdy.
Next, I cut the 1×4 lumber for the front and back of the crates. Each crate would have four slats on the front and four on the back, so I cut eight pieces per crate to the appropriate length, again, precisely matching the closet width. These slats will give the crates their classic, stylish appearance.
Step 2: Constructing the Crate Base
With all pieces cut, it was time for assembly. I started with the MDF components. To create a strong and durable bond, I predrilled holes in the bottom MDF piece where it would connect to the side MDF pieces. Pre-drilling prevents the wood from splitting and ensures a cleaner finish. I then applied Gorilla Glue wood glue along the edges of the bottom piece and positioned the side pieces. Using wood screws, I secured the sides to the bottom, ensuring everything was flush and square. The combination of wood glue and screws provides superior strength, ensuring these crates can withstand the rigors of enthusiastic child’s play.
Step 3: Adding the Aesthetic Slats
Once the MDF base was assembled, the next step was to attach the 1×4 slats that form the front and back of the crates. I applied Gorilla Glue wood glue to the edges of the MDF sides where the slats would sit, then carefully positioned each 1×4 piece. Using my battery-powered nailer, I quickly secured the slats in place. A nail gun makes this process incredibly fast and efficient, creating strong, evenly spaced connections. I aimed for consistent spacing between each slat to achieve a clean, classic crate look. Four slats on each face provided ample coverage and structural integrity.
Step 4: Making Them Mobile – Installing Casters
The “rolling” aspect is what makes these crates so practical, especially for kids. It allows them to easily pull out the crate to access toys and then push it back without scratching the floor or getting stuck. I purchased simple swivel casters from Walmart – they were inexpensive and perfect for the job. To install them, I simply positioned one caster at each bottom corner of the crate and screwed them securely into the MDF base. Ensure the screws are long enough to grip firmly but not so long that they poke through the inside of the crate.
Step 5: Personalizing with Paint
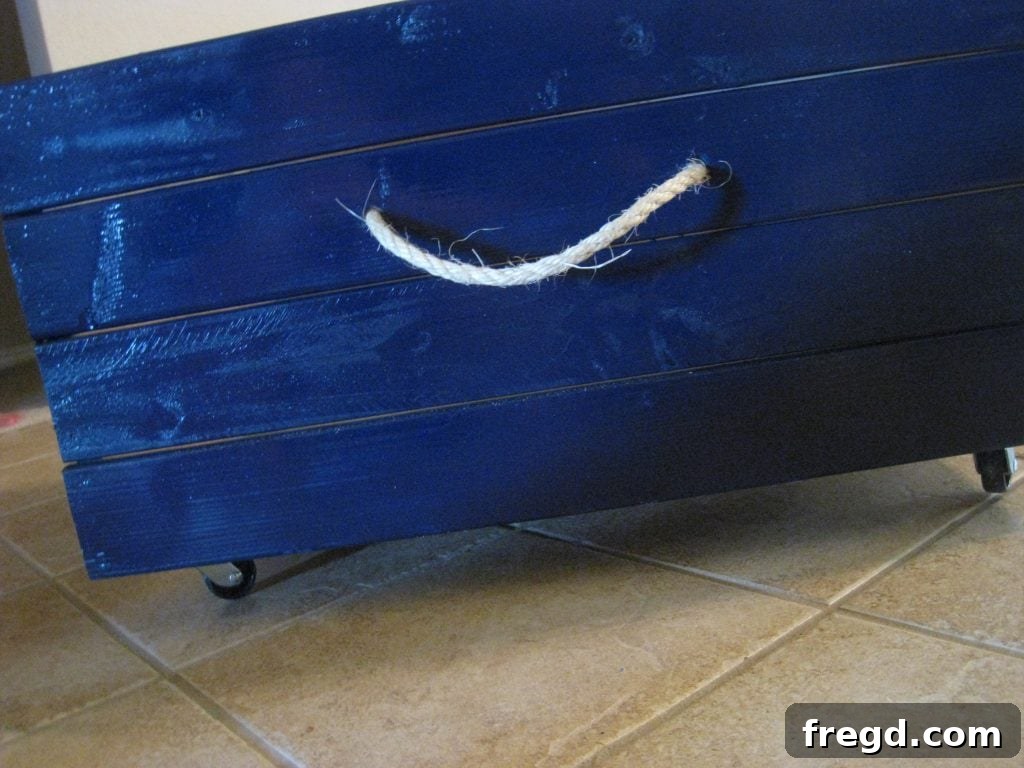
This is where the crates truly come to life and reflect the personality of their owner! While I might have chosen a more neutral or “chic” finish for myself, my son had a clear vision: his favorite color, blue. So, blue spray paint it was! Spray painting offers a smooth, even finish and is quick to apply. I recommend doing this step outdoors or in a well-ventilated area. Apply several thin coats, allowing each to dry completely between applications, for the best results and durability. This not only makes the crates look great but also adds a layer of protection to the wood.
Step 6: Crafting the Pull Handles
For easy access, the crates needed robust pull handles. I decided on a simple yet effective solution using jute rope. First, I used a nifty drill bit (a Forstner bit or paddle bit works well for clean, circular holes) to drill two holes in the center of one of the front slats. These holes were spaced to create a comfortable handhold. Then, I threaded a piece of 4-ply jute through each hole from the outside in. On the inside of the crate, I secured the jute with sturdy knots, ensuring they wouldn’t pull through when the crate was full. This creates a rustic, functional, and durable handle that complements the crate’s aesthetic.
Tips for Success and Customization
Painting Considerations: Outside vs. Inside
You might notice I didn’t paint the inside of my crates. This was a practical decision: they would be full of toys and primarily hidden within the closet. For high-visibility areas or if you want an extra layer of protection, painting the inside is certainly an option. However, for a quick and easy project, focusing on the exterior is perfectly adequate, especially when dealing with busy kids!
Material Alternatives
While MDF and 1x4s are great for this project, you can get creative with other materials:
- Plywood: Can be used for the entire crate, offering a lighter yet sturdy alternative.
- Reclaimed Wood: Pallet wood or old fence planks can add a rustic, weathered charm, often at no cost. Just ensure they are clean and free of splinters.
- OSB (Oriented Strand Board): A more budget-friendly option for the base if you’re painting it.
Sizing and Placement
Always measure your space carefully before you start cutting. Consider:
- Depth: How far can the crate extend into the closet without interfering with doors or other items?
- Width: How many crates can fit side-by-side?
- Height: Will the casters and handles add too much height for shelves above?
Customizing the dimensions to your specific needs is one of the biggest advantages of DIY.
Beyond Toys: Other Uses for Rolling Crates
These versatile crates aren’t just for toys! Consider them for:
- Laundry: Assign a crate for lights, darks, or delicates.
- Craft Supplies: Store fabric, yarn, or art materials.
- Books & Magazines: Keep reading materials tidy and accessible.
- Seasonal Decor: Easily store holiday items or off-season clothing.
- Pet Supplies: Store leashes, toys, or grooming tools.
- Mudroom Organization: Perfect for shoes, backpacks, or sports equipment.
The Transformative Reveal: An Organized Space!
The satisfaction of seeing those messy closets transformed into neatly organized spaces is immense. My daughter, Miss Tenley, was especially thrilled with the new system. These rolling crates make it incredibly easy for the kids to access their toys and, more importantly, put them away. It’s a wonderful start to teaching them the value of organization and maintaining a tidy room.
Final Thoughts and Future Projects
I’m so pleased with how these DIY rolling toy crates turned out – they are not only functional and durable but also add a touch of handmade charm to the kids’ rooms. This project proves that you don’t need to break the bank to create effective and attractive storage solutions. I’m already eyeing more scraps in the garage, ready to build additional crates for other areas of the house. The possibilities are endless when you embrace the power of DIY!
Keep an eye out for my next project update; I’ll be back later to share the cushions I found for my outdoor lounge chairs. Until then, happy crafting and organizing!
~Ashley