
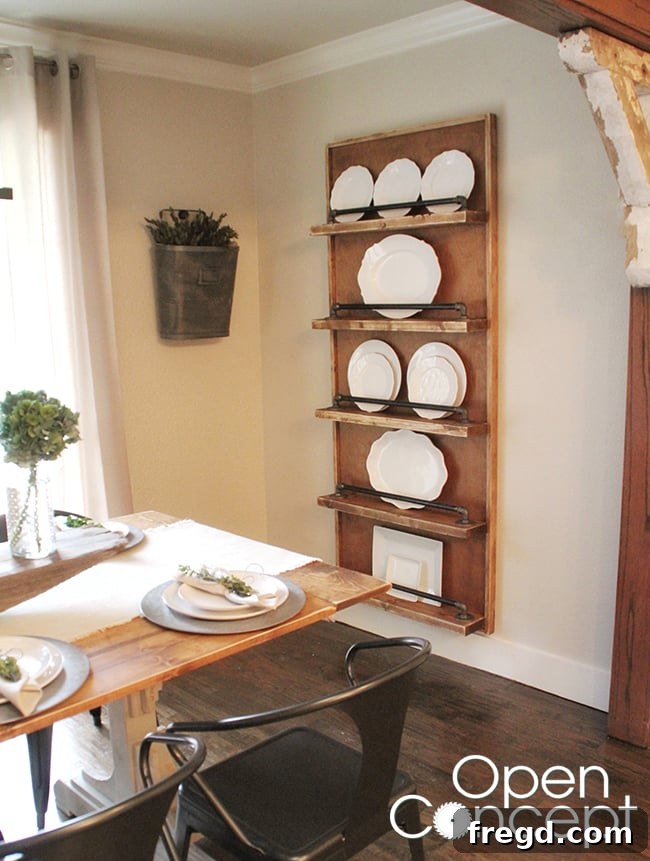
Welcome, DIY enthusiasts and home decor lovers! We are thrilled to share another fantastic and incredibly straightforward DIY project that promises to make a remarkable impact on any room in your home. Get ready to transform your space with a custom-built piece that combines functionality with high-end style without breaking the bank. This week, we’re diving into the creation of a stunning Industrial Plate Rack, a versatile storage and display solution perfect for showcasing your favorite dishes, adding character to a blank wall, and infusing your kitchen or dining area with a touch of rustic charm.
Industrial design elements, particularly those featuring metal pipes, have taken the interior design world by storm. You’ve likely admired them in high-end catalogs and upscale home goods stores like Pottery Barn and Restoration Hardware, where their raw appeal and sturdy aesthetic command attention. These elements bring an edgy yet sophisticated vibe, perfect for blending with modern, farmhouse, or even traditional decor styles. Inspired by this popular trend, we set out to construct this custom Industrial Pipe Plate Rack. Our goal was two-fold: to elegantly fill a substantial blank wall in our kitchen and to create the perfect showcase for my cherished collection of dishes and platters. This isn’t just a storage unit; it’s a statement piece, a blend of practical kitchen organization and captivating wall art.
One of the best aspects of this project is its accessibility. This DIY Industrial Plate Rack is absolutely perfect for beginners, making it an excellent entry point into the world of woodworking and home improvement. With a clear step-by-step guide and the right tools at your disposal, you’ll find the process incredibly rewarding and surprisingly simple. There’s immense satisfaction in creating something beautiful and functional with your own hands, and this project delivers just that. Let’s gather our materials and get started on building a beautiful custom plate rack that will enhance your kitchen’s aesthetic and functionality.
Essential Tools for Your DIY Plate Rack Project
Before we dive into the construction, let’s ensure you have the necessary tools to make this project smooth and successful. Having the right tools not only simplifies the process but also ensures safety and accuracy. For this Industrial Plate Rack, you’ll need:
- **Circular Saw or Table Saw:** For precisely cutting the plywood and 2×6 boards. A miter saw can also be incredibly useful for the 2×6 cuts.
- **Brad Nailer:** Essential for temporarily securing pieces before permanent attachment and for the trim work.
- **Drill/Driver:** For pre-drilling holes and driving screws, especially when attaching the shelves and pipe components.
- **Measuring Tape:** Crucial for accurate measurements. “Measure twice, cut once” is the golden rule!
- **Pencil:** For marking cuts and screw locations.
- **Wood Glue:** Provides extra strength and stability to your joints.
- **Safety Glasses and Hearing Protection:** Always prioritize safety when working with power tools.
- **Level:** To ensure your shelves are perfectly straight.
- **Stud Finder (for hanging):** To locate wall studs for secure mounting of your finished plate rack.
Supplies You’ll Need to Build Your Industrial Plate Rack
Here’s a detailed list of the materials required to bring this stunning Industrial Plate Rack to life. We’ve carefully selected these components for their durability, aesthetic appeal, and ease of use, ensuring your finished piece is both robust and stylish.
- 1 – 3/4″ sheet of Purebond plywood: Chosen for its quality and eco-friendly properties, this will form the sturdy back panel of your rack.
- 3 – 1×2 @ 8ft. pieces of wood: These will be used for the decorative trim around the plywood backing, adding a framed look.
- 2 – 2×6 @ 8ft. pieces of wood: These robust boards will serve as the shelves, providing ample support for your dishes.
- 10 – galvanized floor flanges: These are the base anchors for your pipes, offering a secure attachment point to the shelves.
- 10 – galvanized 90 degree street elbows: These connect the pipes to the flanges and create the angled support for your plates.
- 5 – 24″ (1/2″ thick) galvanized pipes: The star of the show, these pipes create the industrial aesthetic and act as the retaining bar for your plates.
- Wood glue: For strong, lasting joints between wood components.
- Brad nails (for brad nailer): For temporary fastening and trim work.
- 3″ wood screws: For securely attaching the shelves to the back panel.
- #12 x 5/8″ screws: For attaching the galvanized pipe components to the shelves.
- Wood stain (e.g., Rust-Oleum Carrington) or paint: To achieve your desired finish and protect the wood.
- French Cleat hanging system: An excellent choice for safely and securely mounting heavy pieces like this plate rack to your wall.
Step-by-Step Construction Guide: Crafting Your Custom Plate Rack
Phase 1: Building the Back Panel
The foundation of your Industrial Plate Rack begins with the sturdy back panel. I had my 3/4″ sheet of Purebond plywood expertly ripped down at the store to a precise 74″x30″ piece. This saves time and ensures perfectly straight cuts, which are crucial for a professional-looking finish. If you’re cutting it yourself, use a circular saw with a guide or a table saw to achieve these dimensions accurately. Remember, precision here lays the groundwork for the entire project.
Next, it’s time to prepare the trim pieces that will frame your back panel. I cut two pieces of 1×2 lumber, each exactly 30″ long. It’s always a good practice to measure and cut as you go for each component rather than pre-cutting everything, as this accounts for any minor variations and ensures the best fit. These shorter trim pieces will cap the top and bottom edges of your plywood back panel.
With your 1×2 pieces cut, apply a thin, even line of high-quality wood glue along one edge of each 1×2. Wood glue provides incredible strength and helps prevent future joint separation, making your plate rack much more durable. Don’t over-apply, as too much glue can create a mess and doesn’t necessarily increase strength.
Now, carefully attach one 30″ 1×2 piece to each short end of the plywood using your brad nailer. The key here is proper alignment: ensure the back of the plywood is flush with the back of the 1×2, creating a precise 3/4″ overhang on the front side. This overhang will become a crucial support lip for your shelves later, so accuracy is important. A few brad nails every 6-8 inches will secure it while the glue dries.
Once the short end trims are in place, cut two more 1×2 pieces, this time measuring 75.5″ each. These longer pieces will complete the frame around your plywood back panel. Apply glue to these pieces and attach them to the long ends of the plywood, following the same method as before. Again, ensure the back edges are flush and the front has the consistent 3/4″ overhang. This completes the foundational structure of the back panel, creating a clean, finished look and preparing it for the shelves.
And just like that, the core construction of the back part of your Industrial Plate Rack is complete! This framed plywood provides the robust foundation needed to support your shelves and all the beautiful dishes they will hold. Now, with the main structure ready, it’s time to move on to adding the functional shelving components that will give this piece its true character and utility.
Phase 2: Installing the Shelves
For the shelves, we’ll be using sturdy 2×6 boards. I utilized my trusty 10″ miter saw to make these cuts, ensuring straight and consistent edges for each shelf. A miter saw is ideal for cross-cutting larger lumber like 2x6s, offering precision and ease. If you don’t have one, a circular saw with a reliable guide can also achieve these cuts.
I cut five 2×6 boards, each precisely 30″ long. These will be your individual shelves. Before attaching them, apply a thin, continuous line of wood glue along the back edge of each board. This glue will bond the shelves to the plywood back panel, significantly increasing the structural integrity of your plate rack.
To hold the shelves in place temporarily while the glue sets and before we add the permanent screws, I used my brad nailer. Drive a few brad nails through the 1×2 trim and into each end of the shelves. This technique ensures the shelves are perfectly aligned and held securely against the back panel, preventing any shifting until you can reinforce them more permanently. This step is crucial for maintaining squareness and a professional finish.
Careful planning for shelf placement is vital for functionality and aesthetics. I positioned my shelves 13″ apart from each other, a measurement I determined based on the size of the plates and platters I intended to display. This spacing allows ample room for larger items and makes it easy to access your dishes. Consider the tallest items you plan to store and adjust your spacing accordingly. Use a measuring tape and a pencil to mark the precise locations for each shelf before nailing.
For ultimate strength and stability, once the shelves were temporarily secured, I flipped the entire unit onto its side. From the back, I then drove three 3″ wood screws into each shelf, passing through the plywood back panel and firmly into the 2×6 shelf. This method creates an incredibly strong connection, ensuring your shelves can bear the weight of a full collection of dishes without sagging or coming loose. Always pre-drill pilot holes to prevent splitting, especially near the edges of the wood.
With the shelves robustly attached, the main structure of your DIY Industrial Plate Rack is now complete. After meticulously staining the wood to achieve one of our favorite rich colors, it was finally time for the exciting part: adding the distinctive galvanized pipes that define the industrial aesthetic of this piece!
Phase 3: Assembling and Attaching the Industrial Pipes
The galvanized pipe elements are what truly give this plate rack its unique industrial character. The first step in assembly is to screw one 90-degree street elbow firmly into each galvanized floor flange. Ensure these connections are hand-tight for a snug fit. These assemblies will serve as the anchor points and the angled support for the pipes on each shelf.
With the elbow-flange units ready, proceed to attach the 24″ galvanized pipes between them. Screw one end of a pipe into the open side of an elbow, and the other end into another elbow-flange unit. You will create five of these complete pipe assemblies, one for each shelf. Ensure all connections are tightened to create a rigid and secure pipe structure. The beauty of galvanized pipes is their pre-threaded nature, making assembly straightforward and tool-free for the connections themselves.
Finally, it’s time to attach these pipe assemblies to your wooden shelves. Position each pipe assembly on its respective shelf, ensuring the elbows are angled appropriately to support your plates. Using #12 x 5/8″ screws, secure the floor flanges to the shelves. Use your drill to drive the screws through the pre-drilled holes in the flanges and into the wood. I recommend two to three screws per flange for maximum stability. This step firmly integrates the industrial pipe elements into your plate rack, completing its distinctive look and providing the essential support for displaying your dishes.
Finishing Touches and Installation
The choice of finish can dramatically transform the look of your DIY Industrial Plate Rack. For this project, I applied a single coat of rich Rust-Oleum Carrington stain. This particular shade lends a deep, warm hue that beautifully complements the raw, metallic tones of the galvanized pipes, enhancing the overall industrial farmhouse aesthetic. When applying stain, ensure you follow the manufacturer’s instructions for preparation, application, and drying times. You can also opt for a distressed paint finish, a natural wood look with a clear coat, or even a bold color to match your existing decor. A durable topcoat is highly recommended, especially for a kitchen piece, to protect against moisture and daily wear and tear.
Once your stain or paint is fully cured, it’s time to hang your magnificent creation. For a piece of this size and weight, selecting the right hanging hardware is paramount for safety and stability. I highly recommend a French Cleat hanging system. This method is incredibly robust and makes hanging large, heavy pieces like this plate rack surprisingly easy and secure. A French Cleat consists of two interlocking pieces, one attached to the wall studs and the other to the back of your plate rack. When properly installed, it distributes the weight evenly and ensures your custom plate rack stays firmly in place, even when fully loaded with dishes.
And there you have it! A quick, easy, and incredibly impactful DIY project that is sure to impress everyone who sees it. This Industrial Plate Rack isn’t just a functional storage solution; it’s a testament to your creativity and a stylish addition to your home decor. The total cost for building this impressive piece came in at approximately $225. While the majority of this cost is attributed to the galvanized pipes, their distinctive look and robust functionality are truly what make this piece stand out. At over 6 feet high, it transcends mere wall decor and truly functions as a magnificent piece of furniture, offering substantial storage and display space. I am absolutely captivated by this finished plate rack and now find myself inspired to incorporate more industrial pipe elements throughout my home!
We hope this detailed guide empowers you to tackle this DIY Industrial Plate Rack project with confidence. Remember, the beauty of DIY lies not only in the finished product but also in the satisfaction of creating something unique and personalized for your space. Don’t hesitate to customize it further with different wood stains, paint colors, or by adding hooks for mugs to make it truly your own. Happy building!
Thank you for stopping by and sharing in our DIY journey!
~Ashley
Explore More Home Design Elements from Our Kitchen
Curious about other design choices featured alongside our Industrial Pipe Plate Rack? Here are some links to details on other elements that contribute to our kitchen’s overall aesthetic:
Valspar Paint Color: Find out more HERE
Cambria Countertops: Explore details HERE
Cabinotch Cabinets: Discover our selection HERE