
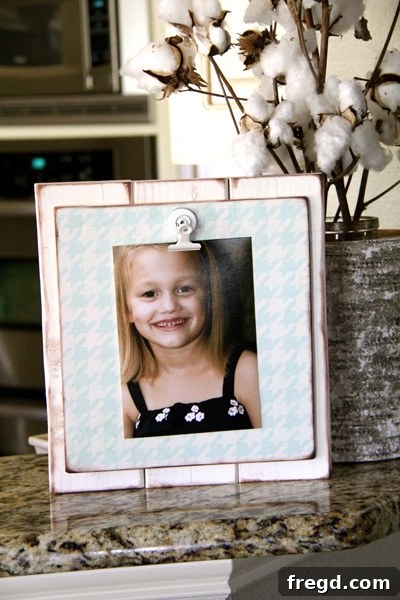
Transforming Scrap Wood: Your Guide to a Beautiful DIY Photo & Memo Display Frame
Hey fellow DIY enthusiasts and creative crafters! Happy Monday! Today, I’m thrilled to share a fantastic project born from a desire to tackle my ever-growing wood pile in the garage. We’re going to craft a versatile, charming, and utterly functional display frame – perfect for showcasing cherished photos, important memos, or beloved recipes right in your kitchen. But don’t limit yourself; this design is adaptable for virtually any space or purpose you can imagine. It’s a wonderful way to add a touch of rustic elegance and personalized flair to your home decor, all while being incredibly budget-friendly.
There’s immense satisfaction in taking raw materials, especially reclaimed scraps, and transforming them into something both beautiful and useful. This DIY photo display project embodies that spirit, turning humble pieces of wood into a centerpiece for your memories or daily reminders. Whether you’re looking to organize your family photos, keep track of important notes, or simply add a unique handmade touch to your living space, this custom memo board offers a delightful solution. It’s an accessible craft project for beginners yet offers enough room for personalization to appeal to seasoned makers. Let’s dive into the step-by-step process of creating your very own custom photo and memo display. You’ll be amazed at how quickly you can bring this idea to life, even if you’re new to woodworking or crafting.
Gathering Your Materials for this Rustic Display Project
Before we begin cutting and gluing, let’s ensure we have all the necessary supplies. One of the best aspects of this DIY home decor project is its reliance on readily available and often inexpensive materials. This makes it an ideal choice for anyone looking to add personalized home accents without breaking the bank. Using scrap wood not only saves money but also contributes to a more sustainable crafting approach, giving new life to materials that might otherwise be discarded.
Wood Components:
For the main frame base, I utilized a piece of scrap 2×4 lumber. These dimensions are fantastic for creating a sturdy yet visually appealing frame. From this, you’ll need to cut three individual pieces, each precisely 11 inches long. If you don’t have a 2×4, any similar scrap wood could work, just adjust the length and quantity to achieve your desired frame size. Precision in cutting here will ensure a flush and professional-looking finished product. Always prioritize safety when using power tools; wear appropriate protective gear, such as safety glasses, and ensure your workspace is clear.
For the backing, which will hold our decorative paper, a sheet of 1/4-inch plywood is perfect. At Lowe’s, you might find this labeled as a “project panel,” and it’s often available in smaller, manageable 2×2 foot pieces, which are ideal for this size project. While I used a scrap from a larger 4×8 foot sheet, the smaller panels are perfectly suited for this project and very affordable, making it a truly budget-friendly craft. We’ll cut this to a specific size later on, but having a piece ready is crucial for the next steps.
Adhesives & Sealants:
Gorilla Wood Glue: This is my go-to adhesive for strong, durable wood bonds. It dries incredibly strong and is suitable for various woodworking tasks, ensuring your frame remains robust and long-lasting. Its reliability means your personalized frame will hold up beautifully over time, securing the planks together for a solid foundation.
3M Photo Adhesive Spray: This product is truly a game-changer for paper-to-wood applications. Its even spray ensures a smooth, bubble-free adhesion, which is absolutely essential for a professional and seamless finish on your chosen scrapbook paper. I’ve used it on many DIY projects, including photo blocks, and it consistently delivers exceptional results, making it super easy to achieve a flawless surface.
Matte Mod Podge: To protect and seal the scrapbook paper, especially if your rustic memo board will be placed in a high-traffic area like a kitchen, Mod Podge is indispensable. The matte finish preserves the original look of your paper while adding a durable layer of protection against moisture, dust, and general wear and tear, ensuring your beautiful design lasts.
Finishing Touches:
12×12 Inch Scrapbook Paper: This is where you infuse personality into your display! Choose a pattern, color, or theme that perfectly complements your existing home decor. The vast array of options available in craft stores ensures you’ll find something perfectly suited to your style, from vibrant florals to subtle geometrics, making your handmade frame truly unique.
Rust-Oleum Heirloom White Spray Paint: For that beautiful, slightly distressed, farmhouse-chic look, this color is absolutely ideal. It provides a soft, antique white finish that pairs wonderfully with rustic aesthetics. Of course, feel free to choose any color that matches your aesthetic vision; darker tones can create a more dramatic or industrial feel, while bright colors can make a bold statement.
80-Grit Sanding Block: This coarse grit is excellent for distressing the edges of your paper-covered panel, giving it that wonderfully worn, ‘shantied’ or aged appearance. It’s the secret to adding character and an authentic vintage vibe to your handmade frame.
Distressing Ink (Optional but Recommended): This adds depth and character to the distressed edges, enhancing the vintage or rustic feel of your display. A brown or black ink applied sparingly can really make the worn areas pop.
Bulldog Clip: The functional heart of our photo and memo display! Choose one appropriate for the size of items you plan to hold. We’ll be painting this to match the frame for a cohesive and polished look. You could also use mini clothespins or small hooks if you prefer a different aesthetic.
Tools You’ll Need:
Saw (a miter saw for precise cuts or a hand saw for a more traditional approach), measuring tape, pencil, wood clamps (essential for holding glued pieces together during drying), craft knife or sharp razor, safety glasses, and optionally, a paint sprayer or brushes for a non-spray paint alternative. A brayer or a flat tool can also be useful for smoothing out the scrapbook paper.
Step-by-Step Construction of Your Custom Display Frame
Phase 1: Building the Solid Wood Base
Step 1: Preparing Your Wood Pieces. Begin by taking your scrap 2×4. Using a miter saw for optimal precision or a sturdy handsaw, carefully cut three pieces, ensuring each is precisely 11 inches in length. Accuracy here is paramount for creating a symmetrical and strong frame base. After cutting, lightly sand any rough edges with a piece of sandpaper to ensure a smooth finish and prevent splinters. This initial step is critical for the overall quality and appearance of your finished rustic photo display.
Step 2: Gluing the Frame Planks. Now, it’s time to assemble the main wooden base for your DIY photo holder. Apply a generous, continuous bead of Gorilla Wood Glue along one long side of your first 11-inch wood piece. Take a second piece and press its long side firmly against the glued edge of the first piece, ensuring they are perfectly aligned. The goal is to create a seamless, flat surface. Repeat this process for the third piece, adhering it to the second. You should now have three planks laid side by side, glued together along their lengths, forming a solid wood block.
The key to a strong and lasting bond is proper glue application and sufficient clamping pressure. Ensure the glue is spread evenly across the entire surface to be joined, but avoid applying an excessive amount that would result in significant squeeze-out, as it can be tricky to clean up once dry. A little squeeze-out is actually a good sign, indicating good coverage and a strong bond.
Step 3: Clamping and Drying. Once all three planks are glued together, it’s crucial to clamp them securely to ensure the glue cures properly and creates a strong, flat bond. My husband recently gifted me a fantastic clamp, which I was finally able to put to excellent use here! If you don’t have a specific wood clamp, don’t worry – you can get creative: use heavy books stacked on top, strong straps, or even painter’s tape wrapped tightly around the assembly to hold the pieces firmly in place while the glue cures. The goal is to apply even pressure across the glued seams to prevent gaps. I strongly recommend leaving the clamped assembly for several hours, ideally overnight (a minimum of 4-6 hours), to allow the wood glue to dry completely and achieve maximum strength. This is a perfect time to step away, perhaps tackle some errands like grocery shopping, and let the magic happen!
Phase 2: Crafting the Decorative Back Panel
Step 4: Cutting the Plywood Backing. Once your wood base is dry and fully cured, turn your attention to the 1/4-inch plywood project panel. Measure and cut a piece to precisely 9 x 9.5 inches. This size is specifically designed to fit perfectly within the dimensions of your glued wood base, leaving a slight, attractive border around the decorative paper. Remember to use appropriate safety measures, such as safety glasses, when cutting wood. A steady hand and a sharp saw will yield the best results for this crucial component of your DIY memo board.
Step 5: Adhering Scrapbook Paper to Plywood. This is where the display truly starts to take on its unique character and charm! Lay your chosen 12×12 inch scrapbook paper face-down on a protected surface, such as newspaper or a drop cloth. Generously spray one side of your cut plywood panel with 3M Photo Adhesive. This adhesive is fantastic because it provides a strong, even bond without warping the paper or leaving unsightly bubbles, which is essential for a professional and smooth finish. Carefully center the sprayed side of the plywood onto the backside of your scrapbook paper, pressing down firmly from the center outwards to ensure full contact and eliminate any trapped air pockets. Smooth it out thoroughly with your hands or a brayer for an impeccable, flat surface. The versatility of scrapbook paper allows for endless creative possibilities for your personalized frame.
Step 6: Trimming Excess Paper. With the scrapbook paper firmly adhered to the plywood, it’s time to trim away any overhang to match the exact dimensions of your panel. While I initially sought my craft knife (which was, of course, mysteriously “MIA” when I needed it most!), a sharp razor blade works perfectly for this task. Carefully cut along the edges of the plywood panel, using the wood as a guide, to ensure a clean, crisp finish. Take your time and use a ruler or straight edge if necessary to achieve perfectly straight lines for a professional and polished look. This attention to detail will significantly enhance the overall appearance of your rustic photo display.
You should now have a beautifully patterned wood panel, ready for its distressed makeover, which will add incredible character and depth to your custom frame.
Step 7: Distressing for Rustic Charm. This is where we truly achieve that coveted “shantied” or wonderfully rustic look that gives your DIY frame its unique personality! Take your 80-grit sanding block and lightly sand all the edges and corners of your paper-covered panel. The goal isn’t to remove all the paper, but to gently scuff and wear away the edges, revealing subtle glimpses of the wood underneath and creating a beautifully aged, weathered appearance. Experiment with the pressure until you achieve your desired level of distress – some prefer a subtle wear, while others enjoy a more pronounced, chipped look.
To further enhance this effect and add even more depth, I added a touch of distressing ink around the newly sanded edges. This deepens the worn look and adds definition, making the distressed areas pop and contributing significantly to an authentic vintage or rustic feel. Simply dab the ink pad directly along the edges, blending as desired with a sponge or cloth. This step is optional but highly recommended for those aiming for a truly antique or weathered aesthetic on their handmade frame.
Step 8: Sealing the Paper. At this stage, apply a generous, even coat of matte Mod Podge over the entire surface of your decorated paper panel. While the adhesive itself provides a good bond, the Mod Podge acts as a crucial protective sealant. This is especially important if your DIY photo display will be located in a high-traffic area like a kitchen, as it helps guard against splashes, grease, dust, and general wear, making the surface easy to wipe clean with a damp cloth. The matte finish ensures the paper’s original appearance and vibrant colors are preserved without adding an undesirable glossy sheen. Allow this protective coat to dry completely, typically for at least an hour, before moving on to the final assembly steps.
Phase 3: Assembly and Finishing Touches
Step 9: Painting the Wood Base. With your Mod Podge-sealed paper panel drying, take your now-dry, three-plank wood base and give it a beautiful coat of Rust-Oleum Heirloom White spray paint. This classic color imparts a lovely, soft, slightly antique aesthetic that perfectly complements the rustic distressing and the decorative scrapbook paper. Apply thin, even coats to avoid drips and ensure smooth coverage, allowing adequate drying time between coats (usually 15-30 minutes, depending on humidity). Feel free to use a brush and your favorite acrylic or chalk paint if you prefer a different finish, color, or a more hands-on painting method for your custom frame.
Step 10: Final Assembly. Once both your beautifully painted wood base and the sealed paper panel are completely dry and cured, it’s time to bring these two primary components together to form your rustic memo board. Apply a strong wood glue (or even more 3M Photo Adhesive spray for a broader and more aggressive surface bond) to the backside of your paper-covered wood panel. Carefully center and press this decorative panel onto your painted wood planks. Apply firm, even pressure across the entire surface to ensure a secure and lasting bond. You might want to place some heavy objects on top or clamp it gently until the glue sets, just to be sure the two parts are permanently united. This step is where your personalized frame truly takes its final form.
Step 11: Attaching the Bulldog Clip. The final functional element that completes your DIY photo display is the bulldog clip. Before attaching it, I gave my bulldog clip a quick coat of the same Heirloom White spray paint to ensure a cohesive and polished look that seamlessly integrates with the rustic aesthetic. Once dry, attach it securely to the top center of your display. You can use a small screw (predrill a pilot hole to prevent splitting), a strong adhesive like E6000, or even a brad nail, depending on your clip type and personal preference. Ensure it’s firmly attached to reliably hold your photos, memos, or recipes without slipping.
And just like that, your beautiful, custom DIY photo and memo display frame is ready to be utilized, admired, and become a focal point in your home decor!
Unleash Its Potential: Customization and Display Ideas
Currently, my frame proudly holds a cherished photo, adding a warm, personal touch to my space. However, the true beauty of this design lies in its incredible versatility. You can effortlessly switch out its contents to match your mood, the season, or your current organizational needs. Imagine it displaying a weekly grocery list, an inspiring quote to kickstart your day, a child’s latest masterpiece, a new recipe you’re eager to try, or even a collection of postcards from your travels. The possibilities for this versatile memo board are truly endless!
One of my favorite features is the vibrant pop of color and intricate pattern that the scrapbook paper adds to the otherwise rustic wood. It creates a stunning contrast and allows for endless personalization, making each frame truly unique. Think about incorporating seasonal papers for holidays, sentimental patterns for creating thoughtful gifts, or bold geometrics for a more modern twist in your home decor. This handmade frame isn’t just a functional item; it’s a statement piece that vividly reflects your unique style and creativity, transforming a simple wall into a gallery of personal expression.
Consider making a few of these DIY photo holders in different sizes or with varying paper designs to create a captivating gallery wall. Such an arrangement can become a stunning focal point in any room, allowing you to curate a dynamic display of memories and inspiration. They also make incredibly thoughtful, handcrafted gifts for friends and family, perfect for housewarmings, birthdays, or just because. Your loved ones will undoubtedly appreciate the time, effort, and personal touch you put into creating something so special and practical, making it a cherished item in their own home.
Conclusion: Your Next Creative Home Decor Project Awaits!
I truly hope you’ve enjoyed this comprehensive tutorial and are inspired to create your own DIY photo and memo display. With just a couple of hours of your time and some spare change – quite literally, given the smart use of scrap materials – you can achieve a super cute, highly customized, and incredibly functional piece of home decor. It’s an accessible project for all skill levels, offering immense satisfaction and a beautiful, tangible result that you can proudly display.
This project is more than just making a frame; it’s about embracing creativity, promoting sustainability by upcycling, and adding genuine personal expression to your home. It’s about turning the ordinary into the extraordinary, one scrap of wood at a time, and proving that stunning decor doesn’t require a hefty budget. Thanks so much for stopping by and spending some time with me on this creative journey – your enthusiasm fuels my passion for sharing these simple, rewarding projects!
And don’t forget to have your amazing DIY projects ready for our “I Made it Without My Hubby” feature on the 7th! I can’t wait to see all the incredible things you’ve been creating, celebrating your independence and ingenuity in crafting. Thanks again for your support and enthusiasm – let’s keep those creative juices flowing!
~Whitney