
DIY Shanty Chic Memo Board: Elevate Your Teen’s Room on a Budget
Hello fellow DIY enthusiasts!
Life can get pretty hectic, especially when you’re cheering on your girls at Nationals, as I recently was! But now that the excitement has settled, I’m thrilled to finally carve out some time to share my latest passion project. I’ve embarked on a complete transformation of my son’s room, aiming to infuse it with personality and functionality without breaking the bank. During my quest for inspiration, I stumbled upon a truly charming memo board on PBTeen. Its stylish design immediately sparked an idea: why not create my own “shanty chic” version, customized perfectly for his space and my budget?
This project is a testament to the power of upcycling and creative problem-solving. It’s about taking simple materials, some of which you might already have lying around, and turning them into something both beautiful and incredibly useful. This detailed guide will walk you through every step of crafting a unique, personalized display board that’s perfect for holding memories, notes, and all those little treasures that make a room truly special. Get ready to dive into a rewarding DIY experience that promises a chic result for a surprisingly low cost!
Gathering Your Materials: The Foundation of Your Memo Board
One of the best aspects of this DIY memo board is its reliance on readily available and often inexpensive materials. For the main base of my project, I utilized some sturdy 1/2-inch MDF (Medium-Density Fiberboard) that I had as scrap from my previous decorative wall mirrors project. Repurposing materials not only saves money but also gives your creation a unique story.
If you don’t have scrap MDF, don’t worry! You can easily purchase a sheet from your local hardware store like Home Depot or Lowe’s. A handy tip: most of these stores offer cutting services, so you can have your MDF cut to your exact specifications right there on site. This saves you the hassle of cutting large pieces at home and ensures clean, straight edges. For this particular project, I opted for a generous size of 20 inches by 45 inches, providing ample space for all my son’s future keepsakes. While MDF is an excellent choice for its smooth finish and stability, you could also consider using plywood for a slightly different texture and aesthetic.
Beyond the main board, you’ll also need:
- 1×2 wood pieces for the trim
- Paint (chosen to match your decor)
- Wood stain (for the trim)
- Twine or sturdy string
- Staple gun or hot glue gun
- Wood glue
- Small nails (or brad nails)
- Mini clothespins
- Spray paint (optional, for customizing clothespins)
- Basic tools: measuring tape, small knife, saw (if cutting wood yourself)
Having all your materials prepped and ready before you begin will make the entire process smoother and more enjoyable. Think of this as the exciting prelude to a fantastic crafting adventure!
Step-by-Step Guide to Crafting Your Custom Memo Board
1. Preparing the Base: Painting the MDF
The first step in bringing your memo board to life is to prepare its canvas – the MDF base. I began by painting one side of the 20″ x 45″ MDF board a solid black. This choice was deliberate, as black perfectly complements the existing bedding in my son’s room, creating a cohesive and stylish look. However, the beauty of DIY lies in customization! Feel free to select any color that sparks joy or perfectly matches your unique interior design vision. Consider bold primary colors for a playful child’s room, soft pastels for a serene space, or even a vibrant metallic for a touch of glam.
Applying a uniform coat of paint ensures a professional finish. Use a roller for large, even coverage, and a brush for edges if needed. Allow ample time for the paint to dry thoroughly according to the manufacturer’s instructions. Patience at this stage prevents smudges and ensures a durable, beautiful base for your upcoming creative additions. This initial layer is crucial, as it sets the tone for the entire piece, establishing the background against which all your future memories will be displayed.
2. Crafting the Decorative Trim: Adding Rustic Charm
While your painted MDF base is drying, you can move on to preparing the trim pieces that will frame your memo board. For this project, I used 1×2 wood, which provides a nice, substantial border without being overly bulky. Precision in cutting is key here for a neat, professional look. I cut two long pieces of 1×2 wood to 45 inches, perfectly matching the length of my MDF board. For the side pieces, I cut two at 21.5 inches. This measurement ensures that the side trim pieces will slightly overlap the ends of the long trim pieces when assembled, creating a clean, finished corner joint.
After cutting, I proceeded to stain the wood trim. Staining before attachment is significantly easier and allows for complete coverage without the risk of staining the painted MDF base. Choose a stain color that complements your overall aesthetic. A dark wood stain, for instance, can provide a beautiful contrast to a lighter painted board, enhancing that “shanty chic” appeal. Apply the stain evenly, wiping off any excess, and then allow the stained pieces to dry completely. This step adds depth, character, and a touch of rustic elegance to your memo board, making it look much more expensive than it actually is!
3. Preparing for Twine: Notching the MDF
This particular step is a clever detail that ensures your twine lays perfectly flat and your trim fits snugly. Using a small, sharp knife, I carefully cut shallow notches along the sides of my MDF board. These notches serve as little channels for the twine. I spaced these notches approximately every 4 inches, which dictated where my horizontal twine strands would eventually run. The key here is not to cut too deep, just enough to create a slight indentation that the twine can rest in. This technique is paramount because it allows the trim pieces, once attached, to sit flush against the MDF board without creating an unsightly bulge caused by the twine.
Taking the time to precisely measure and cut these notches will significantly impact the professional appearance of your finished memo board. It’s these small, thoughtful details that elevate a DIY project from homemade to handcrafted. Ensure your knife is sharp for clean cuts and work carefully to maintain even spacing. This preparation sets the stage for the functional aspect of your board, providing a smooth, integrated system for displaying notes and photos.
4. Integrating the Twine System: The Heart of Your Display
With the notches ready, it’s time to install the practical element of your memo board: the twine. I ran four distinct pieces of twine horizontally across the width of the board, aligning each piece with the notches you just cut. This ensures consistent spacing and a tidy appearance. To secure the twine, I pulled each strand taut across the front of the board and then attached its ends to the back of the MDF using a staple gun. Make sure the twine is firm but not so tight that it bows the MDF. A good, consistent tension across all strands is important for a polished look.
If you don’t have a staple gun, a hot glue gun can serve as an excellent alternative. Simply apply a dab of hot glue to the back of the MDF where the twine will meet, press the twine firmly into the glue, and hold until secure. Whichever method you choose, double-check that each piece of twine is securely fastened and evenly spaced. This network of twine is what will hold all your cherished photos, inspiring notes, and important reminders, transforming a simple board into a dynamic, interactive display. This step truly brings the memo board’s functionality to life!
5. Assembling the Frame: Securing the Trim
Now that your twine is securely in place and your trim pieces are beautifully stained and dry, it’s time to bring all the elements together by attaching the frame. I used a combination of wood glue and small nails to ensure a robust and lasting connection. Begin by applying a generous bead of wood glue along the edges of the MDF board where your long trim pieces will sit. Carefully position the two 45-inch long trim pieces first, ensuring they align perfectly with the edges of the MDF.
Once the long pieces are in place, secure them with small nails, carefully driving them through the trim and into the MDF. A nail gun (brad nailer) is fantastic for this if you have one, as it leaves minimal holes. If using a hammer and nails, be gentle to avoid damaging the wood. After the long pieces are firmly attached, repeat the process for the two 21.5-inch side trim pieces. These should fit snugly between the ends of the long pieces, creating clean, mitered-looking corners. The wood glue provides strong adhesion, while the nails offer immediate structural integrity, holding everything together while the glue dries. This step transforms your flat MDF board into a framed, professional-looking memo board, adding significant aesthetic value.
6. Personalizing Your Display: Adding Clothespins and Memories
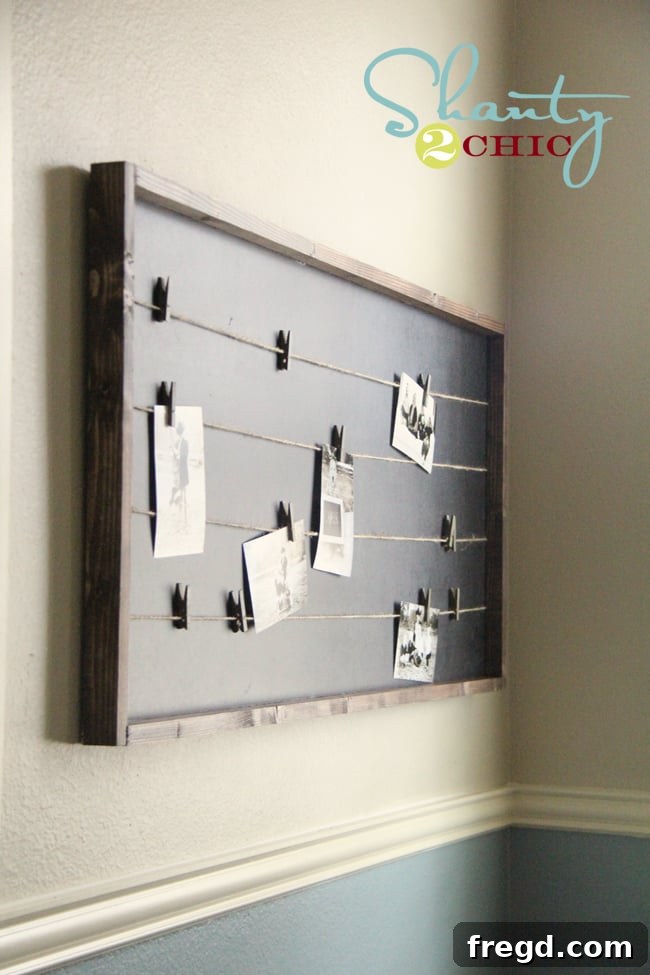
The structural work is complete, and your DIY memo board is officially taking shape! The final, and perhaps most enjoyable, step is to personalize it with clothespins and your chosen display items. I purchased a pack of mini clothespins from Joann’s, which are perfectly sized for holding photos and small notes without overwhelming the board. To tie into my son’s room decor, I spray painted these mini clothespins a vibrant green, matching elements in his bedding. This simple customization adds a thoughtful touch and reinforces the cohesive design of the room.
Once the paint on your clothespins is dry, begin clipping on your favorite family photos, encouraging quotes, important reminders, or even small pieces of artwork. This is where the board truly comes alive, becoming a dynamic gallery of personal memories and inspirations. I started with some family pictures, and I’m sure my son will quickly fill the remaining spaces with concert tickets, drawings, school awards, and other “goodies” that reflect his personality and interests. This customizable aspect makes the memo board a living piece of decor that can evolve and change as your child grows, making it a functional and cherished addition to any room.
The Grand Reveal: Your Finished Shanty Chic Memo Board
After all the careful planning, cutting, painting, and assembling, the moment of truth arrives: hanging your magnificent DIY memo board! It’s incredibly satisfying to see a project through from inspiration to a tangible, beautiful piece of home decor. I carefully mounted the board on the wall in my son’s room, stepping back to admire how it instantly transformed the space. The blend of the dark painted base, the rich stained trim, and the vibrant green clothespins creates a harmonious and inviting focal point.
This custom-made memo board is more than just a place to stick notes; it’s a personal storytelling wall. It encourages creativity, helps organize thoughts, and serves as a constant reminder of cherished moments and exciting plans. Whether it’s showcasing vacation snapshots, a thoughtful handwritten note, or a child’s latest masterpiece, this board provides the perfect platform. Its “shanty chic” aesthetic means it feels both rustic and refined, fitting seamlessly into a variety of decor styles, from modern farmhouse to eclectic bohemian.
Behold the fruits of your labor!