
Crafting Unique Nursery Decor: DIY Distressed Wood Picture Frames on a Budget
Hello fellow DIY enthusiasts and home decor lovers!
Every now and then, it’s wonderful to step away from larger projects and dive into something that sparks immediate joy and allows for creative expression without breaking the bank. That’s exactly what happened recently when I found myself with a much-needed break from some intensive building projects. Conveniently, my ever-growing pile of scrap wood, which by now threatens to rival my own height, presented the perfect opportunity for a fun, small-scale endeavor. This project wasn’t just about using up materials; it was about adding a personal, handcrafted touch to a very special room: the new nursery.
Do you recall the beautiful fabric I previously shared for the new nursery? It truly set the tone for the entire room’s aesthetic, inspiring a vision of warmth, comfort, and playful elegance.
Yes, this fabric, with its charming patterns and delightful color palette, is absolutely enchanting. While my sewing machine remains patiently waiting for its turn, I felt the nursery walls needed a little something extra, something uniquely crafted to complement this lovely textile. An idea began to form: custom picture frames. Instead of heading to a big-box store like Walmart for generic frames, I decided to embrace the challenge and build my own, leveraging the treasures in my scrap pile.
Diving into the Scrap Pile: The Foundation of Our Frame
This is where the infamous scrap pile became my best friend. For the main structure of these frames, I utilized some scrap 1×4 furring strips. These humble pieces of wood are incredibly versatile and, if you do need to purchase them new, they are remarkably affordable – often around $2 for an 8-foot length. This makes them an ideal choice for budget-conscious DIY projects, allowing you to create beautiful pieces without a significant financial outlay. Using scrap materials not only saves money but also gives a wonderful sense of satisfaction knowing you’re repurposing and giving new life to forgotten wood.
Precision Cuts: Preparing Your Frame Components
To achieve perfectly flush corners for the frames, precise angled cuts are essential. I used my trusty DeWalt miter saw for this task, which makes quick work of accurate cuts. However, please don’t be deterred if you don’t own an electric saw. This project is absolutely accessible to beginners! You can easily achieve the same professional-looking 45-degree angles with a simple miter box and a hand saw, typically costing around $5 and $10 respectively at hardware stores like Lowe’s. I personally relied on a hand saw and miter box for a long time before investing in my larger power tools, and they perform like a charm – I promise! The key is to cut all four pieces of your frame at a 45-degree angle, ensuring that when joined, they form a perfect 90-degree corner. Careful measurement and a steady hand are all you need.
Here’s a glimpse of my precisely cut frame pieces, ready for assembly:
Assembling the Frame: Gluing and Clamping for Durability
Once the pieces were cut, the next crucial step was assembly. I knew I’d need an effective way to hold the frame together firmly while the glue dried, ensuring strong and stable joints. There are numerous clamping options available for woodworking projects, and while my chosen tool might not be the most traditional for professional woodworkers, it proved to be incredibly effective and user-friendly for this project.
This particular corner clamping tool was a fantastic find on Amazon for a super affordable price. You can often find similar budget-friendly options at stores like Harbor Freight for under $10. These tools are invaluable for ensuring your frame corners are perfectly square and held under consistent pressure as the adhesive cures. The secret to a durable frame isn’t just the angle of the cut, but the strength of the bond created by quality wood glue.
I applied a generous amount of Gorilla Wood Glue to each of my mitered corners. Wood glue, when properly applied and clamped, creates a bond that is often stronger than the wood itself, making it ideal for structural joints in frames.
Once the glue was applied, I carefully brought the corners together and secured the entire frame with the clamp, allowing it to dry thoroughly. Patience is key at this stage; rushing the drying process can compromise the strength and integrity of your frame.
Adding Inner Trim: Creating Depth and Securing Artwork
While the main frame’s glue was curing, I shifted my focus to the inner trim pieces. These trim pieces serve a dual purpose: they add visual depth and dimension to the frame, and more importantly, they create a small ledge or rabbet to hold the artwork securely within the frame. I again turned to my scrap bin, finding some trim pieces that were perfect for this. If you need to buy them new, an 8-foot piece of similar trim can be found at Lowe’s for around $5.
I cut these inner trim pieces approximately 1/4 inch smaller than the main frame’s opening. This slight reduction in size ensures that when attached, they sit just inside the main frame, creating that essential lip for holding the artwork. Like the main frame, these pieces also required precise 45-degree mitered cuts to form neat corners.
The Artistic Touch: Painting, Stripes, and Distressing the Main Frame
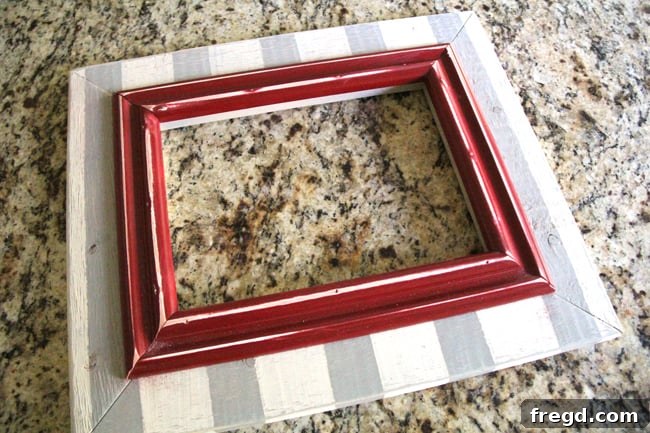
With the first frame fully dried and structurally sound, it was time to bring it to life with color and character. I started by spray painting the entire frame a soft, versatile gray. Gray provides an excellent neutral base, allowing other colors to pop and contributing to a sophisticated yet understated foundation for the distressed look we’re aiming for.
Next, I decided to add a touch of pattern with subtle stripes. I carefully measured from the center of the frame and used blue painter’s tape to mark off evenly spaced stripes, setting them 2 inches apart. Starting from the center ensures a symmetrical design, which is key for a balanced aesthetic even in a distressed piece. Painter’s tape is crucial here for creating crisp lines, though a bit of bleed-through is perfectly acceptable given the rustic finish we’re going for.
Then, using some cream acrylic paint and an inexpensive brush from Hobby Lobby, I carefully painted the stripes. I wasn’t overly concerned with achieving perfectly smooth or pristine lines. In fact, a slightly imperfect application lends itself beautifully to the “shanty-chic” or distressed aesthetic I had in mind for the nursery decor. The goal was character, not factory-perfection.
After applying the stripes, I allowed the paint to dry for about 30 minutes. This was just enough time to tackle a load of laundry and feed the baby – multitasking at its finest! Once the paint was set, I carefully peeled off the painter’s tape to reveal the clean, yet slightly rustic, striped pattern. The real magic happened next: distressing. I took a 220-grit sanding block and gently sanded the entire frame. This process effectively scuffed up the cream paint, revealing hints of the gray base coat and, in some areas, the natural wood beneath. This intentional “wear and tear” gives the frame a wonderfully aged and loved appearance, which I absolutely adore. It adds depth, texture, and a unique story to each piece, perfectly aligning with the “shanty-chic” aesthetic.
The Finishing Touch: Colonial Red Inner Trim
The inner trim pieces, which were patiently waiting, received their own splash of color. I spray painted them with Rust-Oleum Colonial Red. This vibrant, classic red provides a wonderful contrast against the distressed gray and cream of the main frame, adding a cheerful pop of color that perfectly complements the nursery fabric. Once these trim pieces were dry, it was time to attach them to the inside of the main frame.
Given that these trim pieces are lightweight and won’t bear significant weight, I opted for a quick and easy method: hot glue. (Don’t tell the serious woodworkers!). Hot glue provides an immediate bond, making the assembly process very efficient for non-structural elements. It holds the trim securely in place, creating that essential inner ledge for the artwork.
Although the hot glue provided sufficient security, I decided to add a few small nails for extra reinforcement and a bit of visual interest. In hindsight, the nails weren’t strictly necessary – the hot glue alone was perfectly sufficient for this application. However, I actually liked the look of the nails, especially after distressing them slightly with the sanding block to blend with the overall rustic theme. The contrast between the somewhat polished red trim and the “shanty” main frame is quite appealing, and the nails, once distressed, simply enhance that handcrafted feel.
Despite the minor deliberation over the nails, I absolutely love the finished result. It has exactly the character and charm I envisioned for the nursery.
The Grand Reveal: A Perfect Addition to the Nursery
The beauty of DIY projects lies in the journey and the satisfaction of seeing your vision come to life. I haven’t yet added the artwork or “inside” elements to the frame, so for now, I had to get a little creative with how I showcased its potential for you. Even empty, the frame speaks volumes about its handmade charm.
And just imagine how adorable it looks when paired with the inspiring nursery fabric! The colors and textures truly harmonize, creating a cohesive and inviting look for the baby’s room. This custom distressed frame provides the perfect housing for whatever sweet art or photos will eventually fill it, tying into the room’s theme beautifully.
Wait until you see what I have planned to go on the inside of these frames. It’s going to be so much fun and add another layer of personality to the nursery!
Conclusion: Handmade Charm for Your Home
This project serves as a wonderful reminder that beautiful, personalized home decor doesn’t have to be expensive or complicated. With a little creativity, some readily available materials (especially from a scrap pile!), and a willingness to get hands-on, you can create truly unique pieces that reflect your style and add heartfelt charm to any space. These DIY distressed wood picture frames are not just functional items; they are pieces of art in themselves, embodying the rustic elegance and personal touch that handmade projects bring to a home. Whether you’re decorating a nursery, updating a living room, or searching for a thoughtful gift, consider the rewarding path of DIY frame building. It’s an accessible project for all skill levels and yields incredibly satisfying results.
Thank you so much for stopping by and sharing in this creative journey!
~Whitney