
Transform Your Outdoor Space: A DIY Guide to Staining and Sealing Your Lounge Chairs
Hello fellow DIY enthusiasts and outdoor living aficionados! If you’re looking to revitalize your backyard oasis, you’ve come to the right place. There’s nothing quite like the satisfaction of transforming a tired piece of furniture into a fresh, inviting element of your home, especially when it comess to outdoor relaxation. This week, I’m thrilled to share my journey of staining and sealing my outdoor lounge chairs, a project that not only extends their life but also dramatically enhances their aesthetic appeal. It’s a simple, cost-effective way to prepare your patio for endless hours of sunshine and enjoyment, and trust me, the results are incredibly rewarding.
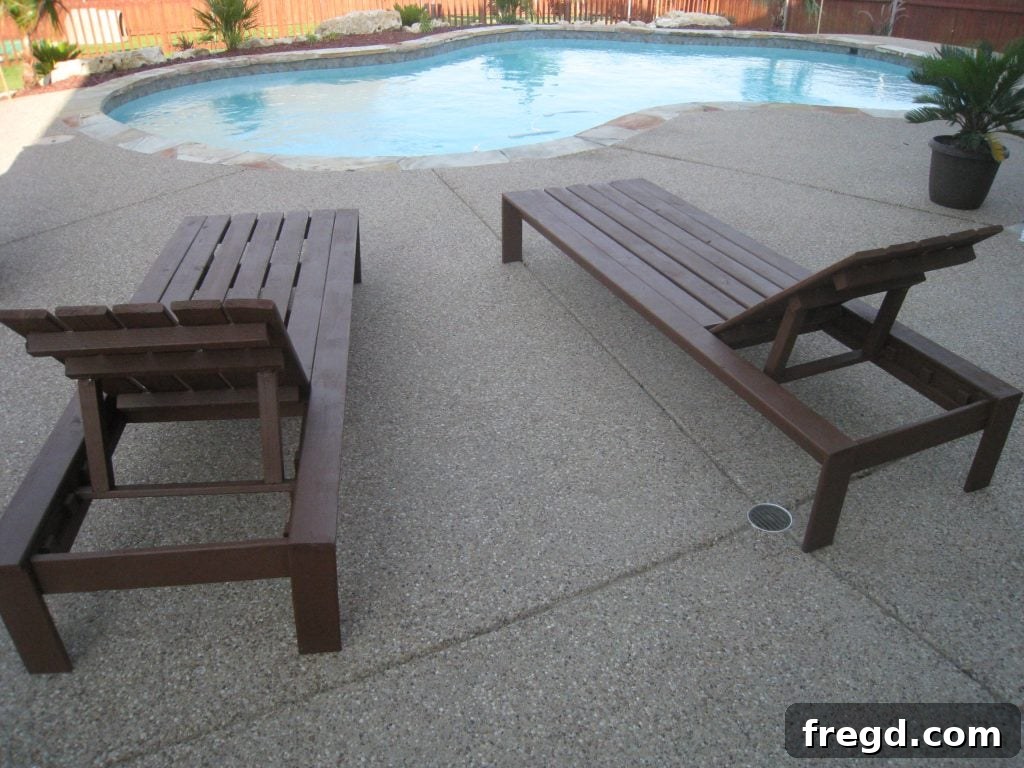
Our backyard is slowly but surely becoming the ultimate retreat, and these newly treated lounge chairs are now perfectly positioned, just waiting for their plush cushions to arrive. Imagine sinking into them after a long day, a cool drink in hand, soaking up the tranquility of your own beautifully crafted outdoor haven. That dream is just a few steps away!
Indeed! They’re already set up in their designated spots, eagerly awaiting the final touch of comfort. The transformation from raw, weathered wood to a rich, protected finish is truly remarkable. Staining and sealing aren’t just about making your chairs look good; they’re essential steps in protecting your investment from the harsh elements, ensuring they stand the test of time and countless sunny afternoons.
Why Staining and Sealing Your Outdoor Furniture is a Must
Before diving into the “how-to,” let’s explore why this project is so crucial for any wooden outdoor furniture. Wood is a natural material, beautiful and versatile, but highly susceptible to environmental damage. Unprotected wood can quickly succumb to rot, mildew, fading, and structural weakening due to exposure to sun, rain, and humidity. Staining and sealing provide a protective barrier that shields your furniture from these threats, significantly extending its lifespan and maintaining its aesthetic appeal.
A quality stain not only imparts a beautiful color but often includes UV inhibitors that prevent the sun’s rays from bleaching and degrading the wood. Sealers, on the other hand, create a water-resistant layer, preventing moisture penetration which is the primary cause of rot and mold growth. Many modern products combine both stain and sealer, offering a convenient all-in-one solution for maximum protection and rich, vibrant color that lasts season after season. Investing a little time now will save you a lot of money and effort in repairs or replacements down the line, making your outdoor lounge chairs a durable centerpiece of your garden or patio.
Preparation: The Foundation of a Flawless Finish
As with any painting or staining project, thorough preparation is the key to achieving professional-looking, long-lasting results. Skipping this crucial step can lead to an uneven finish, poor adhesion, and premature wear. Here’s how I prepared my lounge chairs:
- Cleaning: First, ensure your chairs are completely clean. For new wood, a simple wipe-down to remove dust is sufficient. For existing furniture that has seen some outdoor action, a good scrub with a stiff brush, mild detergent, and water is essential to remove dirt, grime, and any existing mildew. Rinse thoroughly and allow the chairs to dry completely.
- Sanding: A light sanding helps the stain adhere better. Use 120-grit sandpaper to gently scuff the surface, paying attention to any rough spots or splintered areas. If your chairs had an old, peeling finish, you might need to use a coarser grit (like 80-grit) first, followed by a finer grit to smooth everything out. Always sand with the grain of the wood for the best results.
- Repair and Inspection: This is a great time to check for any loose screws, wobbly joints, or splintered wood. Tighten any fasteners and make any necessary minor repairs. A smooth, stable surface is ideal for staining.
- Gather Your Supplies: Before you even open the can, make sure you have everything you need: your chosen stain/sealer, brushes (synthetic brushes work well with most stains), stirring sticks, disposable rags, drop cloths or old sheets to protect your workspace, gloves, and safety glasses.
Working on a dry, non-windy day is always recommended to ensure even drying and prevent dust or debris from sticking to the wet stain. Also, consider the temperature; most stains have an optimal application temperature range, usually between 50-80°F (10-27°C).
Choosing the Perfect Stain: Color and Protection
For this project, I opted for Behr fence stain, tinted to “Valise.” My choice wasn’t arbitrary; it was carefully selected to perfectly match the existing fence and cedar posts in my backyard. This attention to detail creates a cohesive and professional look throughout the outdoor space, making everything feel intentionally designed rather than haphazardly placed. Behr offers a wide range of colors and opacities, from transparent (which highlights the natural wood grain) to solid (which provides a more paint-like finish while still protecting the wood).
When selecting your stain, consider several factors:
- Opacity: Do you want the wood grain to show through, or are you looking for a more uniform color? Transparent, semi-transparent, semi-solid, and solid stains offer varying degrees of coverage.
- Base Type: Oil-based stains penetrate deeper and often offer excellent durability, while water-based stains are easier to clean up and typically dry faster.
- Protection Features: Look for stains specifically designed for outdoor use, offering UV protection, mildew resistance, and water repellency.
- Color Matching: If you have other stained elements in your yard, consider bringing a sample or photo to the paint store to ensure a harmonious color palette.
My choice of “Valise” was driven by the desire for continuity, ensuring my lounge chairs seamlessly blend with the existing elements, creating a unified and inviting outdoor environment.
The Staining and Sealing Process: A Step-by-Step Guide
Once your chairs are prepped and your stain is chosen, the application process is straightforward but requires patience and attention to detail. Here’s how we tackled it:
Step 1: Set Up Your Workspace
Choose a well-ventilated area, preferably outdoors on a non-windy day. Lay down drop cloths or old sheets to protect your ground surface from drips and spills. Have all your tools, including brushes, stir sticks, and rags, within easy reach.
Step 2: Stir, Don’t Shake, the Stain
Before opening the can, read the manufacturer’s instructions carefully. Stains often separate, so it’s crucial to stir them thoroughly with a paint stick. Continue stirring periodically throughout the application process to ensure consistent color and even distribution of pigments and protective agents.
Step 3: Enlisting Helping Hands – The Joy of DIY with Family!
This is where the project truly became a joy! I was incredibly lucky to enlist some fantastic help for this task. My little assistants did a GREAT job, demonstrating impressive focus and enthusiasm. It’s truly wonderful when you can turn a home improvement task into a fun, engaging activity for the whole family. Whoop! I ended up with not one, but two incredible helpers who genuinely enjoy this kind of hands-on work. There’s something special about watching their creativity and effort come to life. I just hope they don’t realize that repetitive staining isn’t always “fun” anytime soon! Their energy made the work fly by and added an invaluable layer of joy to the entire process. Plus, it teaches them valuable skills and the satisfaction of a job well done.
Step 4: Applying the Stain
Using a high-quality brush, apply the stain in thin, even coats, working with the grain of the wood. Avoid applying too much stain at once, as this can lead to drips and an uneven finish. For slatted furniture like lounge chairs, work in sections, ensuring every surface is covered. Wipe away any excess stain with a clean rag after a few minutes to prevent stickiness and ensure even absorption. It’s often better to apply two thin coats rather than one thick coat for optimal durability and appearance. Allow the first coat to dry completely according to the manufacturer’s instructions before applying a second coat, if desired. Lightly sanding between coats with a very fine-grit sandpaper (e.g., 220-grit) can also improve adhesion and smoothness.
Step 5: Drying and Curing
Once all coats are applied, allow the chairs to dry thoroughly. This isn’t just about being dry to the touch; the stain needs to “cure” completely to achieve its full hardness and protective properties. This can take anywhere from 24 hours to several days, depending on the product, humidity, and temperature. Refer to your stain’s instructions for exact curing times. Resist the urge to use the chairs too soon, as this can mar the finish.
The Grand Reveal: Comfort Awaits!
With the staining and sealing complete, our outdoor lounge chairs are looking absolutely fantastic! The deep Valise tint complements the natural greenery of the backyard beautifully, creating a sophisticated and inviting atmosphere. Now, the final piece of the puzzle is patiently waiting on the cushions to arrive. While the chairs look great and are perfectly protected, they aren’t exactly conducive to comfortable lounging on the behind right now, especially on a scorching 101-degree day! That’s why high-quality outdoor cushions are essential for transforming these functional pieces into truly luxurious relaxation spots.
Budget-Friendly Brilliance: The Cost Breakdown
One of the most satisfying aspects of DIY projects is the incredible value they offer. Instead of spending hundreds or even thousands on new, pre-finished outdoor lounge chairs, we achieved a stunning upgrade for a fraction of the cost. Here’s a quick look at the budget:
- Cost per chair: $25 (for the raw wood construction)
- Total for two chairs: $25 x 2 = $50
- Cost for a gallon of stain: $27
- Total Project Cost: $50 + $27 = $77
For just $77, we have two beautifully finished, weather-protected lounge chairs that look brand new and are ready to provide years of enjoyment. This demonstrates the power of DIY – not just for saving money, but for the immense satisfaction of creating something beautiful with your own hands. I’m incredibly happy with this outcome!
Beyond the Stain: Accessorizing Your Outdoor Oasis
Once your chairs are stained and ready, consider how you’ll accessorize them to maximize comfort and style. Outdoor cushions are paramount, but think about coordinating side tables for drinks and books, a stylish umbrella for shade, or even some strategically placed planters to add greenery and color. Regular cleaning and occasional reapplication of a topcoat or stain will keep your furniture looking its best for years to come, ensuring your investment continues to provide comfort and beauty.
Conclusion: Embrace the Joy of Outdoor DIY
This lounge chair staining and sealing project has been a wonderful reminder of the rewards that come with tackling DIY tasks. From the initial preparation to the final protective coat, and especially with the enthusiastic help of my little team, the entire process has been incredibly fulfilling. Our backyard is now one step closer to being the perfect summer retreat, all thanks to a bit of effort and a gallon of stain. If you’re pondering a similar project, I wholeheartedly encourage you to dive in!
If you missed the initial construction process for these DIY outdoor chaise lounges and want to build your own from scratch, you can check out the detailed plans HERE! I hope this guide inspires you to take on your next outdoor furniture project and creates a space you’ll love. Have a great week!
~Ashley