
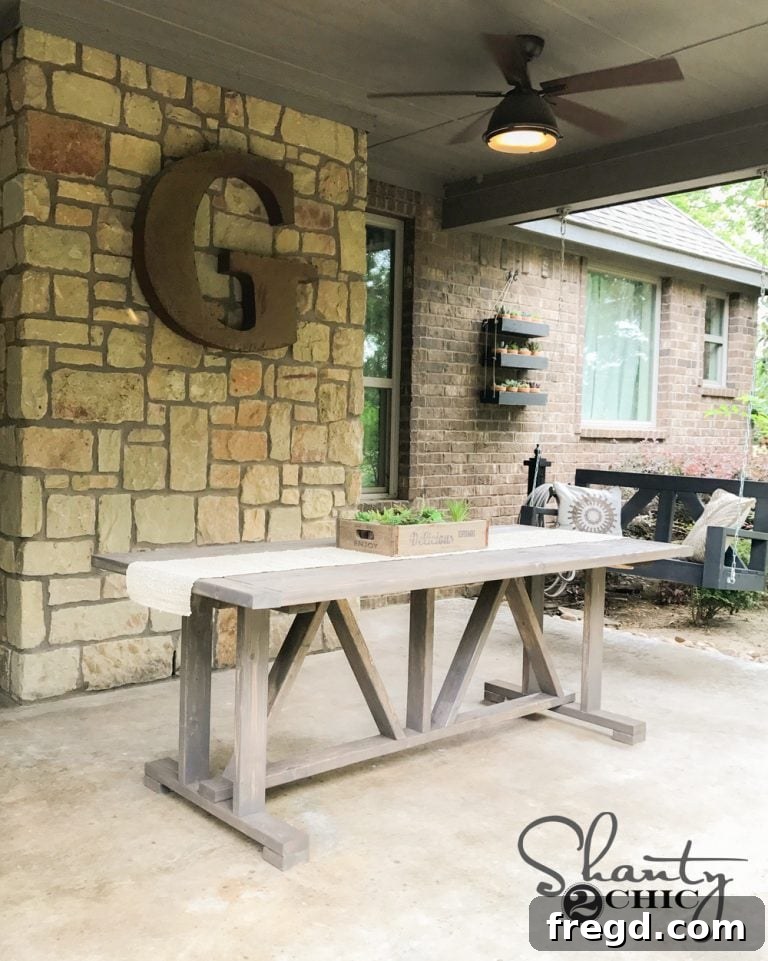
Build a Stunning DIY Outdoor Dining Table for Just $60! Free Woodworking Plans for Your Backyard Oasis
Transform your patio or backyard into an inviting outdoor dining space with a beautiful, custom-built table that won’t break the bank! We are absolutely thrilled to share this incredible DIY project that allows you to construct a robust and stylish outdoor dining table for an astounding lumber cost of just $60. Imagine gathering with friends and family around a sturdy, handcrafted table, knowing you built it yourself without spending a fortune. This detailed guide, complete with free DIY woodworking plans and a comprehensive tutorial, makes that dream a reality for anyone, regardless of their woodworking experience.
Why Build Your Own Outdoor Dining Table? The Unbeatable Value of DIY
In a world where outdoor furniture can cost hundreds, if not thousands, of dollars, the idea of building your own outdoor dining table for a mere $60 in lumber might seem too good to be true. But it’s not! This project proves that high-quality, durable outdoor furniture is within reach for the average homeowner. Beyond the significant cost savings, building your own table offers a unique sense of accomplishment and the flexibility to customize its finish to perfectly match your existing outdoor decor. You’ll gain valuable woodworking skills and end up with a conversation piece that will impress all your guests.
Our design philosophy for this table centered around simplicity, affordability, and durability. We challenged ourselves to create a substantial outdoor dining table using only 2×4 studs – and we succeeded! This clever design utilizes just 17 standard 2x4s, keeping the material costs incredibly low while providing exceptional strength. This approach not only saves money but also makes lumber acquisition straightforward, as 2x4s are readily available at any hardware store.
Essential Materials and Tools for Your Budget-Friendly Build
Before diving into the construction, gathering your materials and tools is crucial. Preparation is key to a smooth and enjoyable building process. Here’s what you’ll need to bring this $60 outdoor dining table to life:
Lumber & Hardware: The Foundation of Your Table
- 17 x 2×4 Studs: These are the workhorses of your table, forming both the base and the tabletop.
- Wood Glue: Essential for strong, long-lasting joints. Don’t skimp on quality here.
- 2.5″ Spax Screws: These provide superior holding power and are excellent for outdoor projects.
- 2.5″ Pocket Hole Screws: Specifically for joining the tabletop planks discreetly and securely.
- Wood Stain (e.g., Varathane Briarsmoke): To give your table a beautiful, lasting finish.
- Outdoor Protectant (e.g., Spar Varnish): Absolutely vital for protecting your table from the elements and ensuring its longevity.
Tools You’ll Need: Efficiency and Precision
- Ryobi 18V Quietstrike Driver: An impact driver is invaluable for quickly and efficiently driving screws. The “Quietstrike” feature makes it a more pleasant tool to use without sacrificing power.
- Kreg Jig K5: A game-changer for creating strong, concealed pocket hole joints, especially for the tabletop. This tool is worth the investment for any woodworking enthusiast. You can often find the K5 HERE on Amazon.
- Miter Saw or Circular Saw: For making precise cuts on your 2x4s. Accuracy here will ensure your table fits together perfectly.
- Measuring Tape & Pencil: For marking your cuts and dimensions.
- Clamps: To hold pieces securely while glue dries or screws are driven.
- Safety Glasses & Hearing Protection: Always prioritize safety when working with power tools.
Get Started: Free Plans and Video Tutorial
We believe in making woodworking accessible to everyone, which is why we’re providing both detailed written plans and a visual tutorial. These resources will guide you through every cut and connection, ensuring you have all the information you need for a successful build.
Before you make your first cut, be sure to download and print the FREE PLANS by clicking HERE! And for a step-by-step visual walkthrough, you can see exactly how we built it in this week’s YouTube video tutorial HERE or by clicking below! Watching the video often clarifies steps that might seem complex on paper, giving you confidence as you proceed.
Now, let’s look at the incredible outcome of this project – a table that’s as charming as it is functional!
Step-by-Step Guide to Building Your $60 Outdoor Dining Table
This project is broken down into manageable phases, making the construction process straightforward and enjoyable. Take your time with each step, paying close attention to measurements and alignment for the best results.
Phase 1: Constructing the Sturdy Table Bases
The foundation of your table’s stability lies in its two robust bases. These identical assemblies will support the entire structure, so accuracy in this step is crucial. Begin by cutting your 2x4s according to the dimensions specified in the free plans. You’ll construct two mirrored “H” shaped frames. Apply a generous amount of wood glue to all mating surfaces before securing them with 2.5″ Spax screws. Using a square during assembly will ensure your bases are perfectly perpendicular, preventing any wobbling later on.
For attaching the pieces, we highly recommend the Ryobi 18V Quietstrike Driver. This tool is genuinely impressive, making light work of driving screws without the loud impact noise associated with traditional drivers. Its power and quiet operation are a significant advantage for any DIY enthusiast. Ensure all screws are driven flush or slightly countersunk for a smooth finish.
Phase 2: Enhancing Stability and Structure
Once your two table bases are complete, the next steps involve connecting them and adding structural elements to fortify the table’s overall stability and aesthetic appeal.
Adding the Foot Pads for Floor Protection
To protect your patio surface and the table legs, attach foot pads to the bottom of each leg assembly. These small but important pieces distribute the table’s weight and prevent direct contact with damp ground, prolonging the life of your table. Again, use a combination of wood glue and 2.5″ Spax screws for a secure attachment.
Connecting with Long Runners
With the foot pads in place, it’s time to connect the two bases using long runners. These boards form the basic bottom frame of the table and provide crucial longitudinal support. Carefully align the runners centrally to both the top and bottom sections of each leg assembly. This ensures even weight distribution and a symmetrical look. Secure these with plenty of wood glue and Spax screws, ensuring a tight bond.
Adding the Vertical Support Board
For additional central support and to prevent any sagging in the tabletop over time, attach a vertical support board. This piece will span between the two long runners, positioned precisely in the center of the table. Again, use both wood glue and Spax screws to ensure a rigid connection. This significantly enhances the table’s load-bearing capacity.
Diagonal Bracing for Ultimate Stability
Diagonal pieces are critical for bracing the table and preventing lateral movement or racking. This is where precision cutting comes into play. Instead of guessing, we recommend lining up the boards and marking your cuts directly with a pencil to achieve the best, tightest fit. Once marked and cut, attach these diagonal braces using wood glue and Spax screws. This step dramatically increases the table’s overall rigidity and durability.
Completing the Base with a Shorter Runner
The final element of the base assembly is attaching a shorter horizontal runner. This piece sits just above the longer top runner, adding another layer of structural integrity and providing additional support for the tabletop. Cut this board to fit precisely between the two top sections of the leg assemblies and secure it firmly with wood glue and Spax screws driven through its top and into the runner below.
Phase 3: Crafting the Perfect Tabletop
With the base structure complete, attention turns to the tabletop – the surface where countless meals and memories will be made. The key to a seamless and strong tabletop lies in utilizing pocket hole joinery.
Preparing the Planks with Pocket Holes
Begin by cutting all your tabletop planks to the desired length. For a robust and visually clean tabletop, we’ll use pocket holes to join the boards together. Using your K5 Kreg Jig, drill 1.5″ pocket holes along one side of all but one of these boards. The Kreg Jig makes this process incredibly easy and precise, creating strong joints that are virtually invisible from the top surface. Additionally, drill a pocket hole into each end of every board. These end pocket holes will be used in the next step to attach the breadboards, providing a polished and durable finish to the tabletop edges.
Assembling the Tabletop Planks
With the pocket holes drilled, it’s time to join the planks together to form a solid tabletop. Apply a thin, even layer of wood glue along the edges of the planks, then clamp them together. Drive 2.5″ pocket hole screws into the pre-drilled holes, pulling the planks tightly together to create strong, seamless joints. Work systematically across the tabletop, ensuring each plank is flush with its neighbor. This method provides immense strength and a professional finish, preventing gaps and warping over time.
Attaching the Breadboards
Breadboards are not just a decorative touch; they also help prevent the tabletop from warping across its width over time. Cut your breadboards to the exact length of your assembled tabletop. Apply wood glue to the ends of the tabletop planks and to the mating edges of the breadboards. Then, using the pocket holes you drilled in the ends of the planks, attach the breadboards with 2.5″ pocket hole screws. This creates a beautifully finished edge and adds substantial stability to the entire tabletop assembly.
Phase 4: Final Assembly – Uniting Base and Top
With both the table base and the tabletop independently constructed, the exciting final step is to bring them together. Carefully flip the base assembly upside down and center it precisely on the underside of your finished tabletop. Take your time to ensure it’s perfectly aligned. Once positioned, secure the base to the tabletop using longer Spax screws, driving them through the top runners of the base and into the tabletop planks. These longer screws will provide a robust and lasting connection, making your table incredibly sturdy. Double-check all connections to ensure everything is tight and secure.
The Finishing Touches: Staining and Protection
Now that your table is fully assembled, it’s time to add the finishing touches that will define its character and protect it from the elements. This is where your table truly comes to life!
Choosing and Applying Your Stain
We opted to stain our table using our favorite: Varathane Briarsmoke! This rich, smoky hue provides a beautiful depth and classic look that complements any outdoor setting. When applying stain, ensure your table surface is clean and free of dust. Apply the stain evenly with a brush or rag, working in the direction of the wood grain. Allow it to penetrate for the recommended time, then wipe off any excess. You may apply a second coat for a deeper color if desired.
Essential Outdoor Protection
Since your beautiful new table will be exposed to the outdoors, adding a protective finish is non-negotiable. We highly recommend a high-quality outdoor protectant like Spar Varnish. Spar Varnish is specifically designed to withstand UV rays, moisture, and temperature changes, preventing fading, cracking, and water damage. Apply several thin coats, allowing each coat to dry completely according to the manufacturer’s instructions. This crucial step will ensure your $60 outdoor dining table remains stunning and durable for many years to come.
And here she is, all finished up and ready to grace your outdoor living space!
Enhance Your Outdoor Space with Complementary Furniture
A beautiful dining table deserves equally charming seating! The chairs shown with our table perfectly complement its rustic yet chic aesthetic. Ashley made a great find with these, and you can find them HERE! Consider pairing your handmade table with comfortable chairs, benches, or even a mix of both to create an inviting and flexible seating arrangement. Matching or contrasting cushions can add a pop of color and extra comfort, transforming your outdoor dining area into a true extension of your home.
Explore More DIY Dining Table Ideas
If this project has sparked your passion for woodworking, or if you’re looking for variations in style or size, we’ve got you covered! You can find more styles and designs in our DIY Dining Table designs collection. We offer over 25 different plans that will fit any budget, skill level, and aesthetic preference. From farmhouse chic to modern minimalist, there’s a design waiting for you to build your next masterpiece.
Conclusion: Enjoy Your Handmade Masterpiece!
Congratulations on completing your incredible DIY outdoor dining table! You’ve not only saved a significant amount of money but also created a beautiful, durable piece of furniture with your own hands. This project is a testament to what you can achieve with a little effort, some basic tools, and a clear plan. From morning coffee to evening barbecues, this table will be the centerpiece of countless cherished moments in your outdoor space. Enjoy the satisfaction of your craftsmanship, and don’t hesitate to share your finished project with us – we love seeing your creations!