
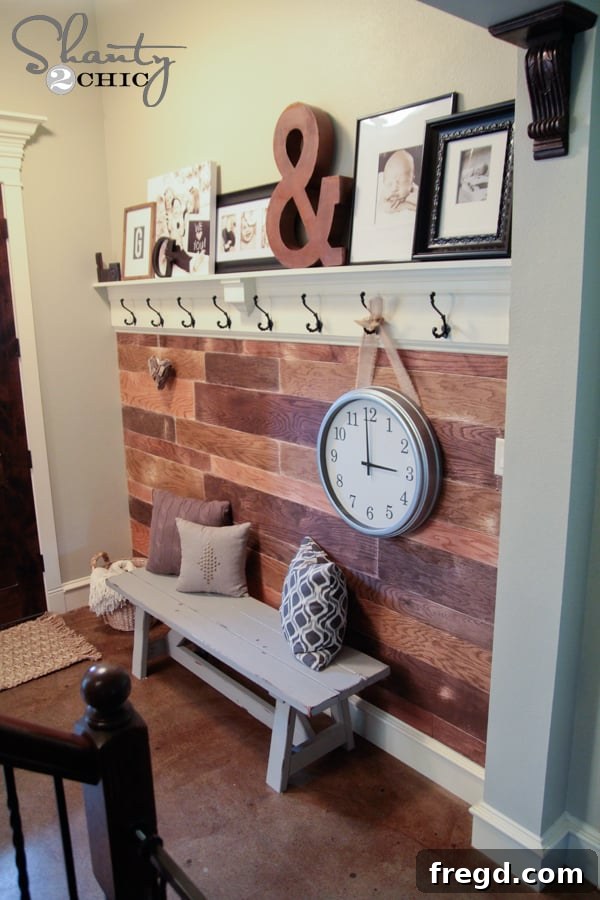
Welcome, fellow DIY enthusiasts! I am absolutely thrilled to finally unveil a project that has been a labor of love and a true game-changer for my home’s entryway: a stunning DIY plank wall. If you’ve been following our journey on Instagram, you’ve caught glimpses of the progress, and now, the moment has arrived to share every exciting detail of this complete transformation! Get ready to be inspired by how our **DIY plank wall in the entryway** turned out – it’s even better than I imagined!
You might be surprised to learn just how simple this project truly is. In fact, I completed the entire planked section of the wall in a single day. That’s right, a full accent wall in mere hours! Today, I’m going to walk you through the entire process, showing you step-by-step how to achieve this stunning look in your own home. Let’s dive into creating your very own **budget-friendly DIY plank wall**!
Why Choose a Plank Wall for Your Home?
Before we get into the “how-to,” let’s chat about the “why.” A plank wall, often associated with a charming farmhouse or rustic aesthetic, offers incredible versatility for modern homes too. It adds texture, warmth, and a unique focal point to any space. Beyond its visual appeal, a **wood plank accent wall** can hide minor wall imperfections, provide a cozy backdrop, and significantly elevate your home’s interior design without breaking the bank. For an entryway, it immediately sets a welcoming and stylish tone, making a memorable first impression.
Selecting Your Materials: The PureBond Plywood Advantage
When planning this project, I prioritized keeping material costs low without sacrificing quality or aesthetics. My immediate choice for the planks was a product we adore and frequently use for our furniture builds: PureBond Plywood. If you haven’t heard us rave about it before, prepare to be impressed!
PureBond is an exceptional hardwood plywood that offers numerous benefits for DIYers and homeowners alike. First, it’s proudly made in the good ol’ USA. More importantly, it’s completely formaldehyde-free, making it a safer, healthier choice for your home and family, eliminating concerns about indoor air quality. It’s also incredibly affordable, allowing you to achieve the luxurious appearance of beautiful hardwood at a fraction of the cost, usually associated with standard plywood. Beyond its environmental and health benefits, PureBond is crafted from reusable resources, underscoring its commitment to sustainability.
But perhaps our absolute favorite aspect of PureBond plywood is its sheer beauty. The natural wood grain is exquisite, providing a perfect canvas for stains and finishes, making it an ideal material for this **entryway plank wall project**. Since discovering it several years ago, it has become our go-to brand for all plywood needs – an easy and confident choice for any project that demands both quality and value.
Smart Prep: Getting Your Plywood Cut at The Home Depot
You can easily find PureBond plywood at The Home Depot. For my wall, I opted for 1/2″ oak plywood. A standard sheet measures a hefty 4′ x 8′, which, as any parent knows, is nearly impossible to maneuver into a car, especially with five energetic kiddos in tow. This is where Home Depot’s fantastic service becomes your best friend!
I highly recommend having the friendly staff in the lumber department rip the large sheets down into manageable boards for you. While the associate did give me a slight look of bewilderment when I rattled off my specific cut list, he quickly got to work, and the entire process was done in no time. This service not only saves you the headache of transport but also ensures precise cuts, which are crucial for a professional-looking **DIY plank wall installation**.
My wall space covered approximately 9 feet in length and rose 6 feet up the wall. For this specific project, I utilized two sheets of the 1/2″ plywood. This strategic approach kept the total cost of the wood under $80, which is an incredible steal for such a dramatic home upgrade! WOOHOO, indeed!
Here’s a breakdown of the cuts I requested at Home Depot to create varying plank widths, which adds visual interest to the finished wall:
SHEET 1 (4’x8′ PureBond Plywood):
– 6 cuts at 4″ wide
– 4 cuts at 6″ wide
SHEET 2 (4’x8′ PureBond Plywood):
– 2 cuts at 6″ wide
– 4 cuts at 8″ wide
Each of these pieces will naturally be 8 feet long, making them perfect for covering significant vertical stretches of your wall. Once cut, load them into your car, and you’re ready to bring home the foundation of your new **rustic entryway plank wall**!
Adding Character: Staining and Distressing Your Planks
To achieve a rich, varied look that gives the wall depth and character, I decided to use five different Varathane stain colors. Varathane stains are fantastic for DIY projects because they dry in under an hour and typically require only a single coat, saving you valuable time. You can easily find a wide array of Varathane stain colors at The Home Depot.
A key tip for efficiency: I stained all the boards *before* cutting them to their final lengths and attaching them to the wall. This allowed for easier application and ensured full coverage. Once the stain was thoroughly dry, I used my Ryobi Corner Cat sander, fitted with 120-grit sandpaper, to gently distress the wood. This step is crucial for achieving that charming vintage or weathered look, adding instant age and character to the new planks. Don’t be afraid to experiment with the amount of distressing – a little goes a long way in creating that perfect **aged wood aesthetic**.
The Art of Installation: Strategic Cutting and Layout
For all my cuts, I primarily relied on my miter saw. Given that PureBond plywood is relatively thin, it’s quite easy to cut accurately. However, if you don’t own a miter saw, a good quality hand saw can absolutely get the job done. While it might require a little more “elbow grease,” it’s a perfectly viable option for this project. My first saw was actually a simple hand saw, and it served me well before I upgraded to my “big girl” saw!
[Consider a link here if appropriate, e.g., to a recommended hand saw. If no specific product is required, keep it general.]
There isn’t a rigid formula for deciding on the exact cut sizes for each plank. My approach was entirely visual and organic. I knew I wanted to avoid having any vertical breaks align, ensuring a more natural, staggered look. Additionally, I consciously tried not to stack two planks of the same size directly on top of each other, nor two planks with the same stain. The goal was to create a dynamic, randomized pattern that would make the wall truly unique.
For instance, here’s how I began laying out the planks on the wall:
You can observe that my bottom board is 4″ wide, followed by an 8″ piece. I made sure to use distinct stain colors for each of these pieces, and yet another different stain for the 6″ piece directly above them. Think of it like a fun puzzle: as I attached each plank, I would measure the remaining space, then cut the next piece to fit perfectly. This method is incredibly intuitive and surprisingly easy to master, allowing for a truly custom **plywood plank wall design**.
To maintain small, consistent gaps between each plank and achieve that classic plank wall look, I utilized an ingenious and readily available spacer: pennies! We happened to have a plentiful supply on hand, and they proved to be the perfect thickness for creating uniform spacing throughout the entire installation. This simple trick ensures a professional finish without needing specialized tools.
Seamless Attachment: Nailing Your Planks into Place
Attaching the wood planks to the wall is, arguably, the easiest part of this whole process! And if you know me, you know how much I absolutely adore my Ryobi AirStrike nailer. This tool is a true game-changer for any DIY project involving fasteners.
The Ryobi AirStrike made securing the planks an absolute breeze. There’s no need to lug around a cumbersome air compressor or tangle with power cords. Simply pop in the battery, and you’re ready to go! I used a few nails into each piece of wood, ensuring a strong and secure hold. The ease and efficiency of this tool dramatically sped up the installation, proving that **DIY wall paneling** doesn’t have to be a complicated affair.
Navigating Obstacles: Working Around Outlets and Switches
When installing a plank wall, you’ll inevitably encounter electrical outlets and light switches. This part requires a bit more care and attention to safety. **Critical Safety Reminder: ALWAYS ensure your circuit breaker is switched OFF for the relevant circuit before attempting any work around electrical outlets or switches.** Never work on live electrical components – it’s a dangerous move that can lead to serious injury.
After safely removing the switch plate, I carefully measured and marked the plank where the outlet or switch would fall. Then, I used my jigsaw to precisely cut a small rectangular opening, matching the size of the electrical box. Once the plank was in place, I gently pulled the inside components of the switch or outlet forward, positioning them flush with the new wood surface. Finally, I used small wood screws to securely attach the electrical box back into the wall, ensuring everything was snug and stable before reattaching the decorative plate. This method ensures both safety and a clean, integrated finish for your **plank wall with outlets**.
Here’s a look at how the outlets appeared before I reattached their cover plates:
Here’s another progress shot, about halfway through the installation process:
And a full shot of the plank wall once all the boards were attached, before adding the top shelf. Please excuse the less-than-perfect lighting and the temporary setup at the bottom – the focus here is purely on the magnificent transformation of the wall itself!
This plank wall alone makes a striking statement, but on Monday, I’ll be sharing the tutorial for creating the coordinating shelf that sits atop it. That project is equally simple and truly elevates the entire look of the **DIY accent wall**, adding both style and functionality.
The Stunning Reveal: Your Transformed Entryway
For now, feast your eyes on a few more shots of the finished plank wall, awaiting its elegant top shelf. What do you think? It’s completely achievable, isn’t it? This project proves that with a little planning and the right tools, you can dramatically enhance your home’s character and create a space that feels inviting and beautifully designed. This **affordable entryway makeover** truly exceeded my expectations.
Thank you so much for taking the time to stop by and explore this exciting project! I truly hope this detailed guide encourages you to tackle your own **DIY wood plank wall**. Please feel free to share this tutorial and pin it to your favorite boards with your friends and fellow DIYers. If you have any questions at all about the process, materials, or tools, don’t hesitate to ask in the comments below! I’m here to help you achieve your home improvement dreams.
~Whitney