
Transform Your Space: A DIY Guide to Fast & Flawless Wall Painting
Happy Monday, everyone! I hope you’re all feeling refreshed and ready to tackle new projects. If you’re eager to follow along with all our creative endeavors from start to finish, make sure to follow us on Instagram! We love sharing our journey and insights with our amazing community.
Recently, I embarked on an exciting mission: redoing my baby son Brooks’ room. The decision to repaint wasn’t taken lightly, as I spent several weeks pondering the perfect wall color. His room had been a very light blue, a color I originally chose for his older sister when we first moved into our house. Over time, the walls had accumulated countless tiny marks and cheerful doodles – a testament to a well-loved space, but definitely ready for a refresh. Without any touch-up paint and no recollection of the original color name, a complete repaint became the most practical and exciting solution.
My quest for the ideal shade led me to Ashley’s new house last week, and I immediately fell in love with some of her sophisticated wall colors. Among them, one truly stood out: a captivating hue called “Seine” by Valspar. The moment I saw it, I knew it was the perfect choice for Brooks’ room – a color that would bring warmth, serenity, and a touch of modern elegance to his growing sanctuary.
With the color decided, I wasted no time. Last Tuesday, after sending the kids off to school, I dove straight into the project. Many people find wall painting daunting, often dreading the time and effort involved. However, I’m here to tell you it doesn’t have to be a multi-day ordeal! Despite starting my taping around noon, I managed to have the entire room painted, furniture moved back, and everything reassembled by 8:00 that very evening. Yes, that even included picking up the kids from school and preparing dinner! For those of you who might feel intimidated by the thought of painting, I truly hope my tips and insights will empower you to tackle your next room makeover with confidence and efficiency.
Let’s dive into the practical steps and smart strategies that help me get my painting projects done quickly and flawlessly!
First, allow me to share a “before” shot of the room. While the previous light blue might appear charming in the photo, it doesn’t reveal the true story of the multiple dings, scuffs, and adorable (yet permanent) artwork contributed by little hands. It was definitely time for a transformative change!
Isn’t that twin bed adorable? Fun fact: I made it myself! If you’re interested in recreating this charming piece for your own home, you can find the detailed tutorial and free plans right HERE!
The Essentials: How I Achieve Professional-Looking Walls in Record Time
The secret to a quick and high-quality paint job lies in meticulous preparation and using the right tools. I always begin by thoroughly moving all furniture away from the walls and covering anything that needs protection. Then comes the crucial step of taping off the trim and ceiling.
If you’ve ever found yourself in the painter’s tape aisle at a hardware store, you know the overwhelming array of options available – each promising perfectly straight lines. I haven’t tried all 4,579,223 variations, but I’ve certainly put many to the test. Through trial and error, I’ve consistently achieved the best results with one particular product. It makes a significant difference in the final outcome, ensuring those crisp, professional edges every DIYer dreams of.
My go-to is Scotch Blue Painter’s Tape with Edge-Lock technology. While it might cost a dollar or two more than standard options, I genuinely believe the investment is worth it. The Edge-Lock feature actively seals the tape’s edges, preventing paint from bleeding underneath and creating incredibly clean lines once removed. I approach taping in small, manageable sections, working my way systematically around the entire room to ensure every edge is perfectly masked.
Next on my preparation checklist is addressing any imperfections on the walls, specifically filling all those pesky nail holes. For this task, my absolute favorite product is 3M’s Patch and Primer. This stuff is a true game-changer!
The application couldn’t be simpler: just use a small putty knife or a scraping tool to smoothly spread a tiny amount of the product over each hole. That’s it! After letting it dry for a short while, your walls are perfectly primed and ready for paint. It works flawlessly for me every single time, saving precious minutes and ensuring a smooth, uniform surface.
For a truly clean and professional finish, I always remove all switch plates and outlet covers from the wall. While you can certainly tape them off if you’re uncomfortable, I find removal much easier and it guarantees no paint gets onto the plates. It’s important to be cautious as this does expose electrical wiring; always avoid touching anything inside the holes. To keep everything safe and paint-free, I cover each exposed switch with tape like this:
Here’s a small but incredibly helpful trick: I use a piece of tape to secure the screws directly onto the removed plate. This prevents them from getting lost or misplaced during the painting process, making reassembly a breeze!
The Painting Process: Steps for a Smooth & Speedy Finish
My first actual painting step is always what I call “cutting in.” This involves painting along the edges where the wall meets the ceiling, trim, and corners. For this precise task, I rely on my absolute favorite roller, the Wooster Jumbo Koter. This compact yet powerful roller allowed me to complete all the cutting-in in under 20 minutes, which is truly remarkable for the precision it delivers! It’s perfectly designed to work with the extension pole I’ll introduce later.
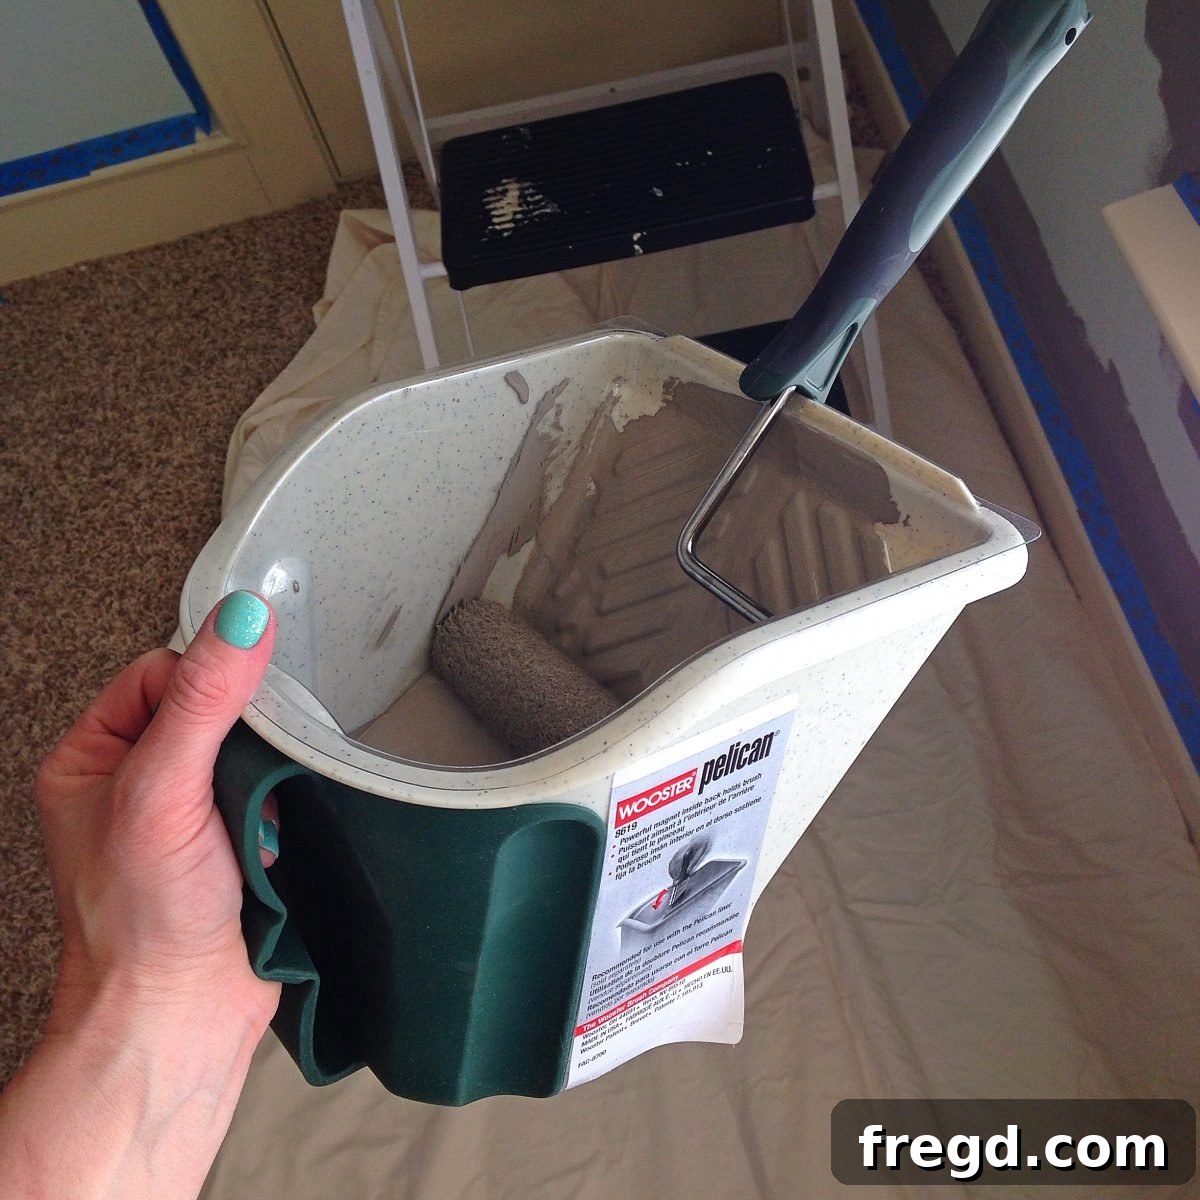
To complement the Jumbo Koter, I also employed my indispensable Wooster Pelican paint pail. I recently shared this ingenious tool on Instagram, and it quickly became a fan favorite – and for good reason! What I adore most about the Pelican pail are its removable trays. These disposable liners mean I don’t have to clean anything up after the job is done, which is a massive time-saver and probably my favorite feature! Additionally, it boasts a clever design that securely holds your roller out of the paint when not in use, preventing drips and keeping your roller ready for the next stroke. It’s incredibly smart and efficient. You can easily find it on Amazon HERE!
Here are some progress shots showcasing the precision and speed of my cutting-in technique!
Inevitably, there will always be those really small, tight spaces that even the most nimble roller can’t quite reach. These often include intricate corners or areas directly adjacent to trim, like this:
For these detail areas, I simply use a small, angled brush. This allows me to fill in all those tiny gaps and ensure full coverage before moving on to rolling the larger sections of the wall, creating a seamless and complete finish.
Here’s another smart trick for your small brushes: once I’m done with the initial painting, I place them in a small plastic baggie and store them in the freezer. This brilliant method keeps the paint from drying out on the brush, making them perfectly ready for any small touch-ups you might need to do once the room is fully reassembled. While the fridge works, I find they last even longer in the freezer!
Now for the main event: rolling the large expanse of the walls! This recent project marked my first time using a specific type of roller, and honestly, I was blown away. It’s truly amazing how much difference the right roller can make. The one I discovered is called the Wooster Sherlock roller system, and I paired it with a 2-4 foot pole, which was ideal for my 8-foot walls.
My absolute favorite aspect of the Wooster Sherlock system is its innovative attachment mechanism to the pole. With many other brands, you often have to frustratingly spin the roller onto the pole, a connection that often loosens or breaks over time. The Sherlock system, however, simply clicks securely into place with the press of a button. It’s pure genius! This feature was a huge advantage, not only for quick setup but also for effortlessly detaching the roller once the painting was complete.
The paint tray I used was another fantastic time-saver. It features excellent plastic liners that adhere securely in place, ensuring, once again, virtually no mess to clean up after you’re finished painting! This combination of smart tools truly streamlines the entire process.
My final painting step involved rolling two coats of paint onto all the previously unpainted wall surfaces. I purchased two gallons of paint for this project, but surprisingly, I only ended up using about two-thirds of one gallon. That’s fantastic efficiency! Now, I just need to find another exciting project to paint in that gorgeous Valspar Seine shade… perhaps a piece of furniture? 😉
And now, for the exciting reveal! Here are a few finished shots showcasing the wonderful new color in Brooks’ room:
Isn’t the new color absolutely stunning? I am completely thrilled with how the Valspar Seine shade transforms the room, making the white trim truly pop and creating a sophisticated yet playful atmosphere perfect for a little boy’s space. And I want to emphasize this again, folks: just like with power tools, having the right painting tools can significantly speed up your work and improve the quality of your results. Investing in good quality supplies is not just about convenience; it’s about achieving a professional finish with minimal effort and frustration.
I sincerely hope this detailed guide has convinced you that wall painting doesn’t have to be a dreaded chore. With a bit of preparation, the right products, and these straightforward techniques, you can overcome any painting fears and create a beautiful, refreshed space in your home. Don’t hesitate to ask me any questions you might have in the comments below – I’m always happy to help!
Thanks so much for stopping by and joining me on this room makeover journey. I can’t wait to share some of the other exciting projects I’m currently working on in this very room with you all very soon!
~Whitney