
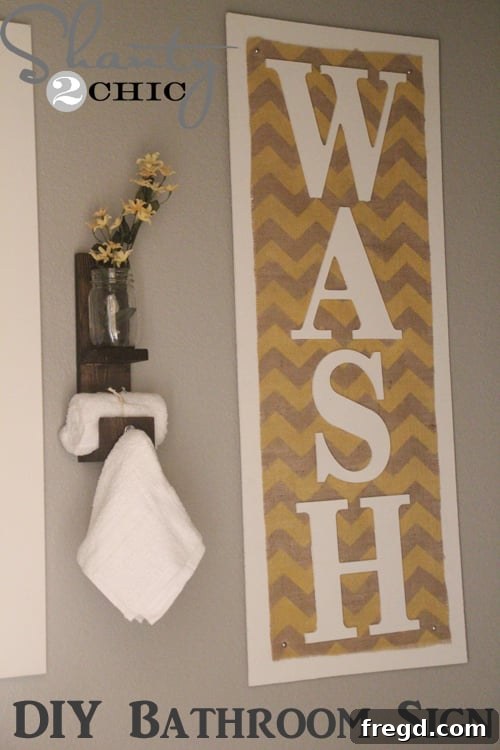
DIY Chevron & Burlap Wall Art: Create a Stylish Statement Piece for Under $15!
Welcome back to my ongoing guest bathroom renovation journey! This week, I’m thrilled to share a project that brings a fresh, bright touch to the space – a custom-made Chevron and Burlap Wall Art piece. Over the past few weekends, I’ve been busy transforming this room, starting with painting the walls and framing the mirror, and then adding a functional yet charming DIY towel hook. Each step has been designed to maximize impact without breaking the bank, and this latest creation is no exception. This particular piece of wall art was not only incredibly inexpensive to make but also surprisingly quick and easy to complete. If you’re looking for a project that delivers big on style with minimal effort and cost, you’ve come to the right place!
Crafting your own wall art offers a fantastic way to inject personality and custom flair into any room. For my guest bathroom, which is quite small and lacks natural light, I wanted something that would visually expand the space and add a touch of warmth and texture. The combination of a crisp chevron pattern and rustic burlap fabric, all framed by a clean white border, achieved exactly that. This DIY endeavor is perfect for beginners and seasoned crafters alike, promising a satisfying result that looks professionally made. Let’s dive into how you can create your very own bespoke piece for roughly $15!
Project Overview: Your $15 Guide to Chic Wall Decor
Before we jump into the detailed steps, let’s get an idea of what makes this project so appealing. For just around $15, and an afternoon of your time, you can create a substantial and stylish piece of wall art that rivals high-end store-bought decor. The total cost can vary slightly depending on sales and coupons at your local craft and hardware stores, but staying within this budget is absolutely achievable. The key to this project’s affordability lies in smart shopping and utilizing common materials effectively. By selecting readily available items like burlap, basic plywood, and pre-cut wooden letters, we keep costs down while ensuring a high-quality finish.
Materials You’ll Need:
- 1.5 yards of Burlap Fabric
- Unfinished MDI (Medium Density Fiberboard) Letters (e.g., “WASH” or your chosen word/initials)
- 2×4 foot sheet of 1/4″ Plywood
- Latex Paint (matched to your home’s trim or desired base color)
- Rust-Oleum Summer Squash Spray Paint (or your preferred stencil color)
- Small box of Furniture Nails (decorative upholstery tacks)
- Gorilla Glue Epoxy (or strong wood adhesive)
- Picture Hanging Wire and Brackets Kit
Tools Required:
- Tape Measure
- Utility Knife or Scissors (for burlap)
- Circular Saw or Jigsaw (for plywood, or ask for cuts at hardware store)
- Paintbrush or Roller
- Silhouette CAMEO (or other craft cutter for stencils, alternatively pre-made stencils or painter’s tape)
- Hammer
- Drill and Screwdriver (for hanging hardware)
- Pencil
Step-by-Step Guide: Crafting Your Chevron & Burlap Masterpiece
1. Sourcing Your Supplies: Smart Shopping for Savings
Our journey begins at the craft store! I headed to Hobby Lobby and picked up 1.5 yards of beautiful burlap fabric, which is incredibly versatile for various DIY projects. For the focal point of the art, I chose unfinished MDI letters. MDI (Medium Density Fiberboard) is a great material for crafts as it’s smooth, takes paint well, and is generally inexpensive. Remember to check for coupons! By utilizing a coupon for the burlap and taking advantage of a 30% discount on the letters, my total spend at the craft store was an astonishingly low $7. Always keep an eye out for sales and coupons; they are your best friends in budget-friendly DIY!
2. Preparing Your Plywood Base: The Foundation of Your Art
Next, it was off to the local hardware store. I purchased a 2×4 foot sheet of 1/4″ plywood for approximately $6. This thin plywood is lightweight but sturdy enough for wall art. If you don’t have a saw at home, most hardware stores offer cutting services for a small fee, or even for free, so don’t hesitate to ask! I custom-cut my board down to 46″ x 18″. The dimensions were determined by eye, taking into account the size of my MDI letters and the specific wall space I intended for the artwork in my guest bathroom. This allows for a good border around the burlap and ensures the letters have enough room. After cutting, I painted the plywood board and the MDI letters with a latex paint I had on hand. I chose a color that matched the existing trim in my house, creating a cohesive and polished look, but you can choose any color that complements your space. Apply at least two coats for full coverage and a smooth finish, allowing ample drying time between coats.
3. Crafting the Chevron Stencil and Preparing Burlap
With the plywood base and letters painted, it’s time to focus on the burlap. I cut the burlap fabric to a size of 43″ by 15″, ensuring it would fit nicely within the painted plywood frame with a consistent border. The star of the show for the burlap is the eye-catching chevron pattern. I created my stencil using my trusty Silhouette CAMEO cutting machine. If you own a Silhouette, you know how incredibly useful it is for custom stencils! Here’s a detailed guide on how to make a stencil with your Silhouette. I simply selected a chevron print, adjusted its thickness to my preference, and then cut multiple pieces (about 4) out of contact paper. I then carefully applied these stencil pieces repeatedly across the burlap until the entire surface was covered with the desired chevron pattern. If you don’t have a cutting machine, don’t fret! You can achieve a similar effect by using painter’s tape to create chevron lines or by purchasing pre-made chevron stencils from a craft store. Precision is key here to get clean lines.
4. Spray Painting the Chevron Pattern
Once the stencil was securely in place on the burlap, I took my project outdoors to a well-ventilated area. This is essential when working with spray paint. I used Rust-Oleum Summer Squash spray paint – a vibrant, cheerful color that would pop against the natural tone of the burlap and complement the light colors of my bathroom. I applied approximately three light coats of spray paint. The key to successful spray painting, especially with stencils, is to apply several thin, even coats rather than one thick coat. This prevents paint from seeping under the stencil and gives a much smoother, more professional finish. Allow each coat to dry to the touch before applying the next. Once the final coat was dry, I carefully peeled off the contact paper stencil to reveal the crisp, striking chevron pattern underneath. The combination of the textured burlap and the vibrant paint creates a truly dynamic visual effect.
5. Assembling Your Wall Art: Burlap and Decorative Nails
Now it’s time to bring all the elements together! I carefully centered the painted burlap onto the plywood board, ensuring an even border of the white-painted plywood was visible all around. To secure the burlap and add a touch of rustic charm, I used decorative furniture nails (also known as upholstery tacks). I purchased a small box of these from my local hardware store for about $2 – another incredibly affordable detail that makes a big impact. I hammered one nail into each corner of the burlap, about half an inch in from the edge. These nails not only hold the burlap firmly in place but also serve as beautiful decorative accents, adding a subtle industrial or farmhouse touch to the piece. Ensure they are hammered in straight and flush with the surface for a clean look.
6. Attaching Your Letters: The Final Touch
The moment of truth – adding your chosen letters! This is where your message comes to life. I used Gorilla Glue Epoxy for its strong bonding capabilities. Epoxy provides a permanent hold, which is essential for ensuring your letters stay securely attached over time, especially in a potentially humid environment like a bathroom. I applied a generous amount of the epoxy to the entire back surface of each painted MDI letter. Then, I carefully positioned and pressed each letter directly onto the burlap, ensuring they were evenly spaced and perfectly aligned to spell out “WASH.” Once all letters were in place, I applied gentle pressure for a few moments and then allowed the epoxy to cure fully, following the manufacturer’s instructions. This usually takes several hours, so patience is key for a strong bond.
7. Hanging Your Masterpiece: Securely Displaying Your Art
The final step is to prepare your beautiful new wall art for display! I used a picture hanging wire and brackets kit that I had purchased previously from my local hardware store. These kits are fantastic because they often come with a variety of hooks and wires, making them suitable for different weights and styles of artwork. While any sturdy picture hanging bracket will work, I highly recommend using a kit that includes wire for ease of leveling. For extra security, especially for a piece of this size, I strongly suggest anchoring a screw directly into a wall stud or using appropriate drywall anchors if a stud isn’t available. This ensures your artwork is hung safely and won’t fall, protecting both your piece and your wall. Measure twice, drill once, and make sure your hanging hardware is securely fastened to the back of the plywood before lifting it into place.
And just like that, the project was complete! A large, custom piece of wooden wall art created for only $15 and a single afternoon’s work. It’s truly rewarding to see your vision come to life with your own hands.
The Transformative Power of DIY Decor
This guest bathroom is naturally very small and, with no windows, it can easily feel dark and enclosed. Before this makeover, it often felt uninviting. I absolutely love how the combination of crisp white accents, which I’ve been incorporating throughout the renovation, and this vibrant “WASH” sign work together to dramatically open up the space and infuse it with much-needed light and character. The chevron pattern adds a playful yet sophisticated dynamic, while the burlap introduces a tactile warmth that prevents the white from feeling stark. It’s truly amazing how a single, thoughtfully chosen piece of decor can transform the entire ambiance of a room.
Tips for Success & Customization Ideas
- Experiment with Colors: While I chose a vibrant yellow, consider colors that match your existing decor or add a bold contrast. Pastels for a softer look, or metallics for glam.
- Personalize Your Message: Instead of “WASH,” think of other words like “RELAX,” “BATH,” or even a single initial for a personalized touch.
- Alternative Stenciling: If a Silhouette machine isn’t available, draw your pattern directly onto the burlap and use painter’s tape to mask off areas, or freehand paint with a steady hand. Many craft stores also sell pre-cut stencils.
- Burlap Alternatives: While burlap offers unique texture, you could try canvas, linen, or even patterned fabric for a different aesthetic.
- Secure Hanging: Always use appropriate wall anchors if you’re not drilling into a stud, especially for larger pieces. Safety first!
- Drying Time: Don’t rush the drying process for paint and glue. This ensures durability and a professional finish.
Why Choose DIY for Your Home Decor?
Embracing DIY projects like this wall art sign comes with a plethora of benefits beyond just saving money. Firstly, you get complete creative control, allowing you to tailor every aspect—from colors and fonts to materials—to perfectly match your home’s aesthetic and your personal taste. Secondly, there’s an immense sense of satisfaction that comes from creating something beautiful and functional with your own hands. It’s a rewarding experience that boosts your confidence and adds unique character to your living space. Finally, DIY projects offer a sustainable approach to home decorating, often utilizing repurposed materials or allowing you to make conscious choices about the products you use. This chevron and burlap wall art is not just a sign; it’s a testament to your creativity and resourcefulness, a unique piece that tells a story and elevates your home.
Thank you so much for stopping by and following along with my guest bathroom makeover! I hope this tutorial inspires you to pick up some supplies and create something wonderful for your own home.
~Ashley
Catch up on my recent guest bathroom projects:
- DIY Towel Hook
- Painted Walls and Framed Mirror