
Build Your Own Portable Air Compressor Cart: Free Plans & Ryobi Kit Review
Welcome back to our exciting 12 Days of Christmas series! Today, we’re thrilled to unveil a game-changer for any DIY enthusiast or seasoned woodworker: a custom-built, portable air compressor cart. This project not only promises to revolutionize your workshop organization but also highlights one of the season’s most incredible tool deals we’ve discovered – the Ryobi Compressor Combo Kit. This powerful kit, often available for just $199 at Home Depot and thehomedepot.com, includes an 18-gauge brad nailer, a 16-gauge finish nailer, a stapler, a versatile hose, AND a compact yet robust compressor. It’s an undeniable value that we couldn’t resist picking up for ourselves and as thoughtful Christmas gifts!
As a bonus for our dedicated readers, during the original run of this series, three lucky individuals had the chance to win their very own Ryobi Air Compressor Combo Kit! While that specific giveaway has concluded, we encourage you to stay tuned for future opportunities and fantastic deals.
Why a DIY Portable Air Compressor Cart is Essential for Your Workshop
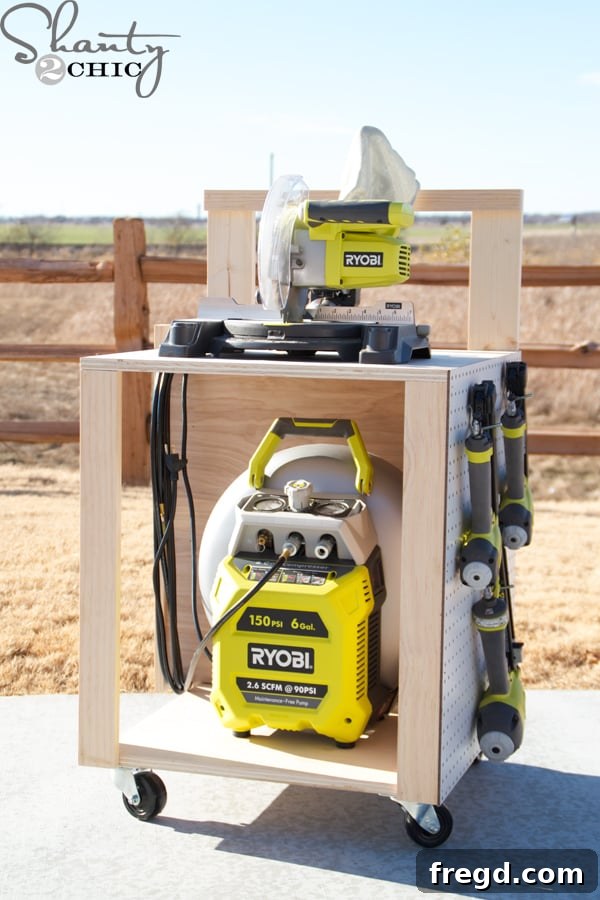
While the Ryobi compressor is impressively lightweight and portable on its own, we quickly realized the immense benefit of housing it on a dedicated rolling cart. Imagine effortlessly moving your compressor, nailers, hose, and essential accessories wherever your project takes you – no more lugging heavy equipment or searching for misplaced tools! This “bad boy,” as we affectionately call it, is designed for ultimate convenience and efficiency. It consolidates all your pneumatic tools into one mobile station, making setup and cleanup a breeze. Whether you’re working in the garage, tackling a project in another room of your house, or even lending a hand at a friend’s place, this tool storage cart transforms your workflow. It protects your valuable equipment, keeps everything organized, and significantly enhances your productivity on any DIY woodworking project.
Get Your Free Printable Plans for the DIY Air Compressor Cart!
Ready to build your own? We’ve made it incredibly easy for you with our comprehensive free printable plans! These detailed plans will guide you through every step of the construction process, ensuring a successful and rewarding build. Don’t miss out on this fantastic resource to create your custom workshop organization solution.
Click HERE or on the image below to instantly download and print your DIY Air Compressor Cart plans!
Tools and Materials for Building Your Air Compressor Cart
One of the most appealing aspects of this project is its accessibility. You don’t need a professional workshop full of high-end tools to achieve fantastic results. I personally built my cart using primarily my Ryobi Air Compressor Kit (specifically the 18-gauge brad nailer) and a reliable saw. The total cost for materials, including essential casters, came in at approximately $70 – an incredibly affordable price for such a versatile and functional piece of workshop furniture.
Here’s a general overview of what you’ll need:
- **Wood:** Plywood and 1×2 lumber (quantities specified in the free plans)
- **Hardware:** Casters (four for easy mobility), 1 1/4″ nails
- **Adhesive:** High-quality wood glue (e.g., Gorilla Wood Glue)
- **Tools:**
- Brad nailer (like the 18-gauge from the Ryobi kit)
- Saw (circular saw or even a jigsaw for plywood cuts)
- Clamps
- Measuring tape and pencil
Step-by-Step Guide: Building Your Ultimate Air Compressor Cart
Follow these straightforward steps, guided by our free plans, to construct your robust and mobile compressor station. Remember to always prioritize safety when working with power tools and to wear appropriate personal protective equipment.
Step 1: Constructing the Back Legs
Begin by assembling the back legs of your cart. If you have access to a workbench, it will greatly assist you in this step. Position the edge of your leg pieces flush with the edge of the workbench, then secure them with clamps. This provides a stable base for accurate attachment. Apply a generous amount of quality wood glue to the joining surfaces before fastening with nails. Wood glue is crucial for adding strength and durability to your joints, ensuring your cart stands the test of time and heavy use.
Here you can see one back leg fully assembled and ready for the next stage of construction. Ensure all connections are square and secure.
Step 2: Preparing Plywood Panels
Next, it’s time to prepare your plywood pieces. If you’re new to cutting large sheets of plywood, don’t worry! Many home improvement stores, including Home Depot, offer a convenient service to rip these pieces to your exact specifications. If you have a circular saw, achieving straight, accurate cuts is simple: just clamp a scrap board to your plywood to serve as a guide. This method ensures clean lines and prevents the saw from wandering, resulting in professional-looking panels for your compressor storage cart.
Step 3: Assembling the Base and Shelves
Once your plywood pieces are precisely cut, begin attaching the bottom panel to the leg assemblies. Again, apply a generous amount of Gorilla Wood Glue to the edges that will be joined, then secure with 1 1/4″ nails. This combination of glue and nails creates an incredibly strong bond, crucial for the structural integrity of your rolling tool cart.
Continue this process by attaching any subsequent shelves in the same manner. Precision here ensures that your shelves are level and ready to hold your compressor and various tools securely.
Step 4: Adding the Top Handle and Divider
Next, attach the top handle. This component is key for guiding and maneuvering your portable workshop station. Ensure it’s firmly secured with glue and nails, as it will bear some stress during movement.
Now, integrate the divider panel. Before permanently attaching it, take a moment to consider the best placement for cord wrapping. I chose to align my cord wrap section with the side where the compressor’s electrical cord naturally exits, ensuring it remains open and easily accessible for storage and deployment. This thoughtful planning contributes to the overall functionality and tidiness of your tool organization cart.
After the divider, attach the main top panel of the cart. This will create the primary work surface or additional storage area, adding significant rigidity to the entire structure.
Step 5: Completing the Front Structure
Just like the back legs, construct the front legs using the same careful assembly techniques involving wood glue and nails. Consistency in construction ensures the cart is balanced and sturdy.
Once assembled, attach the front legs to the main cart body. Then, add a 1×2 piece to the end of the divider for added support and aesthetic finish. On the opposite side, attach the pegboard. This pegboard section is a fantastic feature for hanging frequently used tools, brad nailer storage, finish nailer storage, or other small accessories, keeping them within arm’s reach.
Step 6: Final Touches: Pegboard, Front Panels & Casters
Finally, attach the front panels to the shelves, completing the enclosed structure of your cart. These panels provide aesthetic appeal and prevent tools from falling off. The very last step, but certainly not the least important, is to attach the casters to the bottom of the cart. High-quality casters will ensure smooth, effortless mobility across your workshop floor. With the casters in place, your DIY portable air compressor cart is complete!
Customizing Your Compressor Cart for Ultimate Organization
The beauty of building your own cart is the ability to customize it to your specific needs. The sturdy top surface is perfect for adding an extra tool, like mounting a small miter saw (as I did with my 18-volt miter saw) to create a compact, mobile workstation. Alternatively, you can leave it open to serve as additional workspace for smaller tasks. The pegboard side is a blank canvas for organization; add hooks, baskets, and shelves to store your nailers, air hoses, safety glasses, and other frequently used items. This level of customization ensures that every tool has its place, significantly reducing clutter and saving you valuable time on future projects.
The Perfect Gift for the DIY Enthusiast
This DIY Air Compressor Cart is more than just a functional piece of workshop equipment; it’s also an incredibly thoughtful gift idea. Imagine giving the powerful Ryobi Compressor Combo Kit, and presenting it *inside* this beautifully built cart – essentially making the cart part of the packaging! It’s a memorable and highly practical present for anyone who loves to build and create. Alternatively, if you’re hoping for the Ryobi kit yourself this Christmas, hint to your loved ones that you’d love to receive it so you can then embark on building one of these amazing carts for your own workshop. It’s the gift that keeps on giving, offering organization and efficiency for countless future projects.
Join Our Community & Happy Building!
We hope this project inspires you to tackle your own DIY workshop organization challenges. Building this rolling compressor cart is a rewarding experience that pays dividends in convenience and efficiency. Don’t forget to download our free plans and share your completed projects with us! We love seeing how our community brings these ideas to life. Be sure to explore the rest of our 12 Days of Christmas series for more inspiring projects and fantastic finds.
Happy Building!