
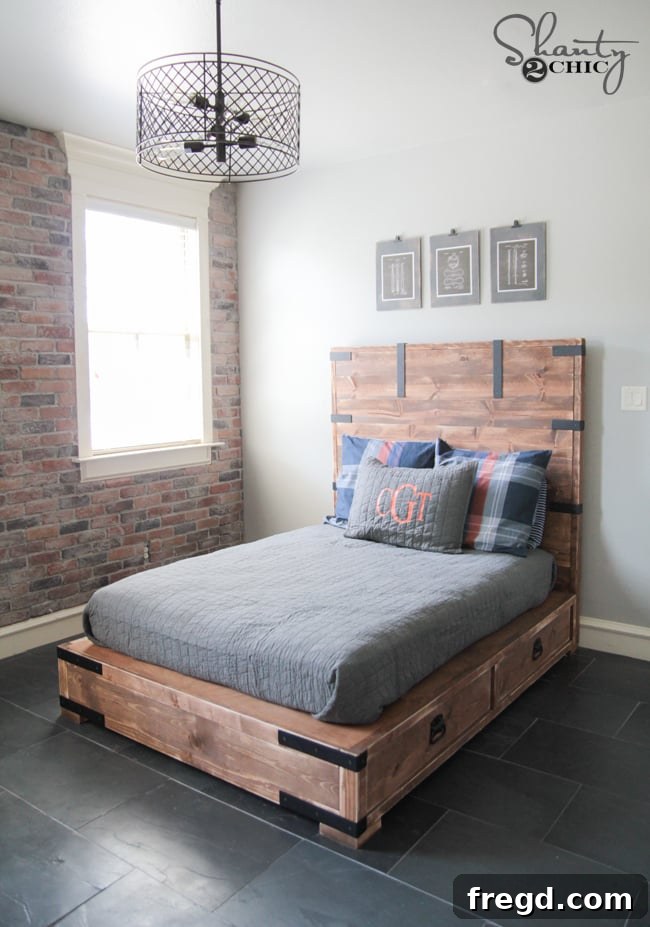
Welcome, fellow DIY enthusiasts! Are you ready to transform your bedroom with a stunning, functional, and incredibly space-efficient piece of furniture? Look no further than this fantastic DIY Full or Queen Size Storage Bed. This project isn’t just about building a bed; it’s about creating a true bedroom storage solution that will revolutionize how you organize your space. Say goodbye to clutter and hello to clever design!
I’m absolutely thrilled to share this woodworking project with you. Honestly, I’m so in love with this bed, I might just trade sleeping quarters with my son! The design allows for incredible storage without sacrificing an ounce of style. Whether you need a full-size storage bed or a queen-size storage bed, these plans are versatile enough to accommodate your needs. For instance, my son’s bed features a full-size mattress, which leaves a beautiful platform border around the bed – a look I particularly adore. However, it’s also designed to perfectly fit a queen-size mattress without the platform showing, giving you flexibility in your design choices.
Isn’t it amazing? The sheer amount of storage under this bed means absolutely no wasted space. Plus, a huge bonus for parents: no more hidden junk accumulation underneath! This DIY storage bed truly is a win-win situation. As always, I’m sharing the complete build process and providing free, comprehensive plans right here on the blog. Stick around until the very end of this post, and I’ll even reveal all the details on where to source the beautiful accessories, sturdy hardware, perfect paint, and everything else you’ll need to complete your own handcrafted bed.
Download Your Free DIY Storage Bed Plans!
Ready to get started on your own custom bed frame? Don’t delay! Click HERE or use the button below to download and print the detailed FREE PLANS for this incredible Full or Queen Size Storage Bed. These plans make building your own furniture simple and enjoyable.
Essential Tools and Materials for Your Woodworking Project
Before diving into the build, let’s talk about some key tools and materials that made this project a breeze. One of the most invaluable tools for this DIY storage bed was my K5 Kreg Jig. This ingenious tool makes creating strong, hidden pocket holes incredibly easy, which is essential for durable furniture construction. For this build, I actually utilized two K5 jigs: one permanently attached to my workbench for smaller pieces, and another mounted to a scrap piece of 3/4″ plywood, allowing me to easily move it to the floor for longer boards. This setup was perfect for adding all the necessary pocket holes along the sides of each panel.
For the primary material, this storage bed relies on several sheets of high-quality 3/4″ plywood. I highly recommend one of my favorite products: PureBond Hardwood Plywood. You can typically find it in the lumber section at Home Depot. For this particular build, I opted for Birch PureBond, and the results were stunning. This product is truly amazing because it stains beautifully, mimicking the look of true hardwood without the hefty price tag. An added bonus? It’s made right here in America using sustainable resources, making it an eco-friendly choice for your home improvement projects. To learn more about PureBond plywood and its benefits, visit their website HERE.
Building the Foundation: Front, Back, and Side Frames
The very first step in constructing this robust storage bed is to build the front and back frames. This involves meticulously adding 3/4″ pocket holes to your plywood boards, as demonstrated in the image below. These precisely placed pocket holes will ensure strong, seamless joints when assembling your DIY bed frame.
Once your pocket holes are ready, apply a generous line of wood glue and then attach these PureBond plywood panels to your 2×4 boards using 1.5″ pocket hole screws. This combination of glue and screws creates an incredibly strong bond, ensuring the longevity and stability of your new Full or Queen Size Storage Bed.
Next, we move on to the sides of the bed, which will ultimately form the frames for your storage drawers. For this part, I decided to use my Ryobi table saw to rip my own 2×2 lumber from 2x4s. This often yields a much higher quality and straighter piece than the pre-cut 2x2s available in stores. Again, the Kreg Jig came in handy here; I added 1.5″ pocket holes to these boards to prepare them for assembly.
Assembling the side frames begins with securing the corner pieces, followed by the center supports. This methodical approach ensures precision and strength in your drawer framing, a critical component of any well-built storage bed.
With the side frames complete, the next step is to attach them securely to the previously built front and back panels. A Kreg Right Angle Clamp proves incredibly helpful during this stage, acting like an extra pair of hands to hold pieces perfectly square while you drive in the screws. This ensures that the overall structure of your DIY storage bed is perfectly aligned and sturdy.
At this point, you’ll start to see your bed truly taking shape! The frame will begin to look like a robust base for a Full or Queen Size bed with ample space for integrated storage. It’s an exciting milestone in your woodworking journey.
Constructing the Bed Base and Drawer Runner System
Following the main frame assembly, I attached the central PureBond support piece using 1.25″ pocket hole screws. This central support is crucial for the structural integrity of your DIY storage bed, providing a solid foundation for both the mattress and the drawer system.
Next up were the runners for the drawers – a critical part of making this a true storage bed. We utilize a fantastic wood drawer slide system that I absolutely love for its simplicity and effectiveness. Most pieces were attached using pocket holes and pocket hole screws, ensuring strong, reliable connections. Additionally, I used a combination of wood glue and Spax screws to attach the side 2×2 pieces for maximum durability. This system provides smooth operation for your drawers, making accessing your stored items effortless.
Here are some additional progress shots to better illustrate how the drawer slide system came together and the various components involved in building the base of this Full or Queen Size Storage Bed. Observe the careful placement of drawer guides and supports, all designed to ensure smooth functionality and a long-lasting storage solution.
Tools like a finish nailer and an impact driver are indispensable for efficient and precise assembly. The finish nailer is perfect for attaching trim and smaller components, providing clean, almost invisible fasteners. Meanwhile, an impact driver offers powerful torque for driving larger screws quickly and effectively, such as when securing the bed’s feet.
Here’s another progress shot, showcasing the bed frame nearing completion. The robust structure and integrated drawer runners are now clearly visible, promising both durability and exceptional storage capability.
Adding the Feet and Decorative Trim
To finish off the bed’s base, I used my impact driver and durable Spax screws to attach the feet. These provide stability and elevate the bed, giving it a polished look. Following that, I used my nailer in conjunction with wood glue to meticulously attach the decorative trim around the outside of the bed frame. This trim not only enhances the bed’s aesthetic appeal but also conceals any visible joinery, giving your DIY furniture a professional, finished appearance.
Constructing the Storage Drawers
After completing the main bed frame, it was time to move on to the storage drawers themselves. These are surprisingly simple to build, designed for maximum functionality. The sides of each drawer are crafted from 1×6 lumber, attached with 1.25″ pocket hole screws, ensuring strong and rigid drawer boxes. The base of each drawer is made from PureBond plywood, securely glued and nailed into the side frames. This combination results in lightweight yet incredibly sturdy drawers that will stand up to daily use in your new Full or Queen Size Storage Bed.
Finally, to complete the drawer assembly, I glued and nailed the drawer face frames to the drawer boxes using 1.25″ finish nails from the inside of the drawer side. This method ensures a clean, seamless exterior appearance for your storage drawers.
Crafting the Stylish Headboard
Now for the headboard – the grand finale! Compared to the detailed bed base, building the headboard is remarkably straightforward and much faster. This simple yet stylish headboard will beautifully complement your DIY Full or Queen Size Storage Bed.
You’ll start by cutting your 2×3 lumber pieces and creating 1.5″ pocket holes on the bottom of each side. These strategically placed pocket holes are essential for securely attaching the headboard to the main bed frame, ensuring a robust and stable connection.
Next, I began planking the 1x boards into each side of the headboard frame, securing them with 1.25″ pocket hole screws. This creates the classic planked look that adds so much character to the headboard.
Continue planking, ensuring even spacing and secure attachments for each board. This iterative process quickly brings the headboard to life, revealing its beautiful texture and design.
Even with a skilled builder, a little help always makes a project more enjoyable and often more efficient! My little helper was on hand to lend a hand (or paw!) during the headboard construction.
Almost done with the beautiful planked face of the headboard! The progress is truly satisfying as each board adds to the overall aesthetic of this custom bed frame.
Once the front of the headboard was complete, I stood it upright to easily attach the three crucial support boards to the back. These boards add significant rigidity and strength to the headboard, ensuring it remains stable and securely attached to the bed.
Finishing Touches: Staining, Hardware, and Decor
With the entire bed and headboard constructed, the next step was to apply the finish. I highly recommend staining all components before moving them into the house and performing the final assembly. This ensures thorough coverage and a cleaner finish without worrying about getting stain on walls or floors.
For my son’s bed, I chose Varathane Wood Stain in Early American. This rich, warm hue provides a timeless look that beautifully highlights the natural grain of the PureBond plywood. You can easily find this stain at your local Home Depot, making it accessible for your DIY storage bed project.
Now, let’s talk about the hardware! It adds such incredible character and a unique industrial-chic touch, right? The custom metal straps are truly “amazeballs.” We have a fantastic local friend who owns an incredible Etsy shop called Wayne Works. I shared my vision for these distinctive metal straps, and he brought them to life, creating a custom set specifically for this Full or Queen Size Storage Bed. And guess what? He’s making that exact set available to you too! They attach effortlessly to the wood with simple drywall screws, making installation a breeze. You can find the link to purchase this decorative strap set HERE. These unique touches truly elevate the design of your DIY furniture. Go check out his shop and grab some for your project!
The drawer handles on the bed are outdoor pulls sourced from Home Depot, which I spray painted black to perfectly match the metal straps and create a cohesive, stylish look. These subtle details truly complete the aesthetic of the Full or Queen Size Storage Bed.
Styling Your New Bedroom Storage Solution
Beyond the build, the right styling can truly make your DIY storage bed shine. Here’s a breakdown of the bedding and room elements that brought this bedroom to life:
**The Bedding:** For a personalized touch, I used my Silhouette Cameo cutting machine to create his monogram out of orange iron-on material, which I then proudly attached to a pillow. This machine is fantastic for custom fabric projects! The cozy gray quilt and matching sham were delightful finds at Target. To complete the look, the stylish plaid euro cases were purchased from PBTeen, adding texture and warmth.
**Room Enhancements:** The durable and attractive flooring throughout the room is from The Tile Shop; you can find more information about its installation and style HERE. The eye-catching brick wall behind the bed was another rewarding DIY project, which I shared detailed instructions for HERE. The calming wall color is Mindful Gray (SW 7016) by Sherwin Williams, offering a perfect neutral backdrop. And finally, the striking metal lattice pendant light fixture above the bed, which ties the industrial elements together, is from Lamps Plus; you can view it HERE.
Embark on Your Next DIY Adventure!
Building your own Full or Queen Size Storage Bed is an incredibly rewarding woodworking project that delivers both functional storage and a beautiful, custom piece of bedroom furniture. From the sturdy PureBond plywood construction to the clever Kreg Jig joinery and the stylish finishing details, every step contributes to a truly unique space-saving bed. We hope this detailed guide and our free plans empower you to create a personalized storage solution that brings joy and organization to your home. Don’t forget to grab your FREE PLANS and share your creations with us! Happy building!