
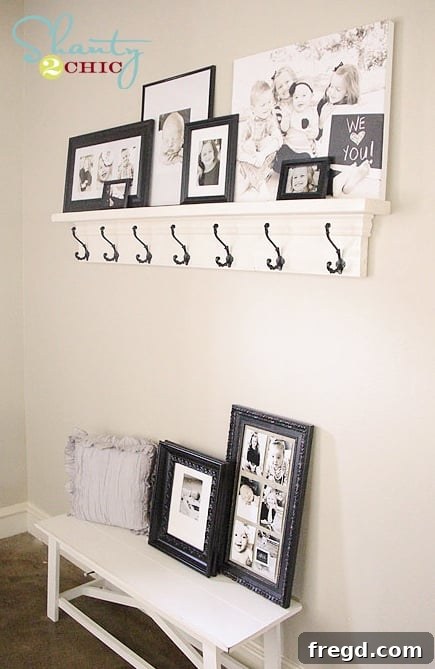
DIY Farmhouse Shelf with Hooks: An Easy Woodworking Project for Beginners
Welcome, fellow DIY enthusiasts! Today, we’re diving into one of our most beloved and frequently asked-about projects: the versatile DIY shelf with hooks. This isn’t just any shelf; it’s a charming, functional piece that can transform any space, offering both storage and a touch of farmhouse elegance. If you’ve been searching for an approachable woodworking project, something that yields stunning results without requiring advanced skills, then you’ve found it. This simple build is perfect for beginners and can be completed in just an afternoon!
The beauty of this project lies in its simplicity and adaptability. Whether you need a practical entryway organizer, a decorative living room accent, or a functional mudroom solution, this shelf is designed to fit seamlessly into your home. It’s a fantastic way to add character and custom storage, often at a fraction of the cost of store-bought alternatives. Let’s get building!
Why Build Your Own Custom Shelf with Hooks?
For a long time, I dreamt of having a classic mantelpiece in my home, but my fireplace layout simply didn’t allow for one. That’s where the inspiration for this project came from. While it’s not a traditional mantel, this DIY shelf with hooks offers a similar aesthetic and a wonderful platform for displaying cherished items, much like a mantel would. It provides that cozy, inviting focal point I always desired, proving that with a little creativity, you can achieve your home decor dreams, even with space constraints.
Beyond its decorative appeal, a shelf with hooks is an incredibly practical addition to any household. Imagine a tidy entryway where coats, bags, and keys have their designated spots, or a mudroom where kids’ backpacks and sports gear are neatly organized. This project isn’t just about building a piece of furniture; it’s about crafting a solution that enhances your daily life, reduces clutter, and adds a personalized touch to your home’s interior design. It’s an investment in both style and functionality.
Gather Your Tools and Materials
One of the best aspects of this DIY shelf is that it requires a relatively short list of materials and common woodworking tools. Most items can be found at your local hardware store like Home Depot or a craft store like Hobby Lobby, making this an accessible project for anyone eager to get started. Preparing everything beforehand will make your building process smooth and efficient.
Wood Components:
- 1 piece of 2×6 lumber: Cut to 5.5 feet (66 inches) long. This will form the top shelf surface.
- 1 piece of 2×8 lumber: Cut to 5 feet (60 inches) long. This will serve as the back support, against which the hooks are attached.
Hardware & Adhesives:
- Wood glue: For a strong, lasting bond between wood pieces.
- 2 1/2-inch wood screws: To secure the main wood pieces together.
- Decorative casing molding: Choose a simple, flat-backed profile that complements your desired style. This adds a touch of sophistication without the complexity of crown molding.
- Finishing nails: To attach the molding neatly.
- 1-inch drywall screws: For attaching the hooks securely to the 2×8 backboard.
- 3-inch long screws: For mounting the completed shelf to wall studs, ensuring maximum stability.
- Wood filler: To conceal screw holes and imperfections.
- Caulk: For sealing edges and nail holes, creating a seamless finish.
Finishing Supplies:
- 120-grit sandpaper or sanding block/orbital sander: For smoothing surfaces and preparing for paint.
- Paint: Rust-Oleum Painter’s Touch in Heirloom White (or your preferred color/finish).
- Paintbrush or paint sprayer: For applying an even coat of paint.
- Decorative hooks: We used seven hooks, found at Hobby Lobby for $2.99 each, perfect for stockings or coats.
Essential Tools:
- Measuring tape: For accurate cuts and placements.
- Saw: A miter saw is ideal for precise 45-degree angle cuts on the molding, but a circular saw can also work for the main wood pieces.
- Drill/Driver: To pre-drill holes and drive screws.
- Cordless brad nailer (e.g., Ryobi AirStrike): Highly recommended for attaching molding. Its cordless convenience and ease of use make it a fantastic tool for DIYers. It shoots up to 2-inch nails and runs on the same 18V battery system as many other Ryobi tools, making it a powerful and portable asset. You can find these excellent Ryobi tools at Home Depot.
- Stud finder: Crucial for safely and securely mounting the heavy shelf to your wall.
Step-by-Step Guide to Building Your DIY Shelf
With your materials and tools at hand, let’s embark on the construction process. Follow these straightforward steps to build your custom shelf with hooks.
1. Assembling the Shelf Base
Begin by creating the foundational structure of your shelf. Take your 5.5-foot 2×6 and your 5-foot 2×8. The 2×6 will form the top surface of the shelf, while the 2×8 will be the back panel where your hooks will attach. Apply a generous bead of wood glue along one edge of the 2×8. Carefully align the 2×6 on top of the 2×8, ensuring the ends are flush on one side and the 2×6 extends slightly past the 2×8 on the other, creating a classic shelf overhang. Use 2 1/2-inch wood screws to securely fasten the 2×6 to the 2×8. Drive screws every 10-12 inches along the joint for maximum strength. This foundational step is critical for the shelf’s stability and longevity.
2. Adding Decorative Molding
To elevate the aesthetic of your shelf, we’ll add a touch of decorative molding. Instead of the more complex crown molding, we opted for simpler casing molding. Casing has a flat back, making it significantly easier to cut and attach. Measure and cut your casing pieces to fit around the exposed edges of your shelf. For clean corners, cut the ends at a 45-degree angle. Apply wood glue to the back of the molding pieces and attach them using finishing nails. This is where a tool like the Ryobi AirStrike nailer truly shines, making quick and precise work of fastening the molding. This step adds a professional, finished look to your DIY project.
3. Preparing for Finishing: Caulking and Sanding
With the construction complete, it’s time to prepare the shelf for its final finish. This crucial step ensures a smooth, professional appearance. Use caulk to fill any gaps along the edges, especially where the molding meets the main shelf body, and to cover all nail holes from the finishing nails. Allow the caulk to dry completely according to manufacturer instructions. Once dry, sand the entire shelf thoroughly using 120-grit sandpaper. This will smooth out any rough spots, remove pencil marks, and create an ideal surface for paint adhesion. A well-sanded piece is the secret to a flawless paint job.
4. Painting Your Shelf
Now for the transformation! We chose Rust-Oleum Painter’s Touch in Heirloom White for its beautiful, classic finish, which perfectly complements a farmhouse aesthetic. This paint is readily available at Home Depot and Hobby Lobby. Apply two even coats of paint to your entire shelf, allowing ample drying time between coats. If using a sprayer, ensure good ventilation and follow safety guidelines. If brushing, aim for smooth, consistent strokes. For a different look, you could also consider staining the wood or using a distressed paint technique to enhance its rustic charm.
5. Attaching the Hooks
Once your paint is fully dry and cured, it’s time to add the functional element: the hooks! We selected seven hooks, perfect for hanging stockings during the holidays or everyday items. These were a fantastic find at Hobby Lobby for just $2.99 each. Measure and mark the desired placement for each hook along the bottom edge of the 2×8 backboard. Ensure even spacing for a balanced look. Pre-drill small pilot holes to prevent splitting the wood, then attach each hook securely using 1-inch drywall screws. This step brings your shelf to life, turning it into a truly practical storage and organization solution.
6. Mounting Your Shelf Securely to the Wall
Given the solid wood construction, this shelf is quite substantial, so secure mounting is paramount. This is a two-person job due to its weight and length. Start by using a stud finder to locate and mark the wall studs where you plan to hang the shelf. These studs provide the strongest anchor points. With assistance, hold the shelf in place, ensuring it’s level. Drill four 3-inch long screws directly through the 2×8 backboard of the shelf and into the marked wall studs. Aim for at least two screws per stud for maximum stability. This method guarantees your shelf is incredibly sturdy and can safely hold decorative items, coats, or even heavier holiday stockings.
7. Finishing Touches
After the shelf is securely mounted, you might notice the visible screw heads. Don’t worry, we have a simple fix! Fill these holes with wood filler, allowing it to dry completely. Once dry, lightly sand the patched areas smooth and apply a small touch-up paint to match the rest of the shelf. This final step seamlessly blends the mounting hardware into the shelf, making it look professionally installed and good as new. Now, stand back and admire your handiwork – the building process is complete!
Customization and Personalization Ideas
While we love the heirloom white farmhouse look, this DIY shelf is a blank canvas for your creativity. Consider staining the wood for a rich, natural finish that highlights the grain. Or, experiment with different paint colors to match your existing decor – a vibrant pop of color for a kids’ room, or a subdued grey for a minimalist aesthetic. The hooks themselves offer another opportunity for personalization; choose antique brass for a vintage feel, sleek black for modern flair, or whimsical shapes for a playful touch. You can even vary the length of the shelf to fit specific wall spaces or add extra detailing like decorative corbels for a more elaborate mantel-like appearance. This project truly adapts to your unique style and needs.
A Budget-Friendly and Rewarding Project
One of the most gratifying aspects of this project is its affordability. We completed this entire shelf for under $40, and more than half of that cost was for the decorative hooks! Building it yourself not only saves money compared to purchasing a custom-made or high-end store-bought piece, but it also gives you immense satisfaction. There’s a unique pride that comes with creating something beautiful and functional for your home with your own hands. This shelf isn’t just a piece of furniture; it’s a testament to your DIY spirit and a custom addition tailored perfectly to your space.
Decorating Your New Farmhouse Shelf
Now for the fun part – decorating your magnificent new shelf! This piece is a fantastic platform for displaying all sorts of treasures. I particularly love using it to showcase lots of my kiddos’ pictures, which brings so much warmth and personality to the space. You can also adorn it with small plants, vintage finds, seasonal decor, or meaningful souvenirs. The hooks, of course, are perfect for coats, hats, bags, or festive holiday stockings. Let your imagination run wild and style your shelf to reflect your personal taste and the current season, constantly refreshing your home’s look.
Conclusion: Your New Favorite Home Decor Piece
We hope you’ve enjoyed this detailed guide to building your very own DIY shelf with hooks. It truly is a project that delivers on all fronts: ease of construction, budget-friendliness, and incredible aesthetic and functional value. This simple woodworking endeavor results in a beautiful, sturdy piece that feels custom-made for your home. It’s perfect for adding that farmhouse charm, organizing your entryway, or creating a unique display area.
We’d absolutely love for you to share your creations and pin this project to your favorite boards! Your enthusiasm helps us continue to bring exciting new DIY ideas to life. Thank you so much for stopping by and being a part of our creative community. We have many more super fun projects and ideas coming your way that we’re eager to share, so be sure to stick around!
~Whitney