
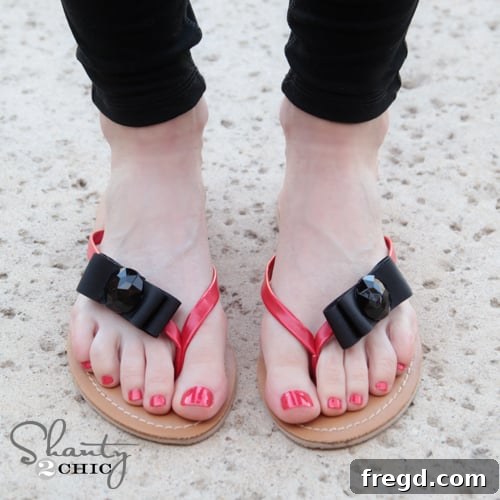
DIY Shoe Clips: Elevate Your Footwear with Custom Style and Flair
Hello, fellow craft enthusiasts and style seekers! There’s nothing quite like the satisfaction of finding that perfect accessory to complete an outfit. However, my journey to find the ideal pair of shoes to complement a specific look often ends in frustration. Sound familiar? That’s where the magic of DIY truly shines! This past Easter weekend, a brilliant idea sparked, and I’m thrilled to share the incredibly simple yet transformative project that emerged: custom shoe clips. If you adore shoes as much as I adore crafting, get ready to discover a game-changing way to personalize your footwear collection.
Transform Any Pair: The Versatility of Shoe Clips
Shoe clips are a truly ingenious accessory. They are removable embellishments that can instantly transform the look of any shoe, offering unparalleled versatility without committing to permanent alterations. Whether you want to add a touch of sparkle to your heels, a playful bow to your flats, or a unique charm to your sneakers, shoe clips make it possible. This project is not only incredibly easy and affordable, but it’s also a fantastic way to express your personal style. And if you have daughters or younger girls in your life, they will absolutely adore creating and wearing these!
The beauty of DIY shoe clips lies in their simplicity. All you really need is a little glue and a dash of creativity. In this comprehensive guide, I’ll walk you through the process of making elegant bow shoe clips, and by the end, you’ll see just how boundless the possibilities are for creating your own unique footwear statements.
Gathering Your Essential Supplies for Custom Shoe Clips
Before we dive into the creative process, let’s ensure you have everything you need. One of the best aspects of this DIY project is that most of the materials are readily available at craft stores, fabric shops, or even online. You might even have some of these items lying around your home!
Materials You’ll Need:
- Ribbon: Choose your favorite colors, patterns, and textures. Satin, grosgrain, velvet, or lace ribbons all work wonderfully. The width of your ribbon will determine the size and prominence of your bow.
- Hot Glue Gun & Glue Sticks: An essential tool for quick and secure bonding. Ensure your glue gun is clean and ready to go.
- Assorted Embellishments: This is where your personality shines! Think buttons, beads, rhinestones, small fabric flowers, miniature charms, or even pieces of old jewelry.
- Shoe Clip Blanks: These are the base components that allow your creations to clip onto shoes. They typically have a flat surface for gluing and a spring-loaded clip mechanism.
- Heavy-Duty Craft Glue: While hot glue is great for attaching embellishments to your bow, a stronger, more flexible craft glue is recommended for securing the shoe clip blank to your finished design, ensuring durability.
- Scissors: For cutting ribbon and other materials cleanly.
- Optional: End Cutter Pliers: If you plan on using shank buttons (buttons with a loop on the back), these pliers are invaluable for removing the shank for a flat surface.
Step-by-Step Guide: Crafting Your Signature Bow Shoe Clips
Let’s get started on making those beautiful bow shoe clips. This method is incredibly forgiving, allowing for variations as you become more comfortable with the technique.
Step 1: Selecting and Preparing Your Ribbon
Begin by selecting the ribbon you wish to use for your bow. Consider the overall aesthetic you’re aiming for – a wide, stiff ribbon will create a dramatic, structured bow, while a narrower, softer ribbon will result in a more delicate and flowing design. Cut a piece of ribbon to your desired length. For a substantial bow, I often start with a piece roughly 12-18 inches long, but feel free to experiment. The exact length will depend on the ribbon width and how many loops you want in your bow.
Step 2: Folding Your Ribbon into a Beautiful Bow
Now comes the fun part: shaping your bow! Take your ribbon and begin folding it back and forth, creating a series of loops that resemble an accordion. As you make each fold, secure the center with a small dot of hot glue. This technique is fantastic because it works seamlessly with both solid-colored ribbons and double-sided patterns. If you’re working with ribbon that has a print on only one side, don’t fret! You can simply create two separate, smaller bows and then glue them together at the back, ensuring the patterned side is always facing outwards. It’s just as easy and yields a beautiful result.
Step 3: Embellishing Your Bow with Flair
Once your bow is formed and securely glued in the center, it’s time to add that personal touch with embellishments. This is where you can truly let your creativity soar! Using your hot glue gun, carefully attach buttons, rhinestones, small beads, or any other decorative elements you’ve chosen to the very center of your bow. Play with textures and contrasts to make your design pop. A single statement button can be incredibly elegant, while a cluster of small beads can add intricate detail and sparkle.
Step 4: Attaching the Shoe Clip Blank
The final step in creating your functional shoe clip is attaching the clip mechanism itself. These blanks are specifically designed for this purpose, featuring a flat base for gluing and a sturdy clip. They are widely available at craft stores like JoAnn’s and can also be found in various quantities through online retailers such as Amazon. Look for “shoe clip blanks” or “shoe clip findings” when searching.
To secure the shoe clip blank to the back of your embellished bow, I highly recommend using a strong, heavy-duty craft glue rather than hot glue. While hot glue provides instant adhesion, a good craft glue offers a more durable and flexible bond that can withstand the flexing and movement of walking. Apply a generous amount of glue to the flat surface of the shoe clip blank and carefully press it firmly onto the back center of your bow. Hold it in place for a few moments and then allow it to dry completely according to the glue manufacturer’s instructions, typically several hours or overnight, to ensure maximum strength.
You can find a variety of suitable heavy-duty craft glues at your local craft store or online by searching for “industrial strength craft glue” or similar terms. Brands like E6000 or Beacon’s Fabri-Tac are popular choices for their strong, long-lasting bonds on various materials.
Styling Your New Shoe Clips: Endless Possibilities!
And that’s it! Your custom shoe clips are complete. This super simple, incredibly fun, and undeniably cute project allows you to instantly upgrade any pair of shoes in your wardrobe. The best part is the sheer versatility. You can clip them on any type of footwear to instantly change its character and complement your outfit.
Imagine transforming a simple pair of black pumps into elegant evening wear with a touch of sparkly bows, or adding a pop of color to neutral flats for a vibrant daytime look. Shoe clips are fantastic for:
- Heels: Instantly dress up a classic heel for special occasions or a night out.
- Flats: Add personality and charm to everyday comfort.
- Sandals & Flip-Flops: Elevate your casual summer footwear with fun, seasonal designs.
They are also super cute on flip flops! Add a tropical flower or a nautical-themed bow to your beach footwear.
Beyond Bows: Unleashing Your Creativity with Shoe Clip Designs
As I mentioned, the possibilities for customization are truly endless! While bows are a classic and charming choice, you can venture into countless other designs. Think rosettes made from fabric or ribbon, delicate lace embellishments, an array of colorful buttons, sparkling rhinestones, intricate beadwork, or even small charms. Let your imagination guide you!
Transforming Buttons into Bespoke Clips
One of my favorite variations involves using large, eye-catching buttons. I once found some really gorgeous gold buttons at JoAnn’s that were half off – which, of course, made them even cuter! Buttons often come with a small loop or “shank” on the back, which needs to be removed to create a flat surface for gluing the shoe clip.
To remove the shank cleanly and easily, I use end cutter pliers. These are incredibly useful for various crafting and building projects, allowing you to snip off small protrusions with precision. Just carefully position the pliers around the shank and snip it off, leaving a smooth, flat back on your button. You can find a great selection of high-quality end cutter pliers at hardware stores or online retailers. Simply search for “end cutter pliers” or “flush cut pliers.”
After I cut the shank off, I simply glue the shoe clip blank to the now-flat back of the button using heavy-duty craft glue, just like with the ribbon bows. Done. Simple, elegant, and perfectly customized!
More Inspiring Ideas:
- Fabric Flowers: Craft small fabric flowers from satin, chiffon, or felt for a soft and romantic look.
- Lace Medallions: Cut out intricate patterns from lace trim and layer them for a vintage-inspired design.
- Seasonal Themes: Create clips for holidays or seasons – tiny pumpkins for fall, snowflakes for winter, vibrant blooms for spring.
- Bridal Bling: For weddings, consider delicate pearl clusters, rhinestones, or lace accents to add a special touch to bridal shoes.
- Kids’ Favorites: Let children pick out small plastic toys, pom-poms, or their favorite cartoon character buttons to create fun clips for their shoes.
- Upcycled Jewelry: Breathe new life into old earrings, brooches, or charm bracelets by repurposing their elements into shoe clips.
Pro Tips for Durable and Long-Lasting Shoe Clips
To ensure your handmade shoe clips stand the test of time and maintain their beauty, here are a few extra tips:
- Quality Glue is Key: Don’t skimp on the heavy-duty craft glue for attaching the clip blanks. A strong bond prevents your beautiful creations from detaching unexpectedly.
- Patience with Drying: Always allow ample drying time for the glue to cure completely. Rushing this step can compromise the durability of your clips.
- Careful Placement: When clipping them onto shoes, ensure the clip mechanism is fully engaged and positioned securely. Avoid placing them in areas that will experience excessive friction or stress.
- Storage: Store your shoe clips in a box or a jewelry organizer to prevent them from getting crushed or damaged when not in use.
- Gentle Cleaning: If your clips get dusty or slightly soiled, gently wipe them with a soft, dry cloth. Avoid harsh chemicals or excessive moisture, especially if they contain delicate materials or non-waterproof embellishments.
Your Journey into Custom Footwear Begins Now!
So, now that you’ve seen far too many photos of my feet (a necessary evil for shoe tutorials!), I’ll wrap this up! This project truly is a fun, economical, and wonderfully creative way to accessorize any outfit. It’s an excellent craft to enjoy with your girlfriends during a relaxed afternoon, a delightful activity to share with your daughters, or simply a rewarding solo project to unleash your inner designer.
I would absolutely LOVE for you to pin and share this tutorial with your friends and fellow crafters! Your support helps me continue sharing these creative ideas. Thank you so much for stopping by and spending some time with me today. Please don’t hesitate to reach out if you have any questions at all about making your own custom shoe clips!
~Whitney