
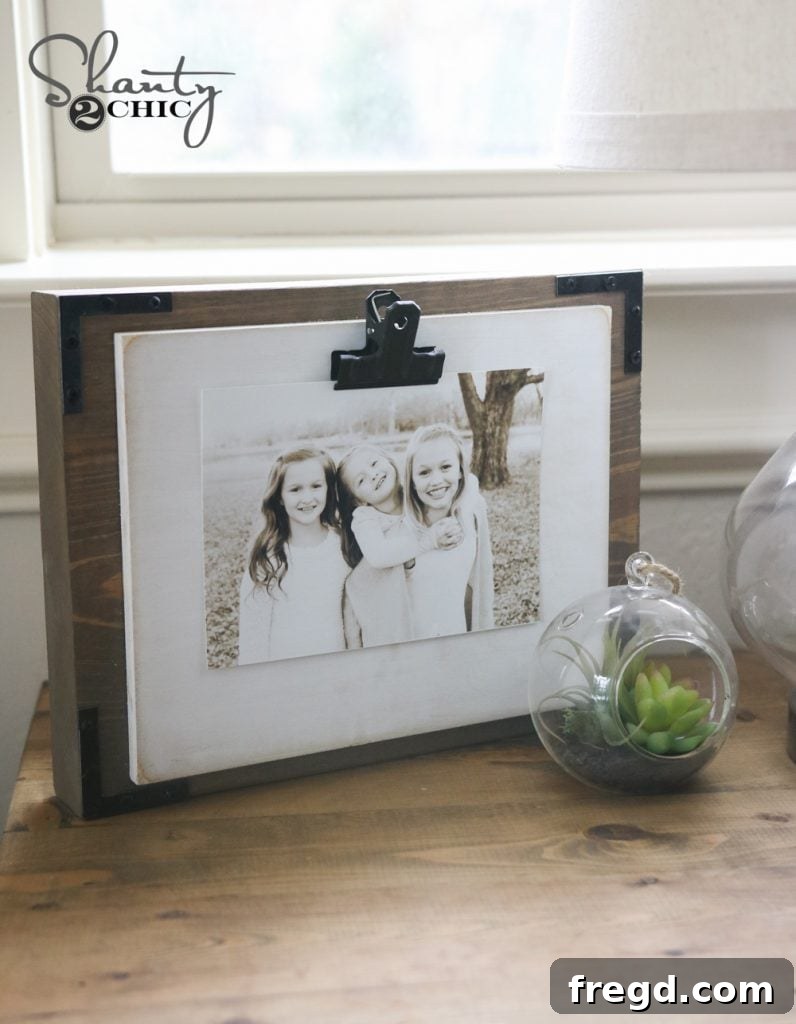
Unlock Your Creativity: Build a Stunning DIY $5 Clip Frame on a Budget!
Welcome, DIY enthusiasts and decor lovers! Are you searching for an incredibly easy, budget-friendly project that adds a touch of rustic charm or modern elegance to your home? Look no further! Today, we’re thrilled to guide you through crafting a versatile DIY Clip Frame that costs barely anything to make – potentially as little as $5 if you utilize scrap materials. This project isn’t just about saving money; it’s about unleashing your creativity and personalizing your living space with handmade treasures. Perfect for displaying cherished photos, inspirational quotes, or even a child’s artwork, this frame can be modified in countless ways to match any decor style. Get ready to transform simple pieces of wood into a functional work of art that will surely impress your guests and bring a smile to your face every day.
The beauty of this DIY clip frame lies in its simplicity and adaptability. Whether you prefer a farmhouse aesthetic, industrial vibe, or a clean minimalist look, this project serves as the perfect canvas for your personal touch. We’re eager to see the unique twists you put on this design! Before we dive into the step-by-step written instructions, be sure to catch our comprehensive video tutorial. It provides a visual guide, perfect for those who learn best by watching every detail come to life. You can watch it right HERE on our YouTube channel!
Gather Your Supplies: Materials and Tools for Your DIY Clip Frame
One of the most appealing aspects of this project is the minimal investment required. With a handful of readily available materials and basic tools, you’ll be well on your way to creating a beautiful, personalized clip frame. Here’s a detailed list of what you’ll need:
Essential Materials:
- 2×10 Scrap Board: This will form the sturdy base of your frame. A piece roughly 12-18 inches long is ideal for a tabletop frame. If you don’t have a scrap piece lying around, an 8-foot 2×10 board can be purchased very affordably at any hardware store. You’ll only need a small section, making it an economical choice for future projects too.
- Craft Board: This lighter, thinner board will be the display surface for your photos. We found ours at Hobby Lobby, but similar smooth, paintable craft boards (such as plywood or MDF scraps) are available at various craft stores or even repurposed from other projects. Look for a smooth surface ideal for painting.
- Wood Stain (e.g., Varathane Briarsmoke): A high-quality wood stain will give your base board a rich, professional finish. Briarsmoke by Varathane, available at Home Depot, is a fantastic choice for its beautiful, deep, smoky tone that enhances wood grain.
- Creamy White Craft Paint (e.g., Martha Stewart Wedding Cake): This will be used to paint your craft board, providing a lovely contrast to the stained base. Martha Stewart’s Wedding Cake offers a classic, elegant white that provides excellent coverage.
- Wood Glue: Essential for a strong, lasting bond between your two wooden pieces. Opt for a reputable brand to ensure durability.
- 1.25-inch Brad Nails: For additional structural integrity when attaching the craft board to the base. These small nails are ideal for securing thinner wood without visible large holes.
- Corner Braces/Hardware: These small decorative metal elements add a stylish touch and can enhance the overall aesthetic of your frame. Choose a style that complements your desired look, be it rustic, industrial, or modern.
- Decorative Clips: The heart of your clip frame! These are what will hold your photos or artwork. We sourced ours HERE on Amazon, offering a wide selection of styles and finishes from rustic bronze to sleek silver.
- Super Glue Gel: Our go-to adhesive for attaching the metal clips securely to the painted craft board. Its gel consistency prevents drips and offers a strong, fast-setting bond, which is crucial for small metal-to-wood applications.
- Black Spray Paint: Optionally, to color your corner braces or other hardware to match your clips or achieve a cohesive, unified look for your frame.
Tools You’ll Need:
- Miter Saw (or Hand Saw/Hardware Store Cutting Service): For precisely cutting your 2×10 board to the desired length. A miter saw offers accuracy and ease for straight cuts, but a basic hand saw works perfectly well with a little patience. Alternatively, most hardware stores offer convenient cutting services, saving you a step and ensuring precision at home.
- Brad Nailer: For quickly and securely fastening the craft board to the base. This tool makes the assembly process much faster and provides a professional finish. If you don’t own one, a hammer and small finishing nails can be used with care, though pre-drilling pilot holes is recommended to prevent splitting the wood.
- Sandpaper or Sanding Block: For smoothing rough edges and preparing surfaces for staining and painting. Various grits (e.g., 120-grit for initial smoothing, 220-grit for a finer finish) are helpful.
- Paint Brushes and Rags: For applying stain and paint evenly. Use separate brushes for stain and paint for best results. Clean rags are essential for wiping off excess stain.
- Measuring Tape and Pencil: For accurate measurements and marking cuts, ensuring your frame is perfectly proportioned.
- Safety Glasses and Gloves: Always prioritize safety when working with tools, cutting wood, and handling chemicals like stains and paints. Eye protection is non-negotiable.
Step-by-Step Guide to Building Your DIY Clip Frame
Now that you have all your materials and tools ready, let’s get started on bringing your beautiful new clip frame to life! Follow these detailed steps to create a stunning and personalized piece of home decor.
Step 1: Preparing the Base Board
The very first step involves preparing the foundation of your frame – the sturdy 2×10 scrap board. This robust piece of wood will provide the essential stability and a substantial, rustic aesthetic. Using your miter saw, carefully cut the 2×10 board to your desired length. For a versatile tabletop frame, a length between 12-18 inches usually works exceptionally well, offering enough space for multiple clips without being overly bulky. However, feel free to adjust this dimension based on the size and number of photos or items you plan to display. If you’re not comfortable using a miter saw, remember that most hardware stores readily offer a cutting service; simply provide them with your exact measurements, and they’ll cut it down for you, saving you a step and ensuring professional precision at home. After cutting, it’s crucial to lightly sand all edges and surfaces thoroughly. This process removes any potential splinters, rough patches, or saw marks, creating a perfectly smooth canvas for the subsequent stain application and handling.
Step 2: Staining the Base for a Rich Finish
With your base board meticulously cut and sanded, it’s now time to apply the stain, which will give your frame its characteristic depth and character. We chose Varathane’s Briarsmoke for its exceptional quality and the beautiful, warm gray-brown tone it imparts. This particular shade perfectly complements a wide range of decor styles, from modern farmhouse to industrial chic, offering a sophisticated, aged look. This stain provides excellent coverage and really highlights the natural wood grain, giving your frame a high-end appearance without the high-end cost typically associated with custom pieces. To apply, use a brush or a clean rag, working the stain evenly along the entire surface and in the direction of the wood grain. Allow the stain to penetrate for a few minutes (refer to product instructions for exact timing), then carefully wipe off any excess with a clean, dry rag to prevent a tacky finish. For a deeper, richer color and enhanced durability, you can apply a second coat after the first has fully dried, always following the manufacturer’s recommended drying times. Ensure you work in a well-ventilated area, preferably outdoors, and always wear gloves to protect your hands from staining.
Step 3: Preparing the Craft Board
Next up is the craft board, which will serve as the bright, contrasting backdrop for your clips and displayed items. This board should be noticeably thinner and lighter than your base, providing a pleasant visual and textural contrast. We sourced ours from Hobby Lobby, but any smooth, paintable craft wood, such as a thin plywood or MDF panel, will do the trick. Just like the base board, ensure its edges are thoroughly smooth and free of any imperfections – a light sanding will prepare the surface perfectly for paint adhesion. We opted for a classic, creamy white craft paint to cover this piece. Specifically, we used Martha Stewart brand in a timeless, elegant color called Wedding Cake. This bright, clean white creates a striking visual contrast with the darker stained base and ensures that your displayed photos or artwork truly pop. Apply several thin, even coats of paint, allowing each coat to dry completely between applications for a smooth, streak-free, and opaque finish. For an extra-professional result, you might consider a very light sanding with fine-grit sandpaper (e.g., 220-grit) between coats. Remember, patience with drying times is key for a flawless and durable paint finish.
Step 4: Assembling the Two Boards
Once both your beautifully stained base board and meticulously painted craft board are completely dry to the touch, it’s time to join them together. This step is absolutely crucial for the structural integrity and overall stability of your clip frame. Begin by applying a generous, continuous line of strong wood glue along the top edge of your 2×10 base board. Ensure the glue is spread evenly from end to end, but avoid excessive application that could squeeze out when the boards are pressed together, leading to a messy finish. Carefully align the painted craft board on top of the glue line, making sure it’s perfectly centered and straight along the base. Once aligned, gently but firmly press the two pieces together, ensuring good contact across the entire glued surface. For an even stronger and more permanent bond, we then secured the craft board using 1.25-inch brad nails with our brad nailer. Space the nails evenly along the length of the board, typically every 4-6 inches, making sure they penetrate both pieces of wood securely. If you don’t own a brad nailer, small finishing nails and a hammer can be used; however, it’s highly recommended to pre-drill small pilot holes to prevent splitting, especially in the thinner craft wood. Allow the wood glue to cure completely according to the manufacturer’s instructions, ideally with clamps holding the pieces together for maximum adhesion during the drying process.
Step 5: Adding Decorative Hardware
Now for some stylish flair that will give your frame a polished, finished look! It’s time to attach the decorative hardware. We absolutely adore these corner pieces, which add a charming, rustic, and slightly industrial touch to the design. To ensure a cohesive and visually appealing aesthetic, we decided to make these corner braces match our chosen clips. This meant giving them a fresh, even coat of black spray paint. When spray painting, always work in a well-ventilated area, preferably outdoors or in a garage with open doors, to avoid inhaling fumes. Apply several light, even coats rather than one thick coat to prevent drips, achieve smooth coverage, and ensure the paint adheres well. Allow ample drying time between coats and before handling the pieces to avoid smudging. Once completely dried, carefully position and attach the corner pieces to your frame. You can use the small screws often included with such hardware, or for a cleaner look, a strong adhesive designed for metal-to-wood bonds can work effectively. This step truly elevates the frame, adding intricate visual interest and a custom, handcrafted feel.
Step 6: Attaching the Clips
The final and most crucial step in completing your custom frame is applying the decorative clips themselves, which will lovingly hold your cherished memories. These versatile clips are what make this frame so dynamic, allowing you to easily swap out photos, notes, postcards, or even small prints, keeping your display fresh and adaptable to your mood or the season. We found an excellent selection of durable and stylish clips HERE on Amazon, offering various sizes, finishes, and designs to perfectly suit any style you envision. When it comes to securing these metal clips firmly to the painted wooden surface, we constantly get asked about the best adhesive for this specific type of application. Our consistent go-to solution for achieving robust, reliable, and long-lasting results is this particular Super Glue Gel. Its thicker, non-drip consistency prevents messy runs and provides an incredibly strong, quick-drying bond, which is absolutely essential for securely holding the metal clips in place without them shifting. Carefully plan and position your clips along the craft board, ensuring they are evenly spaced and aligned for a professional look. Apply a small, controlled amount of the Super Glue Gel to the back of each clip and press firmly into place, holding for a few seconds to allow the initial bond to form. Allow the glue to fully cure as per the product instructions (typically a few hours) before placing any items in the clips to ensure maximum strength.
Your Masterpiece is Complete: Displaying Your DIY Clip Frame!
And there you have it – your very own, beautifully crafted DIY Clip Frame is all finished up! Isn’t it amazing what you can create with just a few dollars and a little bit of effort? This project proves that stunning home decor doesn’t have to break the bank. You’ve successfully transformed simple, affordable materials into a stylish, functional, and deeply personal piece that’s now ready to hold and showcase your most cherished memories, inspirational quotes, or perhaps even a rotating display of art. Place it on a mantelpiece, a bedside table, a desk, or a shelf, and watch how it instantly elevates the space with its unique charm and handmade character. Enjoy the satisfaction of having created something beautiful and meaningful with your own hands!
Customization Ideas to Make It Uniquely Yours
The truly exciting part about this DIY Clip Frame is its incredible potential for personalization. While our chosen aesthetic offers a classic blend of rustic charm and clean lines, don’t feel limited! This project is a fantastic canvas for your creativity. Here are some inspiring ideas to help you craft an even more unique creation:
- Color Variations: Experiment with a wide spectrum of paint colors for the craft board – a bold teal, a soft pastel, a vibrant mustard, or even a distressed black for a more edgy industrial look. For the base, try a rich dark walnut stain, a weathered gray wash, or even paint it a solid white or black for a striking monochromatic feel that suits modern interiors.
- Distressing Techniques: After painting, lightly sand the edges and prominent surfaces of your craft board or base. This technique allows the raw wood underneath or a contrasting base coat to peek through, creating a charming, aged, and vintage appeal that perfectly complements farmhouse or shabby-chic decor.
- Stenciling and Decals: Add a personalized message, a favorite inspirational quote, a family name, or a decorative pattern using stencils or high-quality vinyl decals directly onto the craft board before attaching the clips. This adds another layer of customization and meaning to your frame.
- Different Hardware: Explore the vast array of clip types available – from small wooden clothespins for a natural look, to sleek silver bulldog clips for a modern minimalist vibe, or even magnetic clips if you embed metal strips behind the craft board. Additionally, swap out the corner braces for decorative tacks, unique metal embellishments, or simply leave them off for a cleaner, streamlined design.
- Larger Scale & Wall Mounting: This design can easily be scaled up to create an impressive wall-mounted frame. Simply adjust the dimensions of your boards to suit a larger space and consider adding additional clips for more display capacity. You can also add D-rings or picture wire to the back for secure hanging.
- Thematic Decor: Create a themed frame for a specific purpose or room. Think a whimsical display for a child’s room, a festive setup for holiday decorations (changing photos for each season), or even a rotating seasonal decor piece by incorporating miniature garlands, fairy lights, or small decorative elements that complement the current theme.
Let your imagination guide you! This project is a fantastic opportunity to express your personal style, add meaningful and handmade decor to your home, or create thoughtful, truly unique gifts for friends and family that they will cherish. The possibilities are truly endless!
Share Your Creations!
We hope this detailed guide has thoroughly inspired you to pick up your tools and start building your very own DIY Clip Frame today! This super easy and inexpensive project is truly rewarding, not only in the beautiful piece of decor you’ll create but also in the satisfaction of completing a handmade project. We absolutely love seeing your creative takes on our DIYs, so please don’t hesitate to share your finished $5 Clip Frames with us across our social media channels. Tag us and let the world see your fantastic work and unique design choices! Your creativity inspires us all. Happy crafting, and we can’t wait to see what you come up with!