
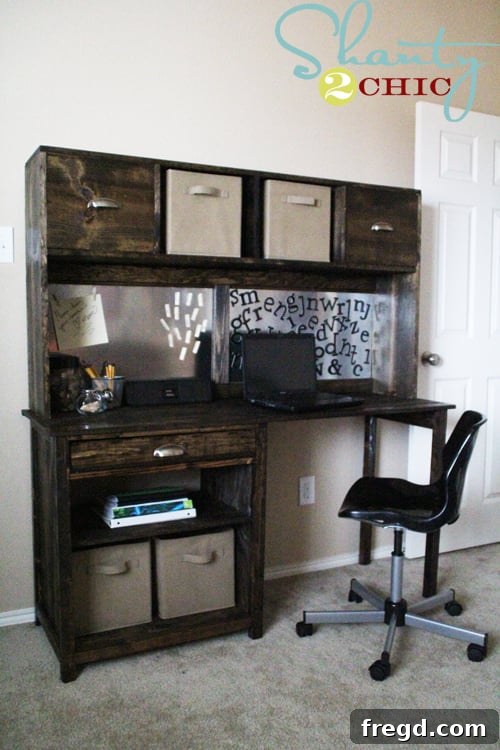
DIY Magnetic Backing for Student Desk: Pottery Barn Inspired Organization Hack
Welcome back, DIY enthusiasts! Today, I’m thrilled to share an exciting continuation of a previous project: adding the perfect magnetic backing to the Pottery Barn Inspired Student Desk I meticulously crafted for my son. This desk, a labor of love, needed a functional yet stylish organizational component, and I believe we’ve hit the mark with this ingenious magnetic board.
If you’re eager to build the desk itself, don’t miss the comprehensive tutorial for this stunning piece, available right HERE! Building on that foundation, our focus today is on enhancing its utility and aesthetic appeal. When brainstorming ideas for the desk’s hutch backing, a traditional cork board initially came to mind. However, the thought of countless push pins, especially with a curious 14-month-old who seems to find joy in exploring everything with her mouth, presented a safety concern I couldn’t ignore. This led me down a different, more innovative path: the creation of a massive, versatile magnet board.
This DIY magnetic board isn’t just about organization; it’s about creating a dynamic, interactive space that adapts to your student’s evolving needs without the wear and tear of traditional pin boards. It’s perfect for displaying artwork, important reminders, study notes, or even decorative elements. Let’s dive into how you can replicate this fantastic feature for your own student desk, transforming it into a truly inspiring and efficient workspace.
Essential Materials and Tools for Your DIY Magnetic Board
Before we begin, gathering all the necessary materials and tools will ensure a smooth and efficient project. Most of these items are readily available at your local hardware store or craft supply outlets.
Materials:
- Galvanized Metal Sheets: You’ll need two sheets, ideally sized to fit the dimensions of your desk’s hutch. Galvanized metal is an excellent choice due to its magnetic properties, durability, and a naturally appealing industrial aesthetic. For this project, I sourced two sheets from Lowe’s, costing approximately $8 each.
- Stick Moulding: This will be used to frame the top and bottom edges of your metal sheets, providing a neat finish and covering any imperfections from cutting. Choose a moulding profile that complements your desk’s style.
- Wood Stain: Select a stain that matches or complements the existing finish of your student desk for a cohesive look.
- Magnetic Strip Roll: A versatile adhesive magnetic strip, often found in craft stores like Hobby Lobby, will be key for creating your custom magnetic accessories.
- Baby Clothespins: These small clothespins (also available at Hobby Lobby) are perfect for magnetizing and holding papers.
- Black Chipboard Letters: Another Hobby Lobby find, these letters can be magnetized to create fun, changeable messages or labels on your board.
- 1×4 Wood Board: This piece will serve as a decorative and functional divider, covering the seam where the two metal sheets meet.
- Wood Glue (Optional): For extra reinforcement when attaching moulding or the seam cover.
- Nails or Brad Nails: For securing the moulding and the 1×4 board.
Tools:
- Measuring Tape: Essential for accurate measurements of your hutch and metal sheets.
- Tin Snips or Metal Shears: Specifically designed for cutting galvanized metal sheets. Ensure they are sharp for clean cuts.
- Utility Knife or Scoring Tool: Can assist in marking precise cut lines on the metal.
- Saw: A miter saw or hand saw for cutting the wood moulding and 1×4 board.
- Sanding Block or Sandpaper: To smooth edges of cut wood.
- Stain Applicator (rag or brush): For applying wood stain.
- Hammer or Brad Nailer: For efficiently attaching wood pieces.
- Safety Glasses and Gloves: Crucial for protecting your eyes and hands when working with metal and tools.
- Pencil: For marking measurements.
Step-by-Step Guide to Crafting Your Magnetic Board
With our materials and tools ready, let’s embark on the transformation. This detailed guide will walk you through each phase of the project, ensuring a professional and durable finish.
1. Preparing and Cutting the Galvanized Metal Sheets
The foundation of our magnetic board begins with the galvanized metal sheets. This material not only provides the magnetic surface but also lends a chic industrial vibe to the desk.
Start by carefully measuring the interior dimensions of your desk’s hutch where the magnetic board will be installed. It’s often best to measure twice and cut once! Since we’re using two sheets to create a larger magnetic surface, divide your total width measurement by two. This will determine the individual width of each metal sheet. My approach involved cutting the sheets so that they would meet precisely in the middle of the hutch, creating two symmetrical halves.
Using tin snips, carefully cut your galvanized sheets to the desired size. Always wear heavy-duty gloves and safety glasses during this process, as metal edges can be sharp and small slivers can detach. A steady hand and a clear workspace are key here. After cutting, you might notice that the cut edges can become slightly wrinkled or uneven. This is a common occurrence with metal sheets, but don’t worry, we have a solution that doubles as a design feature!
2. Adding Decorative and Protective Trim (Moulding)
To give our magnetic board a polished look and to cleverly conceal those inevitably wrinkled cut edges of the metal sheets, we’ll be adding stick moulding to the top and bottom.
Measure the length of the top and bottom edges of your metal sheets (or the corresponding areas on the hutch) where the moulding will sit. Cut your stick moulding to these precise lengths. Once cut, apply your chosen wood stain to the moulding. Allow it to dry completely according to the product instructions. The goal is to match or beautifully complement the existing finish of your desk. When positioning the metal sheets within the hutch, strategically place them so that the slightly wrinkled edges are at the top and bottom. This allows the newly stained moulding to be nailed directly over these imperfections, creating a clean, finished appearance while also adding a subtle decorative touch. This step not only enhances the aesthetics but also makes the edges safer, preventing any accidental scrapes.
3. Crafting Custom Magnetic Accessories
Now for the fun part – creating the accessories that will bring your magnetic board to life! This is where you can personalize the space and add functionality.
I utilized a roll of adhesive magnetic strip, which is incredibly versatile for DIY projects. Simply cut small pieces of the magnetic strip to fit the back of your chosen items. The beauty of these strips is their peel-and-stick backing, making application effortless. For this desk, I created two types of magnetic accessories:
- Magnetic Baby Clothespins: These tiny clothespins are perfect for holding up photos, small notes, or even lightweight artwork. Just peel the backing off a small magnetic strip and firmly press it onto the back of each clothespin. Now, they can securely attach to your galvanized board, adding a charming and practical element.
- Magnetic Chipboard Letters: To personalize the board or spell out inspiring messages, I used black chipboard letters. Attach a magnetic strip to the back of each letter in the same easy peel-and-stick fashion. These are fantastic for learning, organization, or just adding a decorative flair that can be changed on a whim.
The possibilities for magnetic accessories are endless! Consider magnetizing small containers for pencils, whiteboard markers, or even tiny decorative objects. This step truly allows for creative expression and tailored organization.
4. Concealing the Center Seam with a Decorative Divider
As mentioned, the two galvanized metal sheets were cut to meet in the middle of the hutch. This creates a functional surface, but the seam where they join can look a bit unfinished. To address this, and to add another layer of design, we’ll install a simple wooden divider.
Measure the height of your magnetic board. Cut a 1×4 wood board to this exact measurement. Just like with the moulding, you can choose to stain or paint this board to match your desk or to create a contrasting accent. Once finished and dry, simply nail the 1×4 board directly over the vertical seam where the two metal sheets meet. This not only flawlessly covers the unsightly joint but also adds a wonderful design element, creating a natural separation between the two sides of the magnetic board. I particularly love how this simple addition gives the board a structured, dual-panel look, making it even more appealing and functional.
The Finished Look: A Blend of Functionality and Style
With all the components in place, step back and admire your handiwork! This desk has been transformed into an organizational powerhouse with a distinct personality. The addition of the magnetic board seamlessly integrates into the overall design, providing an invaluable resource for any student.
I absolutely adore this desk, and the magnetic board truly elevates its character. The “industrial/boy look” that the galvanized metal brings is undeniably stylish and perfect for a modern kid’s room or home office. This dynamic surface offers endless possibilities for organization, decoration, and learning. It’s a safe, durable alternative to cork boards, ensuring that even the youngest family members can be around without concern for sharp objects.
Customization and Creative Alternatives
While the industrial aesthetic is a favorite, this project also offers fantastic opportunities for customization. If the raw galvanized look isn’t quite your style, consider wrapping the metal sheets with fabric before installation. You could choose a fun patterned fabric to add a pop of color and softness, or a textured linen for a more sophisticated feel. Adhere the fabric securely to the metal sheets using spray adhesive, ensuring smooth, bubble-free application, and then proceed with the moulding and seam cover steps. This simple alteration can dramatically change the overall vibe of the magnetic board, allowing it to fit seamlessly into any decor scheme, from whimsical to elegant.
Furthermore, experiment with different magnet styles beyond the simple clothespins and letters. You could use decorative magnets, create your own with resin or polymer clay, or even magnetize small, lightweight storage cups for pens and other desk essentials. The beauty of a DIY project lies in its adaptability and the ability to tailor it precisely to your needs and preferences.
Conclusion
Crafting this DIY magnetic backing for the Pottery Barn inspired student desk has been a hugely rewarding project. It marries functionality with safety and style, creating an organized and inspiring workspace. It’s a testament to how simple materials and a little creativity can yield truly impactful results. I hope this detailed tutorial empowers you to tackle your own home organization projects and inspires you to think outside the box.
Thank you so much for following along with this DIY adventure. Happy crafting!
~Ashley