

Transform Your Clutter: Easy DIY Headband & Jewelry Holder (Under $10!)
Hello fellow craft enthusiasts and organization lovers!
As the back-to-school season approaches, many of us are bustling with preparations – gathering supplies, sorting backpacks, and getting everything in order for a smooth start. For those with little fashionistas at home, or even grown-up accessory aficionados, this period often highlights one persistent challenge: managing a growing collection of headbands, necklaces, and bracelets. These charming adornments, while adding a perfect touch to any outfit, can quickly lead to tangled messes and cluttered drawers if not properly stored.
I recently found myself in this exact predicament. My girls’ headband stash had reached epic proportions, overflowing baskets, and creating daily chaos. It was clear: we desperately needed a dedicated storage solution. My vision was simple yet specific: I wanted something that was not only super functional but also aesthetically pleasing enough to proudly display in their room – definitely not an eyesore! And, of course, it had to be budget-friendly.
The good news? I’ve discovered (and crafted!) the perfect solution, and I’m thrilled to share it with you. This DIY project cost me a mere $10 for all the supplies, and the best part is, it yields two complete organizers! That’s incredible value, especially since these versatile holders are also fantastic for organizing necklaces and bracelets. Say goodbye to tangled chains and mismatched accessories, and hello to a beautifully organized space.
Ready to reclaim your drawers and display your accessories with style? Let’s dive into how you can create your very own elegant and functional headband and jewelry holder. This project is surprisingly simple, incredibly rewarding, and an excellent way to add a personalized touch to any room. It’s perfect for kids’ rooms, teen bedrooms, or even your own vanity. Get ready to transform your accessory chaos into a chic display!
Gather Your Essentials: What You’ll Need
One of the most appealing aspects of this project is its accessibility. You don’t need a specialized craft store for these items; common hardware and hobby stores will have everything you need. I found all my supplies conveniently at Lowe’s and Hobby Lobby, which, by happy coincidence, are located right across the street from each other – making my shopping trip a breeze!
Here’s a detailed list of materials and tools to get you started:
Materials:
- Wood Spindle: This forms the main vertical support. Look for one with an interesting shape; you can find these in the trim or wood craft section. A 1.25″ x 36″ spindle works well.
- Wood Oval or Round Base: Approximately 6-8 inches in diameter. This will serve as the stable foundation for your holder.
- Wood Dowel: A smooth, straight piece about 0.75″ to 1″ in diameter. This is where your headbands and bracelets will rest.
- Wood Finial: A decorative top piece to cap off the spindle. Choose a style that complements your desired aesthetic.
- Small Craft Wood Circles: Two pieces, roughly 2-3 inches in diameter. These will be added to the ends of the dowel to prevent items from sliding off.
- Gorilla Glue Epoxy: A strong, fast-setting adhesive is crucial for a durable holder.
- Paint: Your choice of color. I used Rust-Oleum Painter’s Touch in Blue Sky for a vibrant finish. Consider spray paint for even coverage.
- Optional: Primer: If painting a dark wood or wanting a brighter final color, a coat of primer can be beneficial.
Tools:
- Saw: A miter saw or hand saw for cutting the spindle and dowel. Always prioritize safety when using cutting tools.
- Mixing Plate/Surface: For preparing the epoxy.
- Disposable Mixing Stick: To thoroughly blend the epoxy components.
- Screwdriver: To attach the finial.
- Sandpaper (80-grit or similar): For distressing the paint finish (optional).
- Protective Gloves: When working with epoxy and paint.
- Drop Cloth or Newspaper: To protect your work surface during painting.
With your materials and tools at the ready, you’re all set to begin crafting! This project is not only an excellent way to organize your accessories but also a chance to express your creativity. Let’s get building!
Step-by-Step Guide: Crafting Your Organizer
This DIY project is designed to be straightforward, even for those new to woodworking or crafting. Just follow these steps, and you’ll have a beautiful, functional organizer in no time!
Step 1: Preparing Your Spindle
The first step involves customizing the height of your main support. I started by cutting my wood spindle down to a more manageable and appropriate size for a tabletop holder. First, I cut the entire spindle in half. From one of those halves, I then cut off approximately 4 inches from the bottom. This adjustment makes the final holder a bit shorter and perfectly scaled for a dresser or shelf. Remember to make clean cuts and always exercise caution when using a saw.
Step 2: Assembling the Base with Epoxy
For this entire project, I relied on Gorilla Glue Epoxy, known for its incredibly strong and durable bond – essential for a sturdy holder that won’t wobble under the weight of accessories. Epoxy is a two-part adhesive, so it’s crucial to mix it correctly for optimal performance.
To begin, I dispensed and thoroughly mixed the two components of the epoxy on a disposable plate, following the manufacturer’s instructions. Once mixed, I applied a generous layer of the epoxy to the bottom end of my cut spindle. This will be the point of contact with your chosen base.
Next, I carefully centered the epoxied end of the spindle onto the wood oval base and pressed down firmly. It’s important to ensure it’s perfectly straight before the epoxy sets. Hold it in place for a few moments, then allow the epoxy to cure completely according to the package directions. This typically takes several minutes to an hour, depending on the brand and temperature.
Step 3: Attaching the Dowel
With the base firmly attached, it’s time to add the horizontal bar where your headbands and other accessories will hang. I cut my wood dowel to about 12 inches long. This length provides ample space for multiple headbands without making the holder too wide or cumbersome.
Once cut, I applied a generous amount of the Gorilla Glue Epoxy to one end of the dowel and carefully attached it to the top of the spindle. The goal is to create a sturdy, T-shaped structure. Ensure the dowel is level and centered before the epoxy cures. Again, allow sufficient drying time for a strong bond.
Step 4: Securing the Finial
After the epoxy holding the dowel in place had thoroughly dried, the next step was to add the decorative finial. Most finials come with a pre-drilled hole and a screw for easy attachment. Simply align the finial with the top of the spindle, and screw it into place. This adds a polished and finished look to your organizer.
Step 5: Adding Craft Circles to the Dowel Ends
To prevent headbands, bracelets, or necklaces from sliding off the ends of the dowel, I added small craft wood circles. Using the same Gorilla Glue Epoxy, I attached one circle to each end of the dowel. Press them firmly into place and allow them to dry completely. These little additions are key for functionality and give the dowel a nice, finished appearance.
Bringing It to Life: Painting and Finishing Touches
Now that your headband and jewelry holder is fully assembled and the glue has cured, it’s time for the exciting part: adding color and character! This is where you can truly personalize your creation to match any room decor.
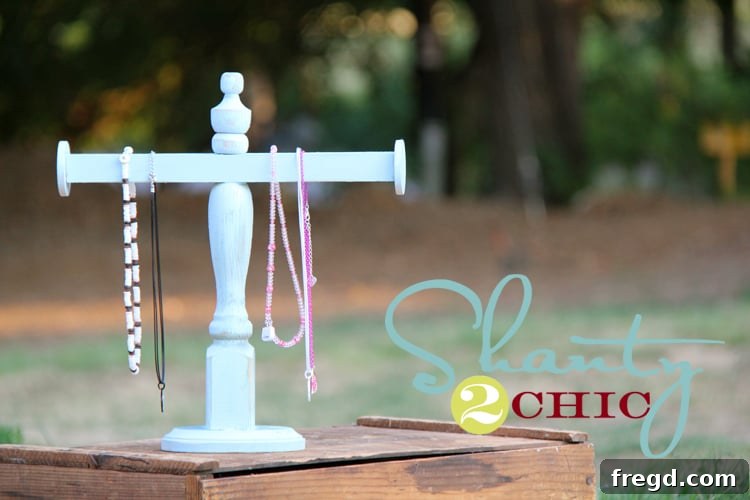
I chose a vibrant “Blue Sky” from Rust-Oleum Painter’s Touch for my project, giving it a fresh and playful look. This little guy received two thorough coats to ensure complete and even coverage. When painting, especially with spray paint, remember to work in a well-ventilated area and apply thin, even layers to avoid drips and achieve a smooth finish. Allow ample drying time between coats and before moving to the next step.
Optional: Distressing for a Shabby Chic Look
Once the paint was completely dry, I decided to add a touch of rustic charm by distressing the edges. Using a piece of 80-grit sandpaper, I gently sanded along the prominent edges and curves of the holder. This technique lightly removes some of the paint, revealing the natural wood underneath and creating a beautifully aged, shabby chic aesthetic. If you’re looking for a similar effect, remember to go light; you can always sand more, but you can’t easily put paint back on! For those interested in perfecting distressing techniques, we have a video tutorial on DIY wall sconces that delves deeper into this process HERE.
And just like that, the project was complete! The result is not just a storage solution, but a decorative piece that adds character and organization to any space. It’s truly rewarding to see something come together from simple materials into a beautiful, functional item.
Beyond Headbands: Versatile Jewelry Organization
While designed with headbands in mind, the beauty of this DIY holder lies in its incredible versatility. It quickly became apparent that this clever little organizer doubles as a fantastic display and storage solution for a variety of other accessories. That’s why I affectionately refer to it as a “Headband & Jewelry Holder” – because it truly excels at both!
The horizontal dowel, perfectly sized for headbands, is also ideal for draping necklaces. Say goodbye to tangled chains and lost pendants! Each necklace can hang freely, preventing knots and making it easy to choose the perfect piece for your outfit. Similarly, bracelets, bangles, and even watches can be neatly slipped onto the dowel, keeping them visible and accessible.
The Sweet Victory of Organization
What do you think of this simple yet impactful DIY project? My girls absolutely adore their new headband and jewelry holders. They love being able to see all their options at a glance, and it makes choosing accessories so much more fun and efficient. From a parent’s perspective, the immediate benefit was clear: I finally freed up an entire drawer in my bathroom that was previously overflowing with headbands! It’s a small victory, but a significant one in the ongoing battle against clutter.
This project proves that effective organization doesn’t have to be expensive or complicated. With a few basic supplies and a little creativity, you can craft beautiful and practical solutions that enhance your living space. Whether you’re looking to tidy up for back-to-school, find a thoughtful gift, or simply add a charming piece to your home decor, this DIY headband and jewelry holder is an excellent choice.
I encourage you to give this project a try! It’s a fantastic way to spend an afternoon, and the satisfaction of seeing your accessories beautifully organized is truly unmatched. Feel free to experiment with different paint colors, finishes, or even add personal embellishments to make it uniquely yours.
Thanks so much for stopping by and taking the time to explore this DIY guide. I hope it inspires you to tackle your own organization challenges with a creative spirit. Have a wonderful and organized week!
~Whitney