
Create Your Own Festive Happy New Year Banner for an Unforgettable Celebration at Home
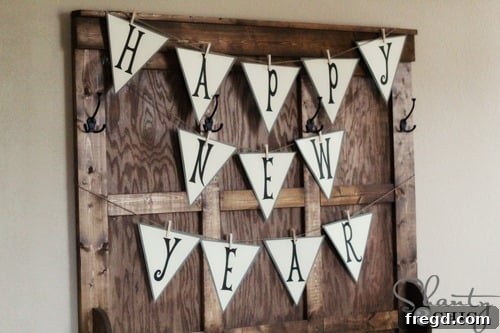
As the year draws to a close, there’s a special kind of magic in the air, especially when it comes to planning a cozy, memorable New Year’s Eve celebration right at home. For many families, including our own, this evening has become a cherished tradition. It’s a time for togetherness, for looking back at the year gone by, and excitedly anticipating the one ahead. The kids eagerly await the chance to stay up late, watching the iconic ball drop on TV, while we all indulge in delicious snacks and simply enjoy each other’s company. To make these precious moments even more festive and visually delightful, I embarked on a little DIY project: crafting a vibrant “Happy New Year” banner. The result was absolutely charming, adding a perfect touch of celebratory flair to our home!
There’s something incredibly satisfying about creating your own decorations. Not only does it allow for personalization and a unique touch that store-bought items simply can’t match, but it also becomes a fun activity for the whole family. This particular banner project was not only simple and cost-effective but also incredibly rewarding. Seeing the banner come to life and the excitement it brought to my children’s faces was truly priceless. It’s a subtle yet impactful way to elevate your home’s ambiance, signaling that a special occasion is at hand. My kids absolutely adored it, and so do I! It brings a warm, inviting, and celebratory feel to our main living space, perfect for welcoming the new year.
Why Choose a DIY Printable New Year Banner?
Opting for a DIY printable banner for your New Year’s festivities offers a multitude of benefits, making it an ideal choice for families and budget-conscious decorators alike. First and foremost, it’s an incredibly creative outlet. You get to select your paper, choose how to assemble it, and decide where to display it, making the final product truly unique to your home and style. This level of personalization is often lacking in mass-produced decorations.
Secondly, DIY banners are wonderfully cost-effective. All you really need are a printer, some paper (cardstock works best for durability), scissors, and a few simple crafting supplies like twine and mini clothespins. Compared to purchasing pre-made banners, the savings can be significant, allowing you to allocate more of your budget to other celebratory treats or activities.
Moreover, creating a banner can be a fantastic family activity. Kids love to get involved in holiday preparations, and tasks like cutting out letters or helping to clip them onto the twine can be fun and engaging for them. It fosters a sense of teamwork and allows them to contribute directly to the festive atmosphere, making the celebration even more meaningful.
Finally, there’s the element of sustainability. By printing only what you need and reusing materials where possible, you can make a more environmentally conscious choice compared to buying new plastic decorations every year. Plus, if printed on sturdy cardstock, your banner can often be carefully stored and reused for several years to come, becoming a part of your annual tradition.
Materials You’ll Need for Your Festive Banner
Gathering your supplies is the first step towards creating your beautiful “Happy New Year” banner. The great news is that most of these items are likely things you already have at home or can easily acquire:
- Printer: A standard home printer is all you need.
- White Cardstock: This is highly recommended over regular printer paper. Cardstock is thicker and more durable, ensuring your banner flags hang nicely without curling or tearing easily.
- Scissors: For neatly cutting out each letter flag.
- Hole Punch (optional, but recommended): If you prefer to thread the twine directly through the flags instead of using clothespins.
- Twine or Ribbon: Choose a material that complements your existing decor. Natural jute twine offers a rustic charm, while metallic ribbon can add a touch of sparkle.
- Small Clothespins: These are perfect for attaching the flags to the twine and allow for easy repositioning.
- The Free Printable PDF Files: Provided below, these are the heart of your banner!
Once you have all your materials assembled, you’re ready to dive into the crafting process!
Simple Steps to Create Your “Happy New Year” Banner
Creating this festive banner is a breeze, even for novice crafters. Follow these straightforward steps to assemble your beautiful decoration:
- Download the Printables: Scroll down to find the links for each letter of “HAPPY NEW YEAR” and the numerical ’13 / 2013′. Click on each link to download the individual PDF files to your computer.
- Print the Letters: Load your white cardstock into your printer. Open each PDF file and print it. Ensure your printer settings are on “best quality” for crisp, clear letters. Print one page for each letter/character.
- Cut Out the Flags: Carefully cut around the outline of each letter, creating your individual banner flags. Take your time to make clean cuts for a professional finish.
- Prepare for Hanging: Decide how you want to attach your flags to the twine.
- Option 1 (Clothespins): This is the simplest method. Lay out your letters in order (“H”, “A”, “P”, “P”, “Y”, etc.) and space them evenly.
- Option 2 (Hole Punch): If you prefer a cleaner look without clothespins, use a small hole punch to create two holes in the top corners of each flag. Thread your twine through these holes from the back to the front, then across the front, and back through the second hole. This creates a continuous banner.
- Assemble the Banner: If using clothespins, simply clip each letter flag onto your chosen length of twine. Arrange them to spell out “HAPPY NEW YEAR ’13” or “HAPPY NEW YEAR 2013,” ensuring there’s enough space between each letter for readability and aesthetic appeal. I personally love the charm of small clothespins; they give the banner a quaint, homemade feel and make it easy to adjust spacing.
And just like that, your personalized “Happy New Year” banner is ready to adorn your home!
Displaying Your New Year Banner: Creative Ideas
Once your banner is assembled, it’s time to find the perfect spot to showcase your festive creation. I attached the flags to twine with small clothespins and had them proudly displayed on our Shanty Hall Tree Bench, which made for a warm and inviting entrance. But the possibilities are endless! Here are a few more ideas to inspire you:
- Over the Mantelpiece: A classic choice, hanging your banner above the fireplace adds a focal point to your living room. You can drape it over a garland for an extra festive touch.
- Across a Doorway or Archway: Welcome guests into your celebration space by hanging the banner across an entrance.
- Along a Wall: Create a festive backdrop for photos by taping or hanging the banner on a prominent wall. This is especially great if you’re planning a photo booth area.
- Across a Window: Let natural light highlight your banner, making it visible from both inside and outside your home.
- Above a Dessert Table: If you have a dedicated snack or dessert station, the banner can serve as a charming backdrop, drawing attention to your delicious treats.
- In a Child’s Room: If your children are particularly excited about staying up, you could even hang a smaller version in their room to build anticipation.
Consider adding fairy lights or complementary metallic streamers around the banner to enhance its visual appeal and create a truly magical atmosphere.
Beyond the Banner: More New Year’s Eve Home Celebration Ideas
A “Happy New Year” banner sets a wonderful tone, but a truly unforgettable New Year’s Eve at home involves more than just decor. Here are some ideas to make your family celebration even more special:
- Delicious Snacks and Treats: Beyond the usual chips and dips, consider creating a special New Year’s Eve spread. Mini pizzas, colorful fruit skewers, homemade cookies, and sparkling cider are always hits.
- Family Games and Activities: Plan a rotation of board games, card games, or even charades to keep everyone entertained as you await the countdown. A scavenger hunt with small prizes can also be a lot of fun.
- Movie Marathon: Choose a selection of family-friendly films to watch throughout the evening. Popcorn and cozy blankets are a must!
- Memory Jar or Time Capsule: Encourage everyone to write down their favorite memories from the past year or their hopes and dreams for the new year. Seal them in a jar to open next New Year’s Eve.
- DIY Party Poppers or Shakers: Craft simple noisemakers using toilet paper rolls, rice, and decorative paper for a fun and safe way to ring in the new year at midnight.
- Resolution Station: Set up a little area with paper and pens for family members to write down their New Year’s resolutions or goals. Share them if comfortable, offering encouragement to one another.
- Themed Photo Booth: Use your banner as a backdrop and add some fun props like hats, noisemakers, and silly glasses for memorable family photos.
- Sparkling Drinks: Offer sparkling grape juice or cider in fancy glasses to make the countdown toast feel extra special for everyone, especially the kids.
These activities, combined with your festive banner, will create a rich tapestry of memories that your family will cherish for years to come.
Download Your Free “Happy New Year” Banner Printables!
I am delighted to include the PDF files below, making it incredibly easy for you to create your very own custom “Happy New Year” banner. These printables are designed for simplicity and charm, ensuring your New Year’s Eve decor is both beautiful and personal. Just click on each link below to download and print the individual letter flags. Remember to use white cardstock for the best results!
Click HERE for the letter H
Click HERE for the letter A
Click HERE for the letter P (first)
Click HERE for the letter P (second)
Click HERE for the letter Y
Click HERE for the letter N
Click HERE for the letter E
Click HERE for the letter W
Click HERE for the letter R
Click HERE for the numbers ’13 (for “Happy New Year ’13”)
Click HERE for the year 2013 (for “Happy New Year 2013”)
You can choose to print either the ’13 or the full 2013, or even get creative by printing individual numbers for the current year!
Make Your New Year’s Eve Unforgettable!
I sincerely hope you enjoy crafting and displaying your “Happy New Year” banner as much as we did. It’s a simple project that yields impressive results, adding a meaningful and personal touch to your holiday decorations. More importantly, I hope it contributes to a truly joyous and memorable New Year’s Eve celebration with your loved ones. May your home be filled with laughter, good company, and the exciting anticipation of a fantastic year ahead! Wishing you and your family a Happy New Year filled with endless possibilities and cherished moments.
Thank you so much for stopping by and being a part of our creative journey!
~Ashley