
Please note: The giveaway mentioned in the original post has concluded and winners have been notified. Thank you for your interest!
Transforming Wood with Vibrant Color: Crafting Personalized Photo Blocks Using Rit Dye
Hello creative DIY enthusiasts! Today, we’re diving into a project that beautifully blends personalization, vibrant color, and the satisfying craft of working with wood. If you’ve ever considered adding a unique splash of color to your wooden creations without the harsh fumes or opaque finish of traditional stains and paints, then you’re in for a treat. I recently had the fantastic opportunity to explore Rit’s extensive line of liquid dyes, and what I discovered truly opened up a world of possibilities. While I’ve been a dedicated fan of Rit for fabric dyeing for years, the exciting revelation that you can effectively dye wood was an absolute game-changer for me! This newfound knowledge immediately sparked a creative impulse, leading to this delightful project: custom-made photo blocks perfect for decorating a nursery, adding a personal touch to any room, or gifting to loved ones. Grandparents, in particular, adore these heartfelt, handmade treasures that capture cherished memories.
Why Choose Rit Dye for Wood? Unlocking Vibrant Craft Possibilities
Before we jump into the detailed step-by-step process, let’s explore why Rit dye stands out as an excellent choice for wood projects. My prior experiences with Rit on various fabric crafts had already solidified my appreciation for its ease of use, consistent results, and extensive color range. However, learning about its successful application on wood unveiled an entirely new dimension of creative versatility. Unlike many traditional wood stains that typically offer a limited spectrum of natural wood tones, Rit liquid dyes provide an astonishing palette of 25 vibrant, ready-to-use colors. But the creative potential doesn’t stop there! Their incredibly resourceful ColorIt Formula Guide empowers you to mix and match these base colors, unlocking over 500 custom shades. This unparalleled level of color customization allows you to perfectly match any existing decor, seasonal theme, or personal aesthetic, making your projects truly unique.
Beyond the sheer volume of color options, Rit dye offers several practical advantages that make it a superior choice for DIY wood crafts. When applied, it penetrates deep into the wood fibers, resulting in a rich, translucent finish that beautifully highlights the natural grain, much like a traditional stain but with significantly greater color depth and variety. Crucially, unlike many conventional wood stains and finishes that often emit strong, unpleasant odors, Rit dye is water-based and produces virtually no noxious fumes. This makes it an ideal solution for indoor projects, allowing you to craft comfortably in your kitchen, workshop, or living room without the need for extensive ventilation. The application process itself, as you’ll soon discover, is also remarkably simple, often involving a straightforward soaking method that eliminates the need for tedious brushing, wiping, or multiple coats, saving you time and effort while delivering stunning results.
Essential Materials: What You’ll Need for Your DIY Photo Blocks
To embark on this engaging and rewarding DIY project, here’s a comprehensive list of all the materials you’ll need. Most of these items are readily available at craft stores, hardware stores, or even around your home, making this an accessible craft for almost anyone, regardless of their crafting experience level.
- Wood Pieces: We’ll be utilizing scrap wood for a sustainable and cost-effective approach. Common lumber like 2x4s, 2x6s, or 2x8s are perfect.
- Rit Liquid Dye: Choose your desired color. For this project, I chose a vibrant Cherry Red to create a striking contrast and cheerful aesthetic.
- Extremely Hot Water: Essential for proper dye dissolution and optimal penetration into the wood fibers.
- Large Mixing Container: An empty Rubbermaid container, a sturdy plastic bucket, or a large basin works perfectly for mixing the dye solution and soaking the wood. Ensure it’s large enough to fully submerge your wood pieces.
- Rubber Gloves: Absolutely non-negotiable for protecting your hands from staining.
- Old Towels or Drop Cloth: For protecting your work surfaces and for drying the dyed wood blocks.
- Printer and Regular Paper: For printing your chosen photographs. Standard printer paper works well.
- Scissors or Craft Knife: For precise and neat cutting of your printed photos.
- Spray Adhesive: To securely and smoothly attach your photos to the wood blocks.
- Mod Podge (Matte or Gloss Finish): For sealing and protecting your photos and the entire wood block, providing durability and a professional finish.
- Foam Brush or Soft Applicator: For applying the Mod Podge evenly without streaks.
- Vinyl Cutter (e.g., Silhouette or Cricut) or Printer: For adding personalized names or decorative designs.
- Black Vinyl or Cardstock: For creating custom lettering, if choosing the personalization option.
Step-by-Step Guide: Crafting Your Personalized Photo Blocks with Rit Dye
Step 1: Preparing Your Wood Blocks for Dyeing
Our creative journey begins with the foundation of our project: the wood blocks. For this particular endeavor, I opted to work with reclaimed pieces of readily available lumber, specifically 2×4, 2×6, and 2×8 scraps. Embracing scrap wood is not only an economical choice but also an environmentally conscious one, giving new life to materials that might otherwise be discarded. The inherent beauty of this DIY project lies in its remarkable flexibility; precise measurements are not a strict requirement. I simply “eyeballed” my cuts, aiming for a delightful variety of heights and widths to create a dynamic and visually interesting display when the finished blocks are arranged together. Feel entirely free to experiment with different dimensions, shapes, and even various types of wood. It’s worth noting that softer woods, such as pine or poplar, tend to absorb dye more readily and deeply, yielding more intense colors, while harder woods like oak or maple might result in a lighter, more subtle hue that still beautifully showcases their unique grain. Before proceeding with the dyeing process, it’s crucial to ensure your wood pieces are impeccably clean, completely dry, and, for an even smoother finish and optimal dye absorption, consider lightly sanding them with fine-grit sandpaper.
Step 2: Mixing Your Rit Dye Solution for Optimal Color
Now, it’s time to prepare the star of our show: the Rit liquid dye! As previously mentioned, I personally selected a vibrant Cherry Red shade, confident that it would beautifully complement the room’s aesthetic and provide a cheerful, eye-catching result. The preparation process for the dye bath is remarkably straightforward, ensuring a hassle-free experience:
- Carefully pour exactly 1 cup of your chosen Rit liquid dye into your large mixing container.
- Next, gently add 16 cups of extremely hot water to the dye. The elevated temperature of the water is absolutely crucial here, as it plays a vital role in helping the dye pigments dissolve thoroughly and penetrate the wood fibers most effectively, ensuring a rich and even color.
- Stir the mixture vigorously and thoroughly until the dye is completely and uniformly integrated into the hot water, creating a consistent solution.
A crucial safety reminder: always remember to wear rubber gloves when handling dye to protect your hands from staining. Utilizing a dedicated mixing container, such as an old Rubbermaid bin or a sturdy plastic bucket, ensures that your everyday kitchenware remains pristine and free from dye residue. This specific ratio of dye to water is designed to provide a rich, saturated color, creating a deep and vibrant finish. However, you have complete artistic freedom to adjust this ratio for lighter or darker shades. For a more subtle, pastel-like appearance, you can use slightly less dye or add more water. Conversely, for a deeper, more intense hue, you can increase the amount of dye or extend the soaking time in the next step.
Step 3: Immersing and Dyeing Your Wood Blocks
This is truly where the magic of transformation begins to unfold! Submerging your prepped wood pieces into the vibrant dye bath is an incredibly simple, yet surprisingly satisfying, step. The immersion process ensures an even and deep penetration of color, unlike surface applications which can sometimes be streaky.
- With your rubber gloves securely on, carefully place each wood block into the prepared dye solution.
- Ensure that both sides of each piece are fully submerged in the liquid. For a rich and consistent color, I found that soaking each side for approximately 5 minutes yielded excellent results.
- The wonderful advantage of immersion dyeing is its low maintenance; it requires no tedious brushing, no constant wiping, and minimal active attention. Simply let the wood naturally soak up the beautiful color!
- For those desiring a darker, more intensely saturated color, you can easily achieve this by simply extending the soaking time. Conversely, for a lighter, more delicate shade, reduce the immersion period. Don’t hesitate to experiment with multiple dips or even layering different Rit colors for truly unique and personalized effects.
One of the most significant and user-friendly advantages of employing Rit dye for wood projects is the complete absence of strong, offensive chemical odors. This means you can comfortably perform this step right in your kitchen, living room, or any well-ventilated indoor space without the common concern of noxious fumes, which are frequently associated with traditional wood stains and finishes. It truly offers a clean, pleasant, and highly enjoyable crafting experience for all.
Step 4: Properly Drying Your Beautifully Dyed Wood
Once your wood blocks have absorbed the dye and achieved your desired color saturation and intensity, it’s time for the crucial drying phase. Proper drying is key to ensuring the longevity and aesthetic integrity of your finished photo blocks.
- Carefully remove each dyed block from the solution, allowing any excess dye to drip back into the container. This prevents unnecessary mess and ensures the dye solution can be potentially reused for other projects or disposed of properly.
- Place the wet, dyed blocks on an old towel, a protective drop cloth, or a wire rack to air dry completely. It’s advisable to avoid direct sunlight during this process, as intense sunlight can sometimes lead to uneven drying or premature fading of the dye. A shaded, well-ventilated area is ideal.
- The total drying time will naturally vary depending on several factors, including the specific type of wood you used (softer woods absorb more moisture), the ambient humidity of your environment, and the amount of dye the wood has absorbed. Typically, this process can take anywhere from several hours to overnight. It is absolutely imperative that the blocks are bone dry before you proceed to the next step to prevent any issues with warping, adhesion, or the overall finish.
A significant benefit I particularly appreciate with Rit dye is that, unlike traditional oil-based wood stains, there’s no need to meticulously wipe off any excess product. This makes the drying process largely hands-off and considerably less messy. The resulting finish beautifully mimics the deep, rich appearance of a high-quality wood stain, but with the added and distinct advantage of an almost limitless color palette, allowing for truly personalized and creative outcomes.
Step 5: Preparing and Attaching Your Cherished Photos
While your beautifully dyed wood blocks are patiently drying to perfection, you can simultaneously prepare the heart of your personalized creation: your chosen photographs! This step transforms simple blocks into cherished keepsakes.
- Begin by carefully selecting your favorite pictures. For this project, I chose heartwarming photos of my little one to create sentimental and custom nursery decor. Consider images that evoke joy and will be appreciated by the recipient.
- Print these chosen pictures using your home printer on regular, standard paper. There’s no absolute need for specialized photo paper unless you specifically prefer its finish; the subsequent application of Mod Podge will adequately protect and seal the images regardless of paper type.
- With precision, carefully cut each printed picture to size, ensuring it fits your now-dry wood blocks. Aim to leave just a small, even border remaining on each side of the photo; this slight margin will help create a neat, professional-looking edge once the photo is adhered to the block.
- Once your wood blocks are completely dry and the photos are cut, apply an even, thin layer of spray adhesive to the back of each photo. It is highly recommended to perform this step in a well-ventilated area to dissipate fumes from the adhesive.
- Carefully position and firmly press each photo onto its corresponding wood block, making sure it is perfectly centered and smooth. Use a brayer, a ruler, or simply your fingers to gently smooth out the photo and eliminate any trapped air bubbles, ensuring perfect adhesion.
Step 6: Sealing Your Photo Blocks with Mod Podge for Protection
To protect your precious photos and to give the entire set of blocks a durable, finished, and aesthetically pleasing look, applying a layer of Mod Podge is an absolutely essential step. This sealant not only secures the image but also adds a protective barrier.
- Using a foam brush or a soft applicator, carefully apply a thin, even layer of Mod Podge directly over each attached picture. Be gentle and use light strokes to avoid tearing or smudging the paper, especially if it’s regular printer paper.
- Ensure that the Mod Podge extends slightly beyond the edges of the photo, overlapping onto the dyed wood. This creates a complete and secure seal, preventing edges from lifting over time.
- Allow the first coat of Mod Podge to dry completely. Depending on the ambient humidity and thickness of the coat, this can typically take anywhere from 15 to 20 minutes, or potentially longer. The surface should feel dry to the touch and appear clear.
- For enhanced durability and superior protection, especially if you anticipate the blocks will be handled frequently or used in an area prone to wear, consider applying two or three thin, additional coats. Remember to allow each successive coat to dry fully between applications for the best results and a smooth finish.
Mod Podge is available in various finishes, including matte, gloss, and satin, allowing you to choose the one that best suits your desired aesthetic for the photo blocks. This crucial step not only seals and protects the printed photographs but also adds a subtle protective layer to the dyed wood itself, significantly enhancing its longevity and making the blocks easier to clean and maintain over time.
Step 7: Adding Personalized Details (Optional but Highly Recommended)
To truly make these photo blocks unique and deeply personal, consider adding a customized name, a special date, or a heartfelt message. This optional step elevates the craft from a simple display to a treasured keepsake.
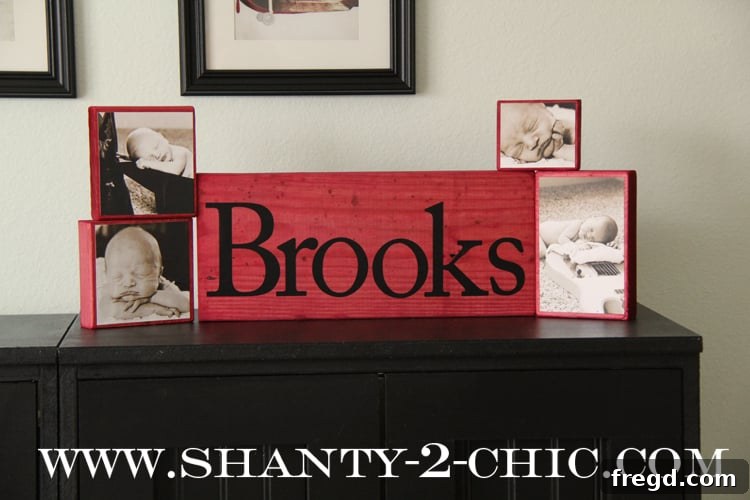
- For a polished and professional look, I utilized my Silhouette cutting machine to precisely cut out my baby’s name from black vinyl. Vinyl offers crisp edges, a clean finish, and is remarkably easy to apply, often coming with transfer tape for perfect placement.
- If you do not have access to a vinyl cutting machine, there’s no need to worry! You can easily achieve a similar personalized effect using readily available tools. Simply print the desired name or message on regular paper, cut it out with care, and then adhere it to the block using Mod Podge, exactly as you did with the photos. Another fantastic option for a more hand-crafted feel is to use stencil letters and permanent paint markers to directly apply names or designs onto the wood.
The Stunning Results: Showcase Your Creativity with Personalized Photo Blocks!
And there you have it! A collection of beautifully personalized photo blocks that not only showcase your creativity and crafting skills but also capture and display precious memories in a truly unique way. The rich, stained appearance achieved with Rit dye is truly remarkable, offering a vibrant yet wonderfully natural finish that perfectly complements the photographs you’ve chosen. I am absolutely thrilled with how these personalized photo blocks turned out! The chosen Cherry Red dye provides a deep, warm, and inviting backdrop, making the embedded photos pop with vivid contrast and adding a cheerful, personalized accent to any space – be it a nursery, living room, or office.
Don’t you just adore the rich, deeply saturated, and beautifully stained effect that the Rit dye provides? It truly elevates simple, unfinished wood blocks into striking, memorable decorative pieces that draw the eye and spark conversation.
LOVE!
Beyond Photo Blocks: Unlocking the Versatility of Rit Dye on Wood
These personalized photo blocks are far more than just a single craft project; they represent a remarkably versatile and budget-friendly gift idea that can be effortlessly adapted for countless occasions and recipients. I’ve created variations of photo blocks before, such as the set I crafted for my in-laws last year, but the exciting discovery of Rit dye’s power on wood has truly unlocked an entirely new realm of creative avenues and design possibilities. Imagine the sheer impact of these vibrant blocks as:
- Heartfelt Holiday Gifts: Perfect for Christmas, Mother’s Day, Father’s Day, or Grandparents’ Day, filled with treasured family photos and dyed in festive or beloved colors.
- Charming Baby Shower Gifts: A thoughtful, handmade present for expectant or new parents, featuring nursery-themed colors, adorable baby photos, or birth statistics.
- Memorable Wedding or Anniversary Presents: Commemorate special marital moments with blocks dyed in colors that beautifully match wedding themes or the couple’s home decor, displaying photos from their journey together.
- Elegant Decorative Accents: Utilize them as stylish bookshelf decor, personalized desk ornaments, or captivating mantelpiece displays that reflect personal stories.
- Customized Room Decor: Match the blocks perfectly to any child’s room theme or an individual’s personal style, creating bespoke decorative pieces that are truly unique.
The creative potential, however, extends far beyond just photo blocks. Consider applying Rit dye to a multitude of other unfinished wood projects around your home or for gifting:
- Colorful Coasters: Craft a vibrant and protective set of dyed wooden coasters that add a pop of color to any coffee table.
- Small Shelves or Organizers: Infuse new life and a contemporary aesthetic into functional home items like small wall shelves, desk organizers, or utility trays.
- Unique Wooden Toys: With appropriate non-toxic sealants applied over the dyed wood, you can create safe, wonderfully vibrant, and engaging children’s toys (always verify product safety for children’s use).
- Personalized Picture Frames: Dye plain, unfinished wooden frames to perfectly match the artwork, photographs, or room decor they will hold.
- Revitalized Jewelry Boxes: Give an old or new wooden jewelry box a fresh, unique, and colorful makeover, transforming it into a cherished personal item.
Working with Rit dye on wood has been an incredibly rewarding and enlightening experience for me. It’s truly amazing to uncover just how cool, effective, and versatile this product is for a broad spectrum of wood projects, offering a clean, user-friendly, and brilliantly colorful alternative to more traditional wood finishes. This discovery has undoubtedly broadened my creative horizons!
Connect with Rit Dye for More Inspiration and Creative Ideas
Ready to explore even more vibrant possibilities and unleash your inner artist with Rit dye? Stay updated on their latest innovative products, discover a wealth of inspiring project ideas, and glean valuable tips and tricks by connecting with them through their official channels. Their resources are a fantastic source of inspiration for any dyeing project!
Rit Dye Official Website: Explore Products & Ideas
Rit Dye Blog: Dive into Creative Projects & Tutorials
Join the Rit Dye Color Community on Facebook
Follow Rit Dye on Twitter for Latest Updates
Final Thoughts and Your Next DIY Adventure
This inspiring project stands as a true testament to how simple materials, combined with a touch of ingenuity and vibrant color, can yield truly meaningful and aesthetically pleasing results. Whether your intention is to craft these personalized photo blocks as thoughtful gifts for friends and family or to create charming, custom decor for your own home, the entire process is undeniably enjoyable, the required materials are readily accessible, and the outcome is consistently charming and rewarding. The exciting discovery of Rit dye’s exceptional effectiveness on wood has not only enriched my own crafting repertoire but has also opened up a whole new realm of DIY possibilities. It encourages passionate experimentation with a broad spectrum of colors and textures on a material that has traditionally been confined to a more limited palette of natural wood tones.
I sincerely hope this detailed guide and step-by-step tutorial inspires you to gather some Rit dye and your own scrap wood to embark on creating something beautiful, personal, and uniquely yours. Don’t shy away from the opportunity to experiment with different colors, various wood types, and distinct personal touches. The beauty of DIY lies in the freedom to create! Happy crafting, and may your next project be filled with color and joy!