
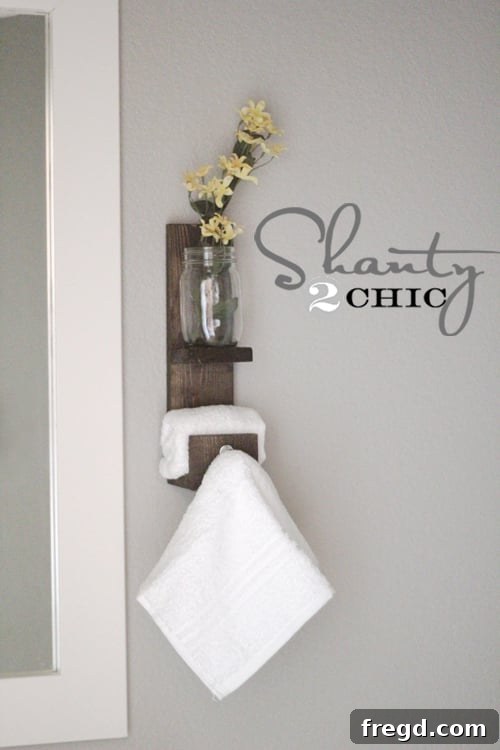
Welcome to a fresh and exciting DIY journey! If you’re anything like me, you’re always on the lookout for budget-friendly, charming ways to refresh your living spaces. Bathroom redecorating can often feel like a never-ending project, especially when you’re seeking that perfect blend of functionality and style without breaking the bank. After completing some initial updates like painting the walls and adding a DIY bathroom frame, I found myself in search of a clever solution for a hand towel holder – something unique that would complement the space and stand out from generic store-bought options. That’s when inspiration struck, leading to this incredibly easy, affordable, and quick-to-build Mason Jar Hand Towel Hook.
This project is more than just a towel hook; it’s a statement piece that brings rustic charm and practical elegance to your bathroom. Imagine a handcrafted wood fixture, complete with a beautiful mason jar for a touch of greenery or extra storage, and a sturdy hook for your everyday hand towel. What if I told you that you could create this stylish piece in about an hour, from start to finish, for under $5? It sounds almost too good to be true, but it’s not! This project epitomizes smart crafting: minimal tools, simple steps, and maximum impact. Say goodbye to drilling multiple holes and fumbling with screws; with the power of modern wood glue, this entire piece comes together effortlessly, promising a durable and beautiful addition to your home. Get ready to transform your bathroom with a personal touch that speaks volumes about your style and DIY prowess.
Why Choose This DIY Mason Jar Hand Towel Hook?
In today’s world of mass-produced decor, there’s a growing appreciation for handcrafted items that bring warmth and character to a home. This DIY project offers numerous compelling reasons to roll up your sleeves and get creative:
- Budget-Friendly Beauty: At under $5, this project is incredibly economical, especially compared to designer bathroom accessories that can cost many times more. You get high-end style without the hefty price tag.
- Speed and Simplicity: You don’t need to be an experienced woodworker to tackle this. With its straightforward steps and minimal drying times, you can have this piece ready in about an hour of active work, making it perfect for weekend warriors or those with limited crafting time.
- No Nails, No Screws: Thanks to the remarkable strength of Gorilla Glue wood glue, you won’t need to fuss with power tools for assembly. This makes the project safer, cleaner, and more accessible for everyone.
- Customizable Design: While we’ll be using Rust-Oleum Dark Walnut stain, you have complete freedom to choose any paint or stain color that matches your bathroom’s aesthetic. You can also experiment with different mason jar sizes, finishes, and the style of the hook to make it truly yours.
- Functional and Stylish: This hook not only provides a convenient spot for your hand towel but also offers a charming small shelf for a decorative mason jar, perfect for holding flowers, cotton balls, or other small essentials.
- Eco-Friendly Appeal: By crafting your own decor, you’re making a conscious choice to reduce waste and embrace sustainability, often by using readily available or reclaimed materials.
Materials You’ll Need:
Gathering your materials before you begin ensures a smooth and uninterrupted crafting experience. Here’s what you’ll need to create your stunning new hand towel hook:
- Wood: One 1×4 pine board. You’ll only need approximately 2 feet in length, so purchase the shortest piece available at your local hardware store to minimize waste and cost. Pine is easy to cut and stain, making it ideal for beginners.
- Wood Glue: Gorilla Glue Wood Glue is highly recommended for its strong bond and quick drying time. Its water-resistant properties also make it suitable for bathroom environments.
- Wood Stain: Rust-Oleum Dark Walnut stain (or your preferred color). This will give your wood a rich, finished look and protect it.
- Epoxy: Gorilla Glue Epoxy or another strong, clear-drying epoxy for securely attaching the mason jar.
- Mason Jar: One standard-sized mason jar (pint or half-pint works well). The size can vary based on your preference and what you plan to store in it.
- Robe Hook: One decorative robe hook. I found a simple yet elegant one at Lowe’s for about $3. Choose a style that complements your bathroom’s existing fixtures.
Tools You’ll Need:
While this project minimizes the need for complex power tools, a few basic items will make the process easier and ensure a professional finish:
- Saw: A miter saw, hand saw, or circular saw for accurately cutting your wood pieces.
- Measuring Tape: For precise measurements of your wood cuts.
- Pencil: For marking your cut lines.
- Clamps (Optional but Recommended): Woodworking clamps can help hold glued pieces firmly in place while they dry, ensuring a stronger bond.
- Rags or Foam Brush: For applying wood stain.
- Protective Gloves: When working with stain and glue.
- Safety Glasses: Especially when cutting wood.
Step-by-Step Guide: Crafting Your Mason Jar Hand Towel Hook
Let’s get started on bringing this beautiful and functional piece to life. Follow these detailed steps carefully for the best results.
Step 1: Prepare Your Wood Pieces
Begin by cutting your 1×4 pine board into the following precise lengths. Accuracy here is key for a well-aligned final product:
- One piece at 13.5 inches (this will be your main backing board).
- Two pieces at 3 inches each (these will form the core of your ledge).
- One piece at 2.75 inches (this shorter piece will complete the front edge of the ledge).
Always double-check your measurements before cutting. If you’re using a hand saw, secure the wood in a vise or with clamps for clean, straight cuts. Safety first: always wear safety glasses when operating any saw.
Step 2: Assemble the Backing and First Ledge Piece
This entire assembly relies on the incredible strength of Gorilla Glue wood glue, eliminating the need for nails or screws. This innovative approach makes the project simple and visually clean.
Take your longest board (13.5 inches). Apply a thin, consistent line of Gorilla Glue wood glue across the middle of one side, approximately 2 inches from the bottom edge. Ensure the glue is evenly distributed to create a strong bond.
Carefully place one of the 3-inch blocks directly onto the glue line, aligning it horizontally with the main board. This 3-inch block will form the initial base of the ledge where the mason jar will eventually sit. Press firmly for a few moments to ensure good contact. If you have clamps, now is a good time to use them to hold the pieces together while the glue sets for approximately 10 minutes.
Step 3: Construct the Front Ledge Piece
Next, take the remaining 3-inch block and the 2.75-inch block. Apply a thin line of wood glue to one of the 3-inch block’s longer edges. Carefully attach the 2.75-inch block to it, ensuring it is centered. The 2.75-inch block should be on the bottom, flush with one side of the 3-inch block, creating a slight overhang on the other side. This creates a stepped effect for the ledge. Press firmly and allow to dry for about 10 minutes. This forms the front part of your dual-layer ledge.
Step 4: Attach the Full Ledge to the Backing Board
Once the individual components have had about 10 minutes to set, it’s time to bring them all together. Apply a thin line of Gorilla Glue wood glue to the bottom edge of the longest board – specifically, the edge facing the front, below where the first 3-inch block was attached. Now, carefully attach the combined ledge piece (from Step 3) to this glue line, ensuring that the 3-inch block of this combined piece is attached to the main board, creating a full ledge. The 2.75-inch block will be at the very front, forming a decorative lip.
The structure should now have the 3-inch block from Step 2 attached higher up on the main board, and the combined 3-inch and 2.75-inch blocks from Step 3 forming the front edge of the ledge, creating a stable, two-tiered surface. Allow this entire assembly to dry for at least 30 minutes, or longer if your environment is humid. A strong bond here is crucial for the longevity of your towel hook.
Step 5: Apply Wood Stain for a Polished Finish
Once all the glue has thoroughly dried and cured, it’s time to add the finishing touch with wood stain. I chose Rust-Oleum Dark Walnut stain, which provides a rich, deep hue that enhances the natural wood grain and adds a rustic, elegant feel. However, feel free to select a stain color that best complements your existing bathroom decor.
Before staining, ensure the wood surface is clean and free of any dust or glue residue. You may lightly sand any rough edges with fine-grit sandpaper for a smoother finish. Using a clean rag or foam brush, apply a single, even coat of stain over the entire piece, including all edges and crevices. Work in the direction of the wood grain for the best results. Allow the stain to penetrate for a few minutes, then wipe off any excess with a clean, dry cloth. This prevents a patchy or overly dark finish. Let the stain dry completely according to the manufacturer’s instructions, which typically takes several hours. If you desire a deeper color, you can apply a second coat after the first has fully dried.
The Final Touches: Assembling and Styling
With the main wooden structure stained and dried, it’s time to add the functional and decorative elements that truly make this piece shine.
Step 6: Secure the Mason Jar
Take your chosen mason jar and turn it upside down. Apply a generous amount of Gorilla Glue Epoxy to the bottom surface of the jar. I used enough to create a small puddle, ensuring maximum adhesion. Carefully center the mason jar on the upper ledge of your wooden piece. Press down firmly and hold in place for a few moments. It’s crucial to allow the epoxy to cure completely, which can take several hours (refer to the epoxy product’s instructions for exact curing times). A well-cured epoxy bond will ensure your mason jar stays securely in place.
Step 7: Attach the Robe Hook
Once the mason jar is firmly attached, it’s time to add the practical element for your hand towel. Select your simple yet cute robe hook. Position it on the lower front portion of the main wooden backing board, centered and at a height that’s convenient for hanging a hand towel. Mark the screw holes with a pencil. Using a drill, pre-drill small pilot holes (this prevents the wood from splitting). Then, screw the robe hook securely into place. This quick addition completes the primary function of your DIY piece.
Step 8: Decorate and Style Your New Towel Hook
Now for the fun part: styling! This is where you infuse your personality into the piece. For a pop of color and natural elegance, place a beautiful stem of artificial or fresh flowers into the mason jar. Consider colors that complement your bathroom tiles or wall paint. Behind the main ledge, where the first 3-inch block was attached, there’s a perfect recessed space to tuck in a rolled-up hand towel, keeping a spare one neatly in reserve. Finally, drape your everyday hand towel gracefully over the new hook.
You can also use the mason jar for other small bathroom essentials like cotton balls, Q-tips, or even a small succulent plant for a touch of greenery that doesn’t require much upkeep. The possibilities for customization are endless!
Tips for Success and Customization
- Wood Selection: While pine is easy to work with, consider oak or maple for a more durable and luxurious feel, though they might be harder to cut and more expensive.
- Sanding: For an ultra-smooth finish, sand all wood pieces with fine-grit sandpaper (120-220 grit) before applying stain. This will help the stain penetrate more evenly.
- Stain Alternatives: Instead of stain, you could paint the wood in a color that matches your bathroom, or use chalk paint for a distressed, farmhouse look. A clear protective topcoat (like polyurethane) can also be applied over stain or paint for added durability in a humid bathroom environment.
- Mason Jar Alternatives: If you don’t like mason jars, any small, decorative glass or ceramic container with a flat bottom could work. Just ensure it’s securely attached with epoxy.
- Hook Style: Explore different types of hooks – from vintage-inspired to modern minimalist – to find one that perfectly complements your chosen aesthetic.
- Installation: To mount your finished piece to the wall, you can attach two small D-ring hangers to the back of the longest board, or drill two pilot holes through the main board (concealed behind the mason jar) and use screws to secure it directly into wall studs or with drywall anchors.
- Drying Times: Always respect the drying and curing times for glues, stains, and epoxies. Rushing these steps can compromise the integrity and finish of your project.
Conclusion: Elevate Your Bathroom with DIY Charm
And just like that, you’ve created a beautiful, functional, and personalized addition to your bathroom! This DIY Mason Jar Hand Towel Hook proves that enhancing your home decor doesn’t require a hefty budget or extensive crafting experience. With simple materials, a few basic tools, and a little creative spirit, you can achieve a fresh new look that feels custom-made for your space.
This project is more than just a place to hang a towel; it’s a testament to the joy of handmade items and the satisfaction of seeing your creative vision come to life. It adds a touch of rustic elegance, an organized spot for essentials, and a conversation starter for guests. I encourage you to embrace the challenge and enjoy the process of crafting something truly unique for your home.
Now that your bathroom boasts this charming new accessory, you might find yourself inspired to tackle even more guest bath decorating projects! I’ll be back to share more exciting DIY ideas soon.
If you’ve loved following along with my DIY towel hook project, I would be absolutely thrilled if you shared it! Please consider pinning this idea to your favorite Pinterest boards below to inspire others to embark on their own creative journeys. Your support means the world!
Thank you for joining me on this DIY adventure, and Happy crafting! Have a wonderful week!
~Ashley