
Hello, fellow craft enthusiasts and holiday dreamers!
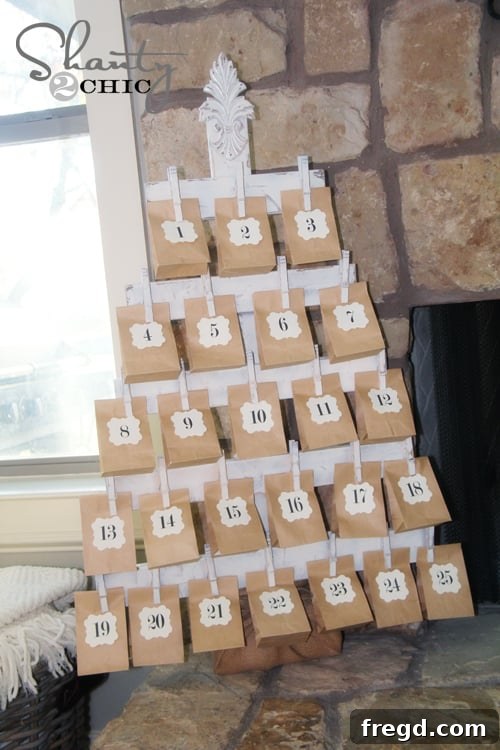
As the festive season approaches, there’s a unique joy in crafting something beautiful and personal for your home. Today, we’re thrilled to share an incredibly charming and straightforward DIY project that will add a touch of rustic elegance to your holiday decor: a handmade Wooden Advent Calendar. This versatile piece not only serves as a delightful countdown to Christmas but can also be transformed into an adorable display for all those cherished holiday cards you receive.
Imagine the warmth and anticipation this piece will bring to your home. It’s more than just a calendar; it’s a canvas for creating daily moments of joy and an heirloom in the making. Let’s dive into how you can bring this project to life!
This project is designed to be surprisingly simple and quick to assemble, making it perfect for busy individuals who want to infuse their holidays with a personal touch without spending days on a single craft. In fact, many have completed similar projects in just an afternoon!
Craft Your Own Wood Advent Calendar with FREE Printables
Creating a beautiful and functional wood advent calendar doesn’t require a workshop full of expensive tools or years of carpentry experience. Our approach focuses on affordability, accessibility, and ease of construction, ensuring that anyone can tackle this project. The secret lies in using common, inexpensive materials and embracing simple techniques that yield stunning results.
**Gathering Your Materials:**
We started with two 1×3 inch furring strips, readily available at any major home improvement store like Lowe’s or Home Depot. These strips are incredibly cost-effective, typically costing less than $2 each, making this an excellent budget-friendly DIY. Furring strips are perfect for this project due to their light weight and ease of cutting, offering a rustic appeal that aligns perfectly with holiday decor.
For your convenience, here are the dimensions we used to achieve the iconic Christmas tree shape:
While these dimensions provide a great starting point, feel free to adjust them to fit your desired size and space. The beauty of DIY is the freedom to customize!
**Essential Tools for Woodworking Beginners:**
For those who might be hesitant about woodworking because they don’t own a saw, let us assure you: this project is a fantastic entry point! You don’t need a heavy-duty miter saw for these simple cuts. A compact, handheld craft saw is more than sufficient and incredibly easy to use. Investing in a good quality, affordable hand saw can unlock a world of DIY possibilities for your home. It’s a game-changer for quick, precise cuts on smaller projects and truly a worthwhile addition to any crafter’s toolkit.
Consider it an early Christmas gift to yourself – a tool that will inspire countless future creations. You’ll be amazed at the variety of projects you can accomplish with such a simple yet effective tool!
**Step-by-Step Construction Process:**
Building your advent calendar is a rewarding process. Follow these steps, guided by the images below, to construct the wooden tree frame.
1. **Measuring and Marking:** Using a tape measure and pencil, carefully mark your furring strips according to the dimensions provided earlier. Precision here ensures a symmetrical and sturdy tree shape.
2. **Making Your Cuts:** With your craft saw, carefully cut along your marked lines. Always ensure a stable surface and follow proper safety guidelines when using any cutting tool. The small size of the furring strips makes these cuts manageable and quick.
3. **Sanding:** Once all pieces are cut, lightly sand the edges to remove any splinters or rough spots. This not only makes the piece smoother to handle but also prepares the wood for painting, ensuring a professional finish.
4. **Assembling the Frame:** Begin by arranging your cut pieces to form the tree shape. Apply a good quality wood glue to the joining surfaces. Wood glue provides a strong, lasting bond, essential for a durable advent calendar. You might find clamps helpful to hold the pieces securely in place while the glue dries, ensuring tight joints.
5. **Attaching the Horizontal Strips:** Once the main tree frame is stable, attach the horizontal strips that will hold your advent bags or cards. Ensure even spacing between each strip to accommodate your chosen decorations. A ruler and pencil will be your best friends here. Secure these strips with wood glue as well, and if desired, small brad nails for extra reinforcement.
**Finishing Touches: Painting and Distressing for a Rustic Charm**
Now for the fun part – giving your advent calendar its unique character! We chose a popular distressing method to achieve a beautifully aged and rustic look, perfect for holiday decor. This technique involves applying a resist (like Vaseline) to certain areas before painting, which allows the base wood or a contrasting undercoat to peek through when lightly sanded. This creates a charming, worn effect that adds depth and history to your piece.
To explore this distressing technique in detail, you can refer to our full tutorial. Simply click on the photo below, and it will guide you through the process, offering tips and tricks for achieving that perfectly weathered finish:
Once your paint has thoroughly dried and you’re satisfied with the distressed look, your advent calendar frame is complete and ready for its festive adornments!
**Personalizing Your Advent Calendar with Daily Surprises**
The true magic of an advent calendar comes from the daily anticipation it builds. We chose to hang small, festive bags from clips attached to each horizontal strip. These bags can be filled with a variety of delights, catering to all ages and preferences. For the little ones, think small candies, vibrant stickers, miniature toys, or delightful treats. For older children or adults, consider small notes with holiday activities, riddles, scripture verses, or even tiny handmade trinkets. The possibilities are endless, making each day a unique surprise!
**Free Printable Advent Numbers**
To complete the advent calendar, clearly numbered tags are essential. We designed and created a set of attractive, easy-to-read numbers that you can print directly from your computer! These free printables are designed to perfectly complement your rustic wood calendar.
Ready to print? Click the links below to download your free advent numbers:
Print Advent Numbers 1-15 (PDF)
Print Advent Numbers 16-25 (PDF)
**The Perfect Paper Punch for Your Number Tags:**
To give your printed numbers a polished, uniform look, a good quality paper punch is invaluable. We found a fantastic punch that creates beautifully shaped tags, perfect for hanging on your advent calendar. A 1.5-inch circle punch is a versatile tool for many crafting projects beyond just this calendar!
While we recommend a specific paper punch, any decorative punch or even simply cutting them into squares or circles will work beautifully. Once punched, attach your numbers to your bags or directly to the clips using string, ribbon, or small wire.
**Your Completed Advent Calendar: A Joyful Centerpiece**
And there you have it! Your very own handcrafted wood advent calendar is complete. We love displaying ours by the fireplace, where its warm, rustic charm enhances the festive ambiance of the room. This piece truly adds a unique, personal touch that store-bought decorations often lack.
Beyond its primary function as an advent calendar, this design also makes a perfect Christmas card display. As holiday cards begin to arrive, simply clip them onto the horizontal strips, transforming your calendar into a beautiful, ever-evolving gallery of festive greetings from loved ones. It’s a wonderful way to keep those cherished cards visible and celebrated throughout the season.
**More Inspiration for Your Holiday Decor:**
Still craving more festive views? Here are additional glimpses of the finished wood advent calendar, showcasing its versatility and charm in various settings. Let these images spark your creativity and inspire how you’ll display your own masterpiece!
We truly hope you love this project as much as we do and that it brings a little extra joy and handmade charm to your holiday season!
If you found this tutorial helpful and inspiring, we would be incredibly grateful if you could share it with your friends and fellow crafters. Pin this advent calendar to your favorite Pinterest boards to save it for later and spread the holiday crafting cheer!
Stay connected with us for more DIY ideas, home decor inspiration, and crafting tutorials. Be sure to follow Shanty on our social media channels:
Follow Shanty2Chic on Facebook for daily inspiration and updates!
And don’t forget to explore our Pinterest boards for a treasure trove of creative projects!
Happy crafting, and happy holidays!