
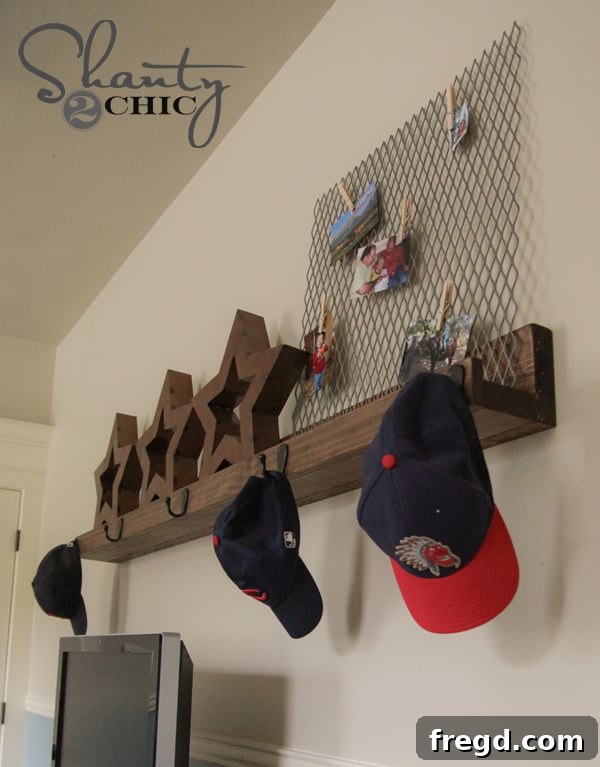
Transforming a Blank Wall: Build a DIY Ledge with Hooks for Ultimate Organization
Every home has those spots – blank spaces that silently beckon for a touch of personalization or a clever storage solution. For months, perhaps even a year, a prominent empty wall above my son’s dresser was one such place. It wasn’t just an aesthetic challenge; it also coincided with another recurring parental dilemma: the ever-growing collection of baseball hats perpetually strewn about, creating a daily tidying task.
I envisioned a project that would not only adorn the wall but also bring order to the hat chaos. The goal was to create a functional yet stylish piece that could grow with him. This DIY ledge with hooks proved to be the perfect solution, marrying form and function beautifully. It’s a project that delivers on both fronts, adding character to the room while keeping accessories neatly organized and easily accessible.
The result? A custom-built storage solution that completely transformed the space and solved my hat-stacking woes. Let’s dive into how you can create a similar, impactful piece for your home or your child’s room!
Designing Your Functional Storage Ledge
This project builds upon the concept of picture ledges I’ve crafted before for his room. However, for this particular wall and its specific purpose of holding hats and potentially other items, I wanted something with more depth and a robust presence. This design incorporates a beefier structure, providing ample space for display items on top while the hooks below handle the hats. It’s a practical enhancement that adds significant storage capacity and visual weight to the wall.
Essential Materials You’ll Need
Gathering your materials before you begin is key to a smooth DIY experience. This project utilizes common lumber dimensions that are readily available at most hardware stores, keeping the cost down while ensuring durability. Here’s what I used:
- 1×3 Pine Board: This piece forms the front lip of the ledge, giving it its classic picture ledge profile and preventing items from sliding off.
- 2×4 Pine Board: This acts as the primary support structure for the top ledge, providing strength and a solid base for attaching to the wall.
- 2×6 Pine Board: The largest component, this forms the main flat surface of the ledge, offering generous space for display items or additional storage.
- Gorilla Wood Glue: Essential for reinforcing the joints, ensuring a strong and lasting bond between your wood pieces.
- 2.5″ Pocket Hole Screws: These specialized screws are designed to work seamlessly with pocket holes, creating incredibly strong and concealed joints.
- Wood Stain (Rust-Oleum Ultimate Wood Stain in Dark Walnut): To give your finished ledge a beautiful, rich color that complements your existing decor. Choose a shade that matches your aesthetic.
- Robe Hooks: I found these sturdy and aesthetically pleasing hooks at Home Depot, but similar options are widely available online or at other hardware stores. These will be perfect for hanging hats, jackets, or bags.
- 3.5″ Wood Screws: For securely mounting the completed ledge to wall studs, ensuring it can hold significant weight without compromise.
The total cost for the wood for this shelf was approximately $12, making it a highly affordable and impactful home improvement project.
Tools for a Seamless DIY Project
Having the right tools can make all the difference in the success and enjoyment of your DIY endeavors. For this project, a few key tools will significantly simplify the process and ensure a professional finish:
- Kreg Jig: An absolute game-changer for woodworking, this tool allows you to create strong pocket hole joints quickly and accurately. If you don’t own one, it’s a worthwhile investment for any DIY enthusiast. You can find the Kreg Jig on Amazon.
- Cordless Brad Nailer (e.g., Ryobi AirStrike Cordless Nail Gun): A powerful and convenient tool for attaching trim and smaller pieces of wood. Its cordless design offers unmatched freedom and ease of use. I highly recommend the Ryobi AirStrike Cordless Nail Gun.
- Stud Finder: Crucial for safely and securely mounting your shelf to the wall. Locating wall studs ensures your shelf is anchored into solid wood, preventing it from pulling away from the drywall. A reliable stud finder is an indispensable tool for many home projects.
- Drill/Driver (e.g., Ryobi 18V Drill): For pre-drilling holes and driving screws with ease. A versatile cordless drill is a must-have for any toolkit.
- Measuring Tape and Pencil: For accurate measurements and marking cuts and drill points.
- Safety Glasses: Always protect your eyes when working with power tools and wood.
Step-by-Step DIY Guide: Building Your Ledge
1. Preparing Your Wood and Creating the Shelf Base
The foundation of this sturdy ledge begins with strategically placed pocket holes. I used my Kreg Jig to create seven 1.5-inch pocket holes along one side of the 2×4 board. The Kreg Jig makes this process incredibly simple, allowing you to create strong, concealed joints that are perfect for furniture construction. Ensure your jig settings are appropriate for the thickness of your wood, and always clamp your material firmly in place before drilling to prevent movement and ensure precise holes.
2. Assembling the Main Shelf Structure
With the pocket holes ready, it’s time to join the 2×4 and 2×6 boards. Apply a bead of Gorilla Wood Glue along the edge of the 2×4 that will connect with the 2×6. Then, align the boards, ensuring they are flush, and drive 2.5-inch pocket hole screws through the pre-drilled pocket holes. The combination of wood glue and pocket hole screws creates an incredibly robust joint, providing the stability and strength needed for a functional shelf that will hold up over time. Make sure your pieces are perfectly square before fully tightening the screws.
3. Adding the Decorative and Functional Lip
The 1×3 board serves as the front lip of the shelf, adding both a finished look and practical functionality by creating a barrier for items placed on the ledge. Begin by applying a generous, continuous line of Gorilla Wood Glue along the front edge of your assembled 2×4 and 2×6 structure where the 1×3 will attach. This ensures maximum adhesion and a durable bond.
Next, carefully position the 1×3 board against the glued edge. Using your Ryobi AirStrike Cordless Nail Gun (or a similar brad nailer), secure the 1×3 in place with brad nails. The AirStrike makes quick work of this step, providing consistent and powerful nailing without the hassle of an air compressor. Its cordless convenience is a huge advantage, allowing you to move freely and work efficiently. This tool is genuinely awesome – a powerful, easy-to-use addition to any workshop!
For those still considering adding a cordless nail gun to their toolkit, I wholeheartedly recommend it. It dramatically speeds up assembly, provides a professional finish, and makes woodworking projects much more enjoyable. It truly is a legitimate tool that you’ll find yourself reaching for again and again!
And just like that, the main assembly of your ledge is complete! It’s surprisingly simple and quick, proving that impressive DIY projects don’t always require complex techniques.
Finishing Touches: Staining and Sealing
Once your ledge is fully assembled and the glue has dried, it’s time for the finishing touches. I chose Rust-Oleum Ultimate Wood Stain in Dark Walnut to match my son’s existing furniture, including his bed and nightstands. This rich, deep stain provides a beautiful, classic finish that enhances the natural grain of the wood.
Apply the stain according to the manufacturer’s instructions, typically using a brush or rag. Work in the direction of the wood grain, wiping off any excess after a few minutes to achieve an even color. Allow ample drying time, which can vary depending on humidity and temperature. For added durability and protection, especially in a child’s room, consider applying a coat of clear polyurethane or a similar sealant once the stain is completely dry. This will protect the wood from scuffs, moisture, and general wear and tear, ensuring your hard work lasts for years to come.
Secure Installation: Mounting Your Ledge
Proper installation is paramount to ensuring your new ledge is safe, secure, and can support the weight of items placed on it. For this project, attaching the ledge directly into the wall studs provides the strongest possible anchor. Before hanging, grab your trusty stud finder.
A stud finder is an invaluable tool for any homeowner. It helps you locate the hidden wooden studs behind your drywall, allowing you to fasten heavy items securely. You’ll likely be surprised at how often you use this tool once you have one! Mark the locations of your studs clearly on the wall where you intend to hang the ledge.
With the studs identified, position the ledge against the wall. Having an extra set of hands for this step is incredibly helpful; my dad kindly assisted by holding the ledge level and in place while I drove the screws. Using 3.5-inch wood screws, drive them through the back 2×6 board of your ledge and directly into the center of the wall studs. Space your screws evenly across the length of the ledge for maximum stability. Make sure the ledge is perfectly level before fully tightening all screws.
Please excuse the slightly grainy photos! We had some rainy weather today, which always makes indoor photography a bit challenging, but hopefully, they still convey the process effectively.
The Grand Finale: Attaching the Hooks
With the shelf securely mounted to the wall, the final step is to add the hooks – the key feature for hat organization. I found some fantastic robe hooks at Home Depot that were both sturdy and aesthetically pleasing. These types of hooks are generally quite strong and have a design that prevents hats from slipping off easily. You can often find similar multi-purpose hooks at great prices online, such as these robe hooks on Amazon.
To ensure even spacing and a clean look, I carefully measured and marked the placement for each hook along the bottom edge of the ledge. Once marked, I used my Ryobi 18V drill to pre-drill a small pilot hole for each screw. Pre-drilling prevents the wood from splitting and makes driving the screws much easier and more precise.
Finally, I attached the hooks firmly using the screws provided with them, driving them into the pre-drilled holes with my Ryobi 18V drill. Ensure each hook is tightly secured, as they will bear the weight of the hats and other items.
Your Completed DIY Ledge with Hooks
And there you have it – a truly functional and stylish DIY ledge with hooks, ready to bring organization and character to any room! It’s rewarding to see the project come to life, transforming a once-empty wall into a purposeful and attractive storage solution. It’s not just “pretty”; it’s incredibly practical and, in my son’s words, “cool”!
Share Your DIY Success and Connect!
I hope this detailed guide inspires you to tackle this project and create your own custom storage solution. My son absolutely loves having his hats neatly organized and displayed, and I’m thrilled to have that blank space beautifully filled. The pride of creating something with your own hands, combined with the practical benefits, makes DIY projects incredibly rewarding.
What do you think of this DIY ledge with hooks? Are you ready to try building one for your home? I would love for you to share this project and PIN it to your DIY boards! Your support helps inspire more creative projects.
Thank you so much for stopping by and taking the time to read this tutorial. If you have any questions at all about the materials, tools, or steps involved, please don’t hesitate to ask in the comments below. Happy building!
~Whitney