
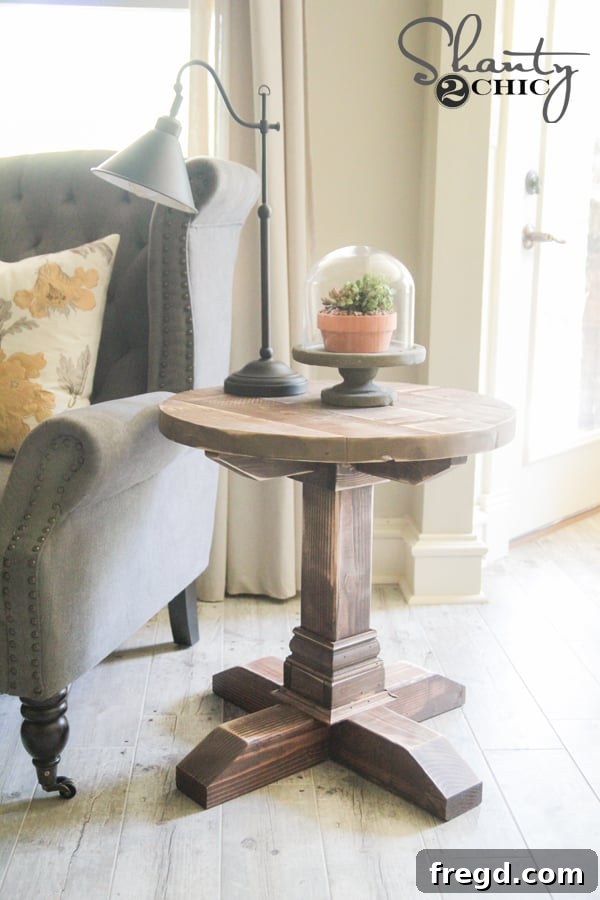
Welcome, fellow DIY enthusiasts! We are absolutely thrilled to share this incredible woodworking project that will add both charm and functionality to your home. If you’ve been searching for a stylish yet simple side table to complement your favorite armchair, you’ve landed in the perfect spot. This DIY round side table not only turned out beautifully but was also an incredibly satisfying build, proving that quality doesn’t have to come with a hefty price tag. Imagine crafting a custom piece of furniture for under $30 – yes, you read that right! That’s a deal you simply can’t pass up.
Crafting your own furniture is an empowering experience, and this round side table is a testament to what you can achieve with a little effort and the right guidance. It’s a fantastic project for both seasoned woodworkers and those just beginning their DIY journey. So, let’s dive into the details and see how this stunning, budget-friendly piece came to life!
Build Your Own Elegant Round Side Table: Free Plans & Step-by-Step Guide
Transform Your Space with a Handmade Accent Table
This project is designed to be straightforward and rewarding. Before you begin, a quick note on tools: if you’re working with 4×4 lumber for the table leg, make sure your saw blade can accommodate its thickness. Some 10-inch miter saws might not have sufficient clearance. Always prioritize safety and ensure your tools are suitable for the task at hand.
We’re going to walk you through every single step of this build, making it easy to follow along. To ensure you have all the precise measurements and cuts, we’ve prepared detailed, free printable plans for you. You can download these essential plans by clicking HERE or by using the button below. Having the plans handy will be invaluable as you embark on creating your beautiful new side table.
Crafting the Perfect Round Tabletop
Our journey began with the tabletop, which forms the striking focal point of this accent piece. We constructed it using five sturdy 2×6 boards, each carefully cut to size according to our plans. For this project, we tried a new technique that significantly elevated the finished look, thanks to some expert advice.
Last week, we had the incredible opportunity to connect with Clint Harp, a name many of you might recognize from HGTV’s Fixer Upper. If you’ve been following us on Instagram, you might have caught a glimpse of our meet-up! Clint is renowned for being the brilliant mind and skilled builder behind all those stunning tables featured on the show. He truly is a master craftsman and an inspiring individual.
We highly recommend exploring Clint’s work and exquisite designs on his website, Harp Design Co. Beyond showcasing his amazing custom furniture, his shop also offers a delightful array of home decor goodies that are worth checking out for your next styling project.
The Secret to Seamless Joints: Straight Edges
Among the many valuable tips Clint shared, one stood out as a game-changer for our projects: precisely cutting the factory-rounded edges off our 2x boards using a table saw. While some experienced woodworkers may already employ this technique, it was a revelation for us, and the results are truly remarkable. This seemingly small step makes an enormous difference in achieving tighter, virtually seamless joints, giving your project a much more professional and polished appearance.
To begin, we simply adjusted our table saw fence to remove a minimal 1/8 inch from the edge of each board. This small shave is enough to get past the rounded mill edge.
Next, we carefully ran both long sides of each 2×6 board through the table saw. This process effectively trims off the subtle rounded edges, leaving you with perfectly straight, crisp edges ready for joining. The precision this step offers is invaluable for high-quality furniture construction.
The immediate outcome is a flawlessly straight-edged 2×6, which we absolutely adore. It’s important to remember that this process does remove a small amount of length from each board. While it didn’t significantly impact this particular project, it’s a crucial consideration for future builds where precise overall dimensions are paramount. Always account for this minor reduction when cutting your initial lumber lengths.
Assembling the Tabletop Planks with Pocket Holes
With all our boards sporting beautifully straight edges, the next step was to prepare them for assembly. We added 1.5-inch pocket holes to each board using our trusty K5 Kreg Jig. Pocket hole joinery is a fantastic method for strong, concealed joints, perfect for a project like this.
Our free plans provide detailed diagrams illustrating the suggested locations for placing these pocket holes to ensure optimal strength and stability. Once the pocket holes were drilled, we meticulously attached each board to its neighbor using a generous amount of wood glue and 2.5-inch pocket hole screws. The combination of glue and screws creates an incredibly robust bond that will withstand years of use.
The Art of Drawing and Cutting a Perfect Circle
With the rectangular plank top assembled, it was time to transform it into the elegant round shape. To draw a perfect 26-inch diameter circle, we employed a simple yet effective homemade compass method. We took a long, thin piece of wood – a yardstick works wonderfully for this – and drilled a small pilot hole near one end. Then, measuring 13 inches (half of our desired 26-inch diameter, which is the radius) from the first hole, we drilled a second small hole.
To execute the circle, we inserted a small screwdriver into the first hole and firmly anchored it at the precise center of our assembled plank top. While holding the screwdriver securely in place, we inserted a pencil into the second hole and carefully rotated the piece of wood around the central pivot, effortlessly sketching a perfect 26-inch diameter circle onto the wood surface.
Once the circle was clearly marked, cutting it out was a breeze with our Ryobi Cordless Jig Saw. The cordless freedom makes maneuvering around the circular line incredibly easy, allowing for a smooth and precise cut. Take your time during this step to ensure a clean edge for your tabletop.
Constructing the Sturdy Table Base
With the beautiful round tabletop successfully cut out, our focus shifted to building a robust and stylish base. This part of the build involves cutting the central leg and four supporting feet. Our detailed plans will guide you through the exact dimensions and angles needed for each piece. You can clearly see in the accompanying image the specific angle we cut for each foot, which provides both stability and a refined aesthetic to the base.
For the base assembly, we opted for our Kreg HD Jig, which is designed for creating extra-strong pocket holes suitable for larger timber like the 4×4 leg and feet. We strategically placed pocket holes on the bottom of each foot and also added them to both the bottom and top ends of the central table leg. These heavy-duty pocket holes are crucial for securing the base components firmly in place.
Assembly of the base was straightforward. We first securely attached the central leg to the underside of the table top using Kreg HD screws. These robust screws provide exceptional holding power. Following that, we attached each of the four feet to the base of the central leg, ensuring they were evenly spaced and angled correctly to provide maximum stability and visual balance for the entire table.
Adding Refinement: Wrapping the Base
To give the table a polished, finished look and cleverly conceal the pocket holes at the top of the leg, we wrapped the top section in 1×4 pine. This simple addition makes a significant difference in the table’s overall aesthetic. We secured the pine wrapping using a combination of wood glue for a lasting bond and 1.25-inch brad nails, which are discreet and hold the trim firmly in place while the glue dries.
Next, we cut the tabletop braces. These braces are crucial for reinforcing the connection between the base and the tabletop, preventing any wobbling and ensuring long-term durability. We attached these braces using wood glue for extra strength and 3-inch wood screws, driving them through the bottom of the brace and securely into the underside of the tabletop. This creates a solid and unwavering structure.
Now, for the final touch on the base: wrapping the lower section of the leg. This step adds visual weight and a decorative element to the table’s foundation. Take a look at what the bare base looked like before we applied this elegant trim:
We began by adding a 1×3 board to the very bottom of the leg, creating a solid foundation for our decorative wrap. On top of this, we then added a casing, building up the profile for a more substantial look. Everything was secured using wood glue and 1.25-inch brad nails, ensuring a strong and seamless finish.
As the grand finale for the base, we carefully applied a small cove molding to the bottom edge of the 1×3 trim. This delicate molding adds a beautiful, classic detail that elevates the entire piece, truly finishing the base with an artisanal touch.
The Finishing Touches: Stain and Distress
With all the construction complete, it was time for the truly transformative step: staining! For this project, we chose Varathane stain in a rich Dark Walnut shade, which beautifully enhances the natural wood grain and adds depth to the table. After allowing the stain to dry thoroughly according to the manufacturer’s instructions, we moved on to distressing.
Using our Ryobi Corner Cat sander, we gently distressed the entire piece. This technique involves lightly sanding certain edges and surfaces to mimic the look of aged, well-loved furniture, adding character and a touch of rustic charm. We absolutely adore the outcome – the combination of the dark stain and subtle distressing gives the table a unique, inviting warmth.
Your New DIY Round Side Table: The Grand Reveal!
And just like that, it’s DONE! The journey from raw lumber to a stunning piece of handmade furniture is incredibly rewarding. Take a moment to admire your hard work and creativity. This custom round side table is not just a functional item; it’s a conversation piece, a testament to your skills, and a beautiful addition to your home decor. The classic design, coupled with its robust build and the warmth of the stained wood, makes it a timeless accent piece that will bring joy for years to come.
Isn’t it absolutely charming? We couldn’t be happier with how this DIY round side table turned out, perfectly complementing our living space.
This project proves that with a little inspiration and clear instructions, you can create high-quality, custom furniture on a budget. We hope you feel inspired to tackle this project and personalize it to match your own unique style!
For those curious about the styling elements in our photos, here are the details: The comfortable armchair can be found at Home Decorator’s HERE. The adorable concrete and glass cloche is a charming find from Save on Crafts HERE. The cozy pillow was a lucky discovery at Home Goods, and the elegant lamp brightens up the space from World Market.
Thank you so much for joining us on this exciting build, friends! We truly appreciate you stopping by. If you have any questions at all about the process, tools, materials, or anything else related to this DIY round side table, please don’t hesitate to ask in the comments below. We’re here to help you succeed in your next woodworking adventure!
Happy building!
~Whitney