
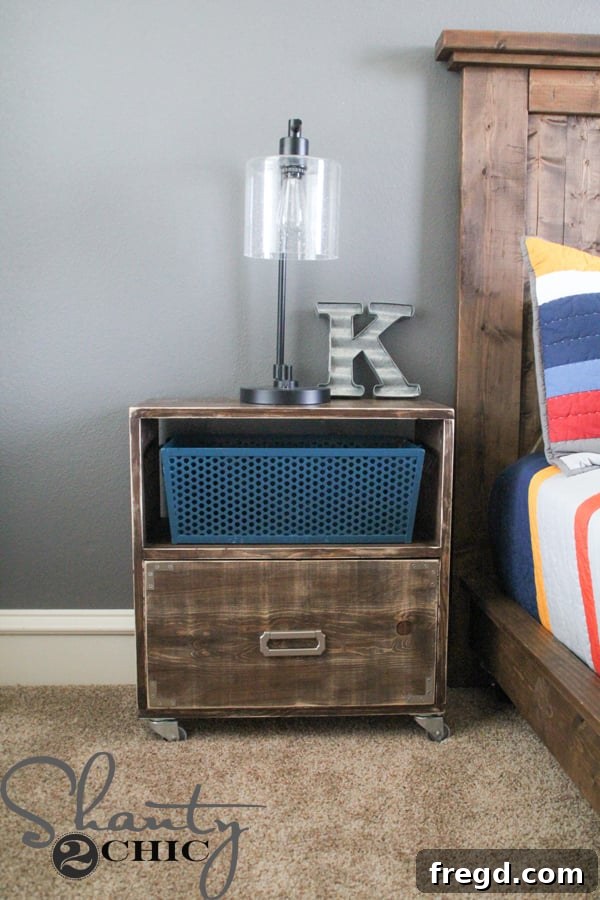
Build Your Own Rustic Industrial Rolling Nightstands: An Easy DIY Project
Transforming a room with custom furniture adds a unique touch and immense satisfaction. After patiently waiting for the perfect design inspiration to strike, I’m thrilled to share this incredible DIY project: a set of rustic industrial nightstands on wheels! What makes this build even better is its remarkable simplicity and affordability. With just five standard 1×12 boards, I was able to craft two stylish and robust nightstands for my son’s room, costing approximately $90 in lumber – an unbeatable value compared to retail options.
The aesthetic of these nightstands perfectly complements the platform bed I previously built, creating a cohesive and visually appealing space. Their rustic texture combined with the sleek industrial elements, especially the functional casters, makes them not only practical but also a standout piece of furniture. They add character and convenience, allowing easy rearrangement and cleaning.
Your DIY Journey Starts Here: Plans and Preparation
Embarking on a woodworking project is incredibly rewarding, especially when you have clear, concise instructions. To help you recreate these fantastic nightstands, I’ve prepared detailed plans. You can access and print the free PDF plans by clicking HERE or by clicking on the image below. These plans are designed for building a single nightstand, so simply duplicate the process if you need a pair. Make sure to follow this comprehensive tutorial alongside the plans, as it provides additional insights, tips, and visual guidance for each step of the construction.
Essential Tools and Materials
Before you even make your first cut, it’s crucial to gather all your tools and materials. Having everything ready ensures a smooth, uninterrupted building process. Here’s what you’ll need for each nightstand:
- Lumber: Five 1×12 boards (common pine or select pine work well). This project cleverly utilizes these boards for the entire structure, including the drawer bottoms, simplifying material acquisition.
- Cutting Tools: A miter saw or circular saw for precise cuts.
- Drilling & Joinery: A drill, a Kreg K5 Pocket-Hole Jig (or similar pocket-hole system), and 1 1/4″ pocket-hole screws.
- Fasteners: Wood glue, 1 1/4″ brad nails (and a brad nailer if you have one, or a hammer for manual nailing).
- Finishing Supplies: Fine-grit sandpaper (120-220 grit), clean rags, Varathane Dark Walnut wood stain (or your preferred shade), Varathane Triple Thick Polyurethane (satin finish recommended).
- Hardware: Four 2″ casters (like these casters), and drawer pull hardware (such as the Liberty Campaign hardware from Home Depot).
- Measuring & Safety: Tape measure, pencil, clamps, and essential safety gear like safety glasses and hearing protection.
Safety First in Your Workshop
Always prioritize safety when working with power tools. Wear appropriate personal protective equipment, ensure your workspace is clear, and understand how to operate each tool safely before starting. If you’re new to woodworking, consider watching a few beginner safety videos.
Step-by-Step Construction Guide: Building Your Nightstand
1. Making Precise Cuts for the Frame
The foundation of any good furniture piece lies in accurate cuts. Begin by carefully measuring and cutting all the pieces required for the main frame of your nightstand. Refer directly to the provided plans for specific dimensions. Taking your time during this initial phase will ensure all subsequent steps fit together seamlessly and contribute to a professional-looking finish. Use a miter saw for the cleanest, most accurate crosscuts. If using a circular saw, employ a straight edge guide.
2. Mastering Pocket Hole Joinery
Pocket hole joinery is a fantastic technique for creating strong, concealed joints, perfect for furniture construction. For this project, you’ll be drilling 3/4″ pocket holes into the ends of the side pieces that will form the nightstand’s frame. Your Kreg K5 Jig (or similar model) is ideal for this. Set the jig to accommodate 3/4″ thick material, clamp your wood securely, and drill your holes. Precision here ensures a tight and durable connection. If you’re unfamiliar with pocket holes, they allow you to drive screws at an angle into a mating piece of wood, creating a very strong joint that doesn’t show screws from the outside.
3. Assembling the Main Frame
With your pocket holes drilled, it’s time to assemble the basic frame of the nightstand. Apply a generous amount of wood glue to the mating surfaces (the ends of the side pieces and the edges of the top and bottom pieces). Then, secure the side pieces to the top and bottom with 1 1/4″ pocket-hole screws. Use clamps to hold the pieces tightly together while driving the screws. This step is critical for ensuring the nightstand is square and sturdy. Double-check for squareness before the glue sets.
At this point, you should have a sturdy, open box forming the primary structure of your nightstand. This open design provides the perfect foundation for the internal shelf and drawers.
4. Integrating the Internal Shelf
Next, it’s time to add the internal shelf that will sit above the drawer. This shelf adds both functionality and structural integrity. Drill 3/4″ pocket holes into the ends of the shelf piece. Refer to your plans for the precise height and placement of this shelf within the frame. Apply wood glue to the mating edges and secure the shelf using 1 1/4″ pocket-hole screws. This creates a dedicated space for books, decor, or personal items, enhancing the nightstand’s utility.
5. Crafting the Drawers
Now, shift your focus to the drawers. Measure and cut the front, back, and side pieces for your drawer box according to the plans. Drill 3/4″ pocket holes into the ends of the front and back drawer pieces. These holes will allow you to connect them securely to the side pieces. Apply wood glue to the joints and assemble the drawer box using 1 1/4″ pocket-hole screws. Ensure your drawer is perfectly square to guarantee smooth operation once installed. Accurate drawer construction is key to a professional look.
Once the pieces are cut and pocket holes drilled, glue and screw the drawer box together. Take your time to align everything perfectly. A square drawer will slide in and out much more easily and look far better in the finished piece.
6. Installing the Drawer Bottom
This clever technique allows you to build the entire nightstand using only 1×12 boards! To create the drawer bottom, measure the inside dimensions of your assembled drawer box. Cut a piece from your 1×12 lumber to fit snugly within this measurement. Next, drill 3/4″ pocket holes along the bottom side (the side that will face downwards) of this newly cut piece. Apply wood glue to the bottom edges of the drawer box and attach the drawer bottom using 1 1/4″ pocket-hole screws. This method hides the fasteners, keeping the drawer looking clean and robust.
“/>
7. Attaching the Drawer Faces
The drawer face is what people see, so attention to detail here is paramount. Align the drawer face piece with the front of the drawer opening on the nightstand. Use shims or spacers to create even gaps around the edges for a professional, consistent look. Once perfectly positioned, apply wood glue to the back of the drawer face and secure it with 1 1/4″ brad nails from the front. The brad nails will hold it in place while the glue dries, creating a strong, seamless bond. Once dry, these small nail holes can be filled and sanded for an invisible finish.
With all the wooden components assembled, your nightstand is now ready for the finishing stages – staining and sealing!
The Art of Finishing: Staining and Sealing for Durability
1. Preparing the Surface: Sanding is Key
Before applying any stain or finish, thorough sanding is crucial. Start with 120-grit sandpaper to remove any pencil marks, small imperfections, or glue squeeze-out. Progress to 180-grit and then 220-grit for a smooth, velvety surface. Sand with the grain of the wood to avoid unsightly scratches. After sanding, use a vacuum and a tack cloth to remove all dust. A clean surface ensures even stain absorption and a flawless finish.
2. Applying the Stain: Varathane Dark Walnut
For that beautiful rustic industrial look, I chose Varathane Dark Walnut stain. This rich, deep color really highlights the wood grain and adds character. To apply, stir the stain thoroughly (do not shake). Using a clean, lint-free cloth or a foam applicator, wipe the stain evenly onto the entire piece. Allow it to penetrate for approximately 5 minutes. The longer it sits, the darker the color will be. Then, with a new clean cloth, wipe off any excess stain, spreading it evenly to achieve a consistent finish. Work in manageable sections to avoid the stain drying before you can wipe it off. Let the stain dry completely according to the manufacturer’s instructions, usually about one hour.
“/>
3. Protecting with Polyurethane: Varathane Triple Thick
Once the stain is completely dry, it’s time to apply a protective topcoat. I highly recommend Varathane Triple Thick Polyurethane in satin finish. This product is truly amazing; it offers the protection equivalent to three coats of traditional polyurethane in a single application, saves significant time, and won’t yellow over time, preserving the beautiful color of your stain. Apply one even coat to the entire nightstand using a quality brush or foam applicator. Ensure good ventilation and allow the polyurethane to dry thoroughly, as per the product instructions. While Triple Thick is efficient, always allow ample drying time for the best durability.
Final Touches: Adding Mobility and Style
1. Attaching Functional Casters
Once the polyurethane has fully cured (this can take 24-48 hours depending on humidity), it’s time to add the casters. These wheels are what give the nightstand its industrial edge and incredible mobility. I attached four 2″ casters to the bottom of each nightstand. Pre-drill pilot holes for the caster screws to prevent wood splitting, then securely fasten each caster in place. Having a mobile nightstand makes cleaning around the bed a breeze and allows for flexible room arrangements.
“/>
2. Installing Elegant Drawer Hardware
The choice of hardware can dramatically impact the overall look of your furniture. For these nightstands, I opted for the Liberty Campaign hardware from Home Depot, which perfectly complements the rustic industrial aesthetic. Carefully measure and mark the placement for your drawer pulls. Always pre-drill pilot holes before screwing in the hardware to prevent splintering the wood. Ensure they are level and centered for a professional finish.
And that’s it for the construction! These nightstands are now ready to be styled and enjoyed. I found some adorable blue storage baskets on clearance at Michael’s, which are perfect for organizing items within the open shelf and adding a pop of color.
“/>
“/>
“/>
“/>
Styling Your New Rustic Industrial Space
I’m absolutely loving how my son’s room is coming together with these new additions! The nightstands perfectly tie into the existing decor, enhancing the overall rustic industrial theme. The ability to roll them easily for cleaning or rearranging the room is a game-changer. Soon, I’ll be back to share another exciting DIY tutorial for the motorcycle wall hanging you might spot in the background – it’s another simple project that adds great character!
If you’re interested in recreating other elements of this room, you can find the plans for the platform bed HERE and the stunning barn door headboard HERE. These complementary projects will help you create a cohesive and personalized space.
For decorative touches, the cozy quilt is from Pottery Barn Teen, the stylish lamp is from Target, and the personalized “K” initial was a charming find from Michael’s.
Thank you so much for joining me on this DIY journey. I hope this detailed guide empowers you to create your own beautiful and functional rustic industrial nightstands. Happy building!
~Ashley