
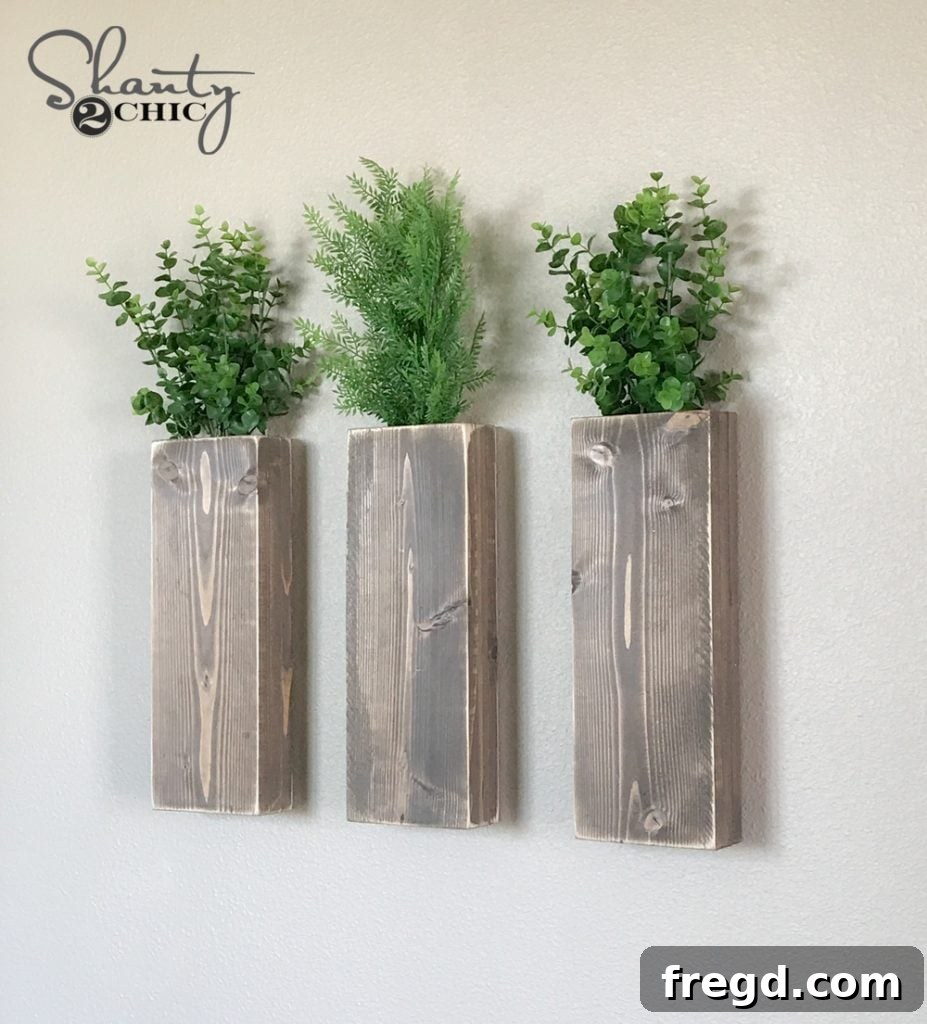
DIY Modern Farmhouse Wall Planters: Crafting Rustic Chic Decor for Your Home
Welcome, woodworking enthusiasts and home decor lovers! Today, we’re diving into an exciting project that beautifully marries rustic charm with modern aesthetics: crafting your very own Modern Farmhouse Wall Planters. This fantastic DIY endeavor is not only incredibly rewarding but also an ingenious way to utilize those leftover wood scraps you might have lying around. Imagine transforming discarded pieces into elegant wall-mounted plant holders that elevate your home’s interior or exterior appeal. Whether you’re a seasoned builder or just starting your journey into woodworking, this project is designed to be accessible, fun, and produce stunning results. Get ready to add a touch of handcrafted greenery to your living space!
For a dynamic visual walkthrough of each step, be sure to watch our comprehensive YouTube video tutorial. It provides invaluable insights and demonstrates the techniques in real-time, helping you visualize the process and confidently tackle each stage. You can access the video right here:
WATCH THE VIDEO TUTORIAL HERE!
Before you gather your tools and wood, make sure to grab the FREE, DETAILED PLANS by clicking HERE! These plans are your blueprint for success, outlining all the precise measurements and cuts you’ll need to create these beautiful planters.
Why Choose Modern Farmhouse Wall Planters for Your Home?
The allure of modern farmhouse style lies in its ability to blend contemporary clean lines with the warmth and comfort of traditional rustic elements. These wall planters perfectly encapsulate this aesthetic, offering a stylish solution for displaying your favorite plants, herbs, or even small decorative items. Beyond their visual appeal, there are several compelling reasons to embark on this DIY project:
- Sustainable Decor: This project is an excellent opportunity to reduce waste by repurposing scrap wood. Instead of buying new lumber, scour your workshop for offcuts and give them a new lease on life. Even if you don’t have scraps, it’s a minimal two-board project, making it cost-effective.
- Customizable Design: While we provide a specific design, the beauty of DIY lies in customization. You can easily adjust the dimensions to fit your space, choose different wood types, or experiment with various stains and paint finishes to match your existing decor.
- Space-Saving Solution: Wall planters are perfect for small spaces, urban apartments, or any area where floor space is at a premium. They allow you to bring greenery into your home without cluttering countertops or windowsills.
- Enhance Air Quality: Incorporating live plants into your home not only adds natural beauty but can also improve indoor air quality, creating a healthier and more refreshing environment.
- Beginner-Friendly Woodworking: This project uses basic woodworking techniques and common tools, making it an ideal project for those new to DIY. It’s a great way to build confidence and hone your crafting skills.
Materials and Tools You’ll Need for Your Planters
To ensure a smooth and enjoyable building experience, it’s essential to have all your materials and tools ready before you begin. Here’s a comprehensive list:
Essential Materials:
- Wood Boards:
- Two 2×6 boards, each 15 inches long. These will form the main body of your planter.
- Two 1×2 boards, each 15 inches long. These will act as side supports and create the internal structure.
- One 1×2 board, 2.5 inches long. This small piece will complete the inner support system.
- Wood Glue: A strong, reliable wood glue is crucial for durable joints. We highly recommend a Glu-bot for easy and precise application.
- Brad Nails: 1.25-inch brad nails will secure your joints while the glue dries, providing extra strength.
- Wood Stain or Paint: Our favorite for this project is Varathane stain in “Briarsmoke” for that perfect weathered farmhouse look, but feel free to choose any finish that suits your style.
- Sandpaper or Sander: Essential for smoothing rough edges and distressing the finish.
- Rags or Brushes: For applying stain or paint.
Recommended Tools:
- Miter Saw or Circular Saw: For making precise and straight cuts on your wood boards. Always use caution and proper safety techniques when operating saws.
- Brad Nailer: This tool makes attaching boards quick and secure. If you don’t have one, a hammer and finish nails can work, but a nailer is highly recommended for efficiency and cleaner results.
- Measuring Tape and Pencil: For accurate measurements and marking cut lines.
- Safety Glasses: Always protect your eyes when cutting, nailing, or sanding.
- Gloves: To protect your hands from splinters and stain.
Step-by-Step Construction Guide: Building Your Modern Farmhouse Wall Planters
Step 1: Gathering Your Wood and Making Precise Cuts
The foundation of any great woodworking project is accurate cuts. Begin by preparing your wood. Even if you’re using scrap wood, ensure it’s free of major defects or warping. Now, it’s time to make your cuts according to the plans. For this project, precision is key to ensuring all pieces fit together seamlessly.
- Take your two 2×6 boards and cut each to a precise length of 15 inches. These will form the front and back panels of your planter, creating its sturdy framework.
- Next, cut two pieces from your 1×2 board, each measuring 15 inches long. These longer 1x2s will serve as the inner side supports, defining the planter’s depth.
- Finally, cut one smaller piece from your 1×2 board, precisely 2.5 inches long. This piece will act as a crucial bottom support, completing the structural integrity of your planter.
Always double-check your measurements before cutting, and remember to wear safety glasses to protect your eyes from flying debris.
Step 2: Preparing the Base – Gluing the First Set of 1x2s
With all your cuts made, it’s time to start assembling. Wood glue provides incredible strength, and when combined with nails, it creates a bond that will last. This step focuses on attaching the longer 1×2 support pieces to one of your 2×6 boards.
- Take one of your 15-inch 2×6 boards. This will be the back panel of your planter.
- Apply a generous, even line of wood glue down both long sides of this 2×6 board. We highly recommend using a Glu-bot for this task. Seriously, guys, if you don’t have one, you NEED this glue bottle in your life! It costs around $7 and provides incredible control, allowing for precise glue application without messy drips. Once you use it, you’ll never go back to regular glue bottles. You can find it HERE on Amazon!
- Now, carefully align and attach one of the 15-inch 1×2 boards flush with one side of the glued 2×6 board. Repeat this process for the other 15-inch 1×2 board on the opposite side of the 2×6. Ensure they are perfectly flush with the edges.
- Using your brad nailer loaded with 1.25-inch brad nails, secure the 1×2 boards to the 2×6. Apply nails every few inches along the length of the 1x2s, making sure they penetrate both pieces of wood. The nails will hold everything securely in place while the wood glue dries, creating a robust bond.
At this stage, your assembled piece should resemble a shallow trough or channel, with the 1x2s forming the sides of what will eventually be the planter’s internal pocket. The structural integrity is already taking shape!
Step 3: Attaching the Shorter Support Pieces
Now, let’s incorporate the smaller 2.5-inch 1×2 piece. This piece is crucial for completing the planter’s internal structure and providing a solid bottom for your plants.
- Take your 2.5-inch 1×2 board. This will fit snugly between the two longer 1×2 supports you just attached.
- Apply wood glue to the ends of the small 1×2 piece.
- Carefully place this piece between the two longer 1x2s, positioning it at one end of the 2×6 board. Ensure it is flush with the edge of the 2×6 and sits securely between the side supports. This creates a closed-off end for your planter.
- Use your brad nailer to secure the small 1×2 piece in place, shooting nails through the longer 1x2s into the ends of the smaller piece. This creates a strong, corner joint, forming a sealed pocket within the planter.
This step essentially closes off one end of the channel you created, forming the bottom of your planter’s reservoir for soil and plants. You’ll notice the structure becoming more defined.
Step 4: Completing the Structure with the Top Board
The final structural step is to attach the second 2×6 board, which will serve as the front panel of your wall planter. This will enclose the internal cavity and create the finished look.
- Take your remaining 15-inch 2×6 board. This will be the front face of your planter.
- Apply a generous line of wood glue to the top edges of all the 1×2 boards you’ve just assembled (the two long ones and the one short one). Ensure complete coverage for a strong bond.
- Carefully align the second 2×6 board onto the glued edges of the 1×2 structure. Make sure it is perfectly flush with all edges and sits securely.
- Using your brad nailer, secure the top 2×6 board to the 1x2s underneath. Drive nails through the front 2×6 board into each of the 1×2 supports, spacing them evenly. This will firmly attach the front panel, completing the box-like structure of your planter.
Once this step is complete, you’ll have a fully enclosed wooden box, with an open top where your plants will eventually reside. Allow the glue to dry completely before moving on to the finishing stages. This ensures maximum strength and durability.
Step 5: The Finishing Touches – Staining and Distressing
Now that your planter is assembled, it’s time to bring out its character with a beautiful finish. This step is where you can truly personalize your creation and give it that sought-after modern farmhouse aesthetic.
- Sanding: Before applying any finish, lightly sand all surfaces of your planter. This will smooth out any rough spots, splintered edges, and prepare the wood to absorb the stain evenly. Use a fine-grit sandpaper for best results.
- Staining: For that perfect rustic, weathered look, we highly recommend Varathane stain in the shade “Briarsmoke.” It’s our current favorite for achieving a warm, aged appearance that complements the farmhouse style beautifully. If you can’t find it locally, you can easily find it HERE on Amazon! Apply the stain with a rag or brush, following the wood grain. Apply it evenly, allowing it to penetrate the wood, then wipe off any excess.
- Drying: Allow the stain to dry completely according to the manufacturer’s instructions. This usually takes several hours. Proper drying time is crucial to prevent smudging and ensure the next step goes smoothly.
- Distressing: Once the stain has dried, it’s time to give your planter that charming, “magical” weathered look. Using a sander (or sandpaper by hand), lightly distress the finish. Focus on edges, corners, and any areas that would naturally show wear over time. This technique subtly removes some of the stain, revealing glimpses of the natural wood underneath, creating an authentic aged effect. Don’t overdo it; a little distressing goes a long way in achieving that perfect rustic patina.
- Sealing (Optional but Recommended): For added durability and protection, especially if your planter will be exposed to moisture or direct sunlight, consider applying a clear coat sealer (like polyurethane or a clear wax). This will protect the wood and finish for years to come.
Tips for Success and Customization
- Wood Choice: While pine scraps are common and work well, consider using reclaimed barn wood for an even more authentic farmhouse feel.
- Drainage: If you plan to plant directly into the planter, drill a few small drainage holes in the bottom to prevent root rot. You can also use plastic liners or smaller pots inside to manage drainage.
- Mounting: Use sturdy D-rings or keyhole hangers on the back for secure wall mounting. Always locate wall studs for heavy planters or use appropriate wall anchors.
- Plant Selection: Choose plants that thrive in shallow containers and complement your decor. Succulents, small herbs, air plants, or trailing ivy are excellent choices.
- Alternative Finishes: Instead of stain, you could paint your planters white, black, or a muted pastel for a different modern farmhouse vibe, then distress the paint.
Displaying Your Beautiful Wall Planters
Once your Modern Farmhouse Wall Planters are complete and the finish has fully cured, it’s time for the most exciting part: showcasing your handmade creations!
- Indoor Accent: Hang them in your living room, kitchen, hallway, or even a bathroom to add a refreshing touch of greenery. Group several planters together at varying heights for an impactful display, or arrange them in a symmetrical pattern above a console table.
- Outdoor Charm: These planters are equally stunning on a covered porch, patio, or fence. Just ensure your chosen plants are suitable for the outdoor environment and that the wood finish has adequate protection from the elements.
- Creative Fillers: Beyond plants, consider using these planters to hold other decorative items. Faux flowers, dried botanicals, small craft supplies, or even rolled hand towels in a guest bathroom can find a stylish home in these versatile pieces.
Here they are, all pretty on the wall… Magical, indeed!
Conclusion: Bring Your Vision to Life!
We truly hope you love these Modern Farmhouse Wall Planters as much as we do! This project is a testament to how simple materials and a bit of effort can create truly stunning and functional pieces for your home. It’s an ideal way to add personalized charm, bring nature indoors, and showcase your DIY prowess. Don’t be intimidated; grab those tools, follow our detailed guide, and create something beautiful. Remember, every project is a chance to learn and grow your skills.
For more detailed visual instructions and helpful tips, don’t forget to check out the video tutorial to help you build your own! We can’t wait to see your interpretations of these gorgeous wall planters. Happy building!