
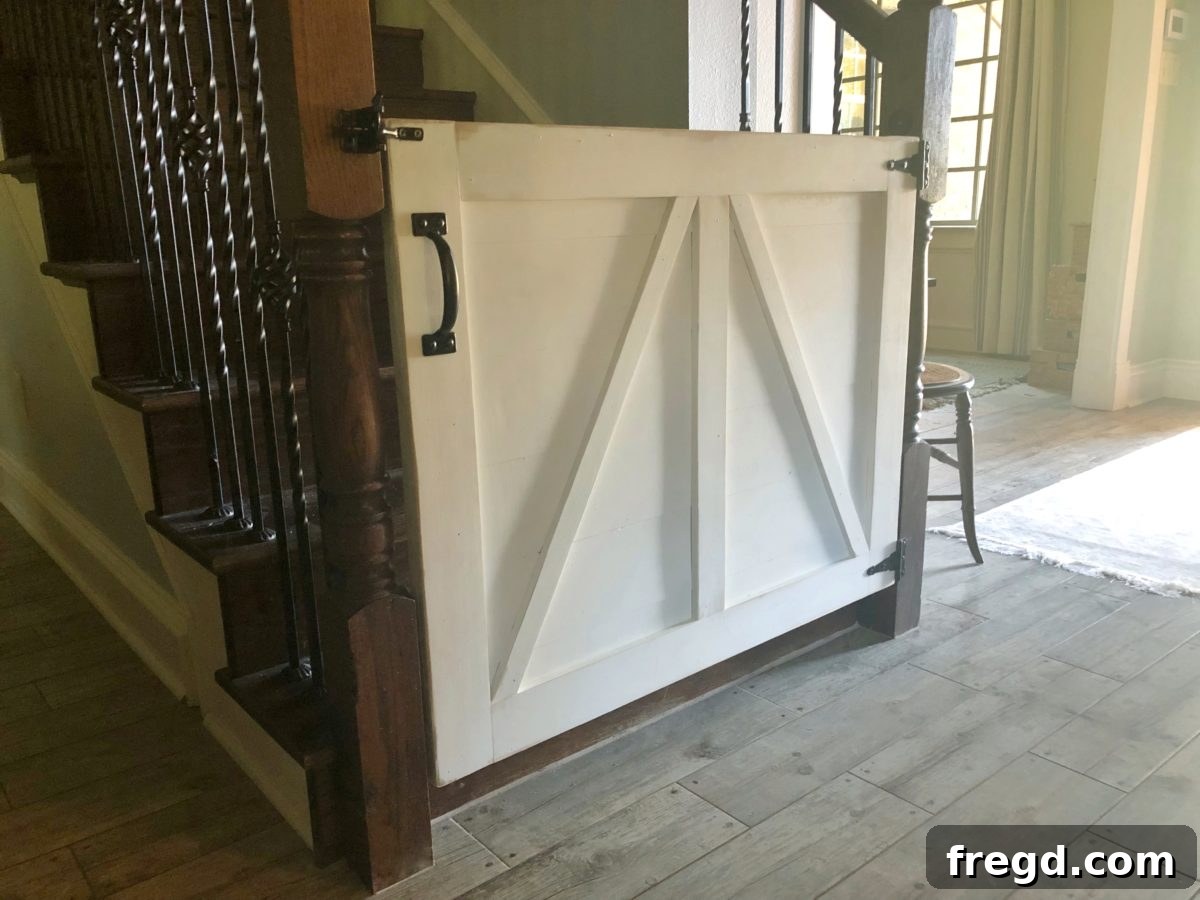
DIY Farmhouse Baby Gate: Build a Stylish & Secure Custom Gate for Your Home
Hey there, fellow DIY enthusiasts! We are absolutely thrilled to share today’s project with you. It’s a game-changer for child safety and home aesthetics, though our little one, Jed, might not agree just yet! With Jed starting to crawl and exploring every nook and cranny, we knew it was time to address the stairs. In the past, with our other children, we’ve relied on store-bought baby gates. While functional, they often lacked visual appeal and, more importantly, the gate openings were notoriously small. Trying to carry a laundry basket or move furniture through them was always a struggle.
That’s why we decided to create our own custom farmhouse baby gate! This design not only blends seamlessly with our home decor but also features a wider opening, making daily tasks much easier. You might even catch me adding a deadbolt to this soon – you’d understand if you met our adventurous son! Before we dive into the step-by-step instructions, be sure to watch our detailed YouTube video tutorial on this build. It brings all the steps to life and offers valuable visual guidance:
Watch the DIY Farmhouse Baby Gate Build in Action!
And speaking of Jed, you just have to see how “excited” he is about his new gate. Clearly, Mom for the win on this one!
Get Your FREE Detailed Plans!
To ensure you have all the precise measurements and cutting lists, be sure to download and print our comprehensive FREE PLANS HERE! These plans are invaluable for guiding you through each stage of the build, making this project achievable for even novice woodworkers.
Why Choose a DIY Custom Baby Gate?
Opting for a custom-built baby gate offers numerous advantages over mass-produced alternatives. Here’s why going DIY is often the superior choice for your home:
- Perfect Custom Fit: Every doorway and staircase opening is unique. A DIY gate allows you to tailor the dimensions precisely to your space, eliminating gaps and ill-fitting installations that can compromise safety.
- Enhanced Aesthetics: Store-bought gates often stick out like a sore thumb. By building your own, you can choose materials, finishes, and designs (like our popular farmhouse style) that seamlessly complement your home’s decor, adding to its charm rather than detracting from it.
- Superior Functionality: Tired of squeezing through narrow openings? A custom gate can be designed with a wider passage, making it incredibly convenient for adults to walk through, especially when carrying groceries, laundry baskets, or children.
- Increased Durability: You get to select high-quality materials and construction methods, resulting in a sturdier, more robust gate that will withstand daily use and the curious attempts of little ones for years to come.
- Cost-Effectiveness: While there’s an initial investment in tools and materials, a custom gate can often be more economical in the long run than purchasing multiple off-the-shelf gates that may not meet your specific needs or aesthetic preferences.
- Personal Satisfaction: There’s immense pride in creating something with your own hands that enhances the safety and beauty of your home. It’s a project that delivers both practical utility and personal accomplishment.
Gather Your Materials and Tools
Before you begin, ensure you have all the necessary materials and tools ready. This will make the building process much smoother and more enjoyable.
Essential Materials List:
- 1×6 Boards: These form the main structure of your gate. The quantity will depend on your gate’s width and height.
- 1/2” x 4” Pine Craft Boards: Used for the vertical side trims and horizontal top/bottom trims.
- 1/2” x 3” Craft Board: For the central trim piece.
- 1/2” x 2” Craft Boards: For the decorative diagonal braces.
- Wood Glue: For strong, lasting joints.
- 3/4” Brad Nails: To secure trim pieces.
- Kreg Pocket-Hole Screws: For assembling the main gate frame (size depending on wood thickness).
- Wood Filler (optional): To conceal nail holes if desired.
- Paint or Wood Stain & Sealer: To finish and protect your gate.
- Gate Hardware: Hinges (heavy-duty for security) and a child-safe latch mechanism.
Tools You’ll Need:
- Miter Saw or Circular Saw: For precise cuts on all your boards.
- Kreg Pocket-Hole Jig: Essential for creating strong, concealed joints.
- Drill/Driver: For pocket-hole screws and mounting hardware.
- Brad Nailer: To efficiently attach trim pieces.
- Measuring Tape & Pencil: For accurate measurements and markings.
- Safety Glasses & Hearing Protection: Always prioritize safety!
- Sander (or sanding block with sandpaper): For smoothing edges and preparing for finish.
- Clamps: To hold pieces securely while glue dries or you attach fasteners.
Step-by-Step Guide: Building Your Farmhouse Baby Gate
Important Note on Measurements:
The measurements provided in our plans are specific to our staircase opening. It is crucial that you measure your own opening accurately. For the main gate width, cut your boards 1/4 inch smaller than your opening to allow for easy swinging and hardware installation. This slight clearance is vital for a functional gate.
Step 1: Prepare Your Main Boards (1x6s)
Begin by cutting all your 1×6 boards to the desired width for your gate opening (remember, 1/4 inch smaller than your actual opening). For a sturdy construction, you will need to add pocket holes. On five of your six main boards, create one pocket hole 1 inch from each end. Additionally, place one pocket hole precisely at the center of each of these five boards. These pocket holes will be crucial for assembling the gate frame with maximum strength and hidden fasteners.
Step 2: Attach Vertical Side Trim
Next, cut your 1/2” x 4” pine craft boards to the appropriate height for your vertical side trims. Apply a generous line of wood glue along the edges of your 1×6 boards where the trim will be placed. Carefully attach these craft boards using 3/4” brad nails. Ensure the craft boards are lined up perfectly flush with both ends of the 1×6 boards. This trim not only adds to the farmhouse aesthetic but also provides additional structural integrity and a finished look to the gate’s edges.
Step 3: Install Top and Bottom Horizontal Trim
Now, measure and cut your 1/2” x 4” craft boards for the top and bottom horizontal trim pieces. These boards will cap off the gate, further enhancing its structural stability and aesthetic appeal. Apply wood glue to the corresponding edges of the 1×6 boards and then securely attach each trim board flush with the top and bottom edges using 3/4” brad nails. Precision here will ensure a clean, professional finish.
Step 4: Secure the Middle Trim Board
The next step involves installing the middle trim board, which is a 1/2” x 3” craft board. This piece serves a dual purpose: it aesthetically breaks up the larger panels and, importantly, covers the pocket holes you made down the center of the 1×6 boards. Carefully align this board in the exact center of your gate panel. Attach it using wood glue and 3/4” brad nails, ensuring it is perfectly straight and flush for a polished look.
Step 5: Create the Decorative Diagonal Braces
The diagonal cuts are where the true farmhouse character comes to life. These are made from 1/2” x 2” craft boards. While specific cut lengths and angles can be calculated, the most reliable method for a perfect fit is to hold the boards in place against your gate and mark directly for your cuts. This “measure in place” technique accounts for any minor variations in your build. Once marked and cut, attach each diagonal board using wood glue and 3/4” brad nails. These braces not only add significant visual appeal but also enhance the gate’s rigidity.
Step 6: Finishing Touches and Hardware Installation
With the construction complete, your gate is now ready for paint or stain! Take your time to sand any rough edges and clean the surface thoroughly before applying your chosen finish. Once the paint or stain has fully dried and cured according to the product instructions, it’s time to attach your hardware. This includes robust hinges that can support the gate’s weight and a reliable, child-proof latch mechanism. For specific hardware recommendations that we found effective and aesthetically pleasing, we encourage you to visit our website for more details on our choices!
Safety First: Important Considerations for Your Baby Gate
Building a beautiful, custom baby gate is only half the battle; ensuring it’s absolutely safe is paramount. Here are critical safety considerations to keep in mind:
- Secure Installation: The gate must be securely mounted to structural elements of your wall or stair posts. Use appropriate fasteners that can withstand significant pressure. Never rely solely on pressure-mounted gates for stairs.
- No Climbable Footholds: Design your gate so there are no horizontal slats or elements that a child could use as a ladder to climb over. The vertical and diagonal elements in our design help mitigate this risk.
- Reliable Latch Mechanism: Choose a latch that is easy for adults to operate with one hand but complex enough to prevent curious children from opening it. Test it repeatedly.
- Gap Spacing: Ensure that any gaps between vertical slats are small enough (typically less than 2-3/8 inches or 6 cm) to prevent a child’s head or body from getting trapped.
- Regular Checks: Periodically inspect your gate for any signs of wear and tear, loose hardware, or structural damage. Address any issues immediately.
- Supervision: Remember, a baby gate is a safety tool, not a substitute for adult supervision. Always keep an eye on your little ones, even with the gate installed.
Enjoy Your Custom-Built Farmhouse Baby Gate!
Congratulations! You’ve successfully built a beautiful, durable, and custom-fit farmhouse baby gate that enhances both the safety and style of your home. No more unsightly, flimsy gates or struggling with narrow openings. This project is a testament to the power of DIY – creating practical solutions that perfectly match your needs and aesthetic preferences.
We hope this detailed guide empowers you to tackle this project with confidence. Whether you’re safeguarding a crawling baby, an adventurous toddler, or even keeping pets contained, this DIY farmhouse baby gate is a fantastic addition to any home. Don’t forget to share your finished builds with us – we love seeing your creativity come to life! Happy building!