
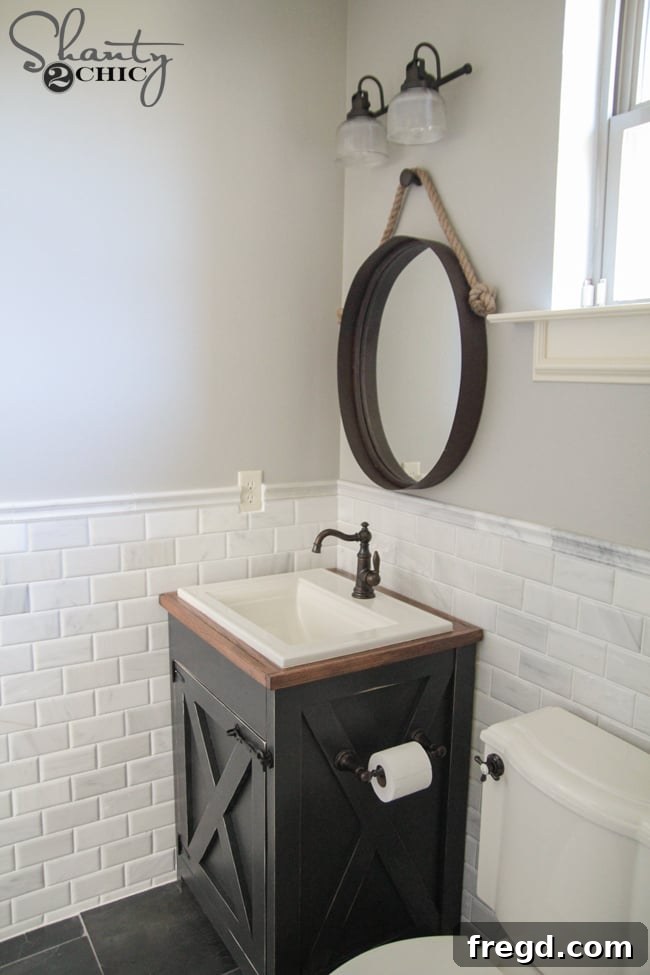
Transform your bathroom into a rustic sanctuary with a stunning DIY Farmhouse Bathroom Vanity! If you’ve been dreaming of a bespoke piece that perfectly combines style, functionality, and the heartwarming charm of farmhouse aesthetics, then this project is for you. We’re thrilled to share comprehensive, easy-to-follow instructions and free plans to help you build a custom vanity that not only meets your needs but also becomes the focal point of your bathroom renovation. This rewarding woodworking project is designed to be accessible, requiring only a few essential tools and a passion for creating something beautiful with your own hands. Get ready to embark on a journey that will elevate your home’s appeal and bring a touch of personalized elegance to your space.
For those embarking on a bathroom remodel, the vanity is often the centerpiece that dictates the overall style and atmosphere of the room. A farmhouse vanity offers a timeless appeal, blending rustic warmth with practical design. It’s a project that might seem daunting at first, but with clear steps and a bit of patience, even intermediate DIYers can achieve professional-looking results. Imagine the satisfaction of crafting a durable, stylish vanity that reflects your unique taste and stands the test of time. We recently completed this project for my oldest son’s bathroom, and the transformation is absolutely remarkable. The new farmhouse bathroom vanity has truly brought his space to life!
To ensure you have all the resources you need for a successful build, we’ve made our detailed plans freely available. These comprehensive plans include precise measurements, cut lists, and diagrams to guide you through every stage of construction. You can easily download and print our free plans by clicking HERE! Having these plans handy will be invaluable as you gather your materials and begin the build.
Crafting Your Dream DIY Farmhouse Bathroom Vanity
Building your own custom farmhouse vanity is a deeply rewarding experience. While it involves several steps, the process itself is surprisingly straightforward once you master a few fundamental woodworking techniques, particularly accurate angle cuts. Don’t let the thought of precise cuts intimidate you; with a good miter saw or table saw and careful measurement, you’ll be well on your way. The majority of the construction involves basic joinery, making this project an excellent opportunity to hone your skills and create a high-quality piece of furniture that perfectly suits your bathroom.
Gathering Your Materials and Essential Tools
Before diving into the build, ensure you have all your materials and tools prepared. For this project, quality materials make a significant difference in the final product’s durability and appearance. We primarily utilize 3/4″ Purebond Plywood, a premium hardwood plywood known for its strength, smooth finish, and formaldehyde-free composition, making it an excellent choice for indoor furniture. You’ll typically find this in large 4’x8′ sheets at home improvement stores. For convenience, ask the store associates to rip the larger sheets into more manageable boards that can fit in your vehicle. Once home, you’ll precisely cut these boards to the exact dimensions specified in our plans using either a miter saw for crosscuts or a table saw for long, accurate rips. Additionally, you’ll need 2×3 boards for the legs (we recommend making these from 2x4s for a cleaner look), 1/2″ craft boards (pine works well) for the decorative X-trim, 1/4″ Purebond plywood for the door backing, and oak boards (1/2″x4″ and 1×2) for the countertop. Don’t forget wood glue, pocket hole screws (1.25″ and 3/4″), and brad nails (3/4″).
Key tools for this build include a miter saw, table saw, drill/driver, pocket hole jig (such as a Kreg Jig), brad nailer (a Ryobi 18V is great for cordless convenience), jigsaw (for the sink cutout), measuring tape, pencil, and safety glasses. Having these tools ready will ensure a smooth and efficient building process.
Constructing the Vanity Sides: The Foundation
We begin the farmhouse vanity construction by building the two side panels. These form the structural backbone of your vanity. As mentioned, these are constructed from 3/4″ Purebond Plywood, precisely cut to the dimensions outlined in the free plans. After cutting the plywood to size, the next crucial step is to prepare for joinery. Using a pocket hole jig, create 3/4″ pocket holes along the sides and top edges of each plywood panel. The pocket holes on the sides will be used to attach the legs securely, while those on the top will be vital for later securing the wooden countertop. If your design incorporates a drop-in sink top that doesn’t require a supporting wood counter underneath, you can omit the top pocket holes. However, for a complete wooden countertop, these top pocket holes provide invisible and strong attachment points.
Adding the Legs and Achieving a Clean Look
With the side panels prepared, the next step involves cutting and attaching the legs. For a robust and aesthetically pleasing finish, we craft these legs from 2×3 boards. A common practice in professional woodworking, and one we highly recommend for a superior look, is to start with 2×4 lumber and remove the rounded edges using a table saw. This technique transforms a standard rounded-edge 2×4 into a perfectly square 2×3, eliminating the soft edges and giving your vanity a much crisper, more refined farmhouse appeal. Once your 2x3s are cut to the precise length from the plans, align them flush with the edges of your plywood side panels. Attach them securely using wood glue for added strength and 1.25″ pocket hole screws driven into the previously drilled pocket holes. This method creates a strong, concealed joint, resulting in a clean and durable frame for your vanity.
Adding the Signature X-Trim Detail
The distinctive X-trim is a hallmark of farmhouse style, adding visual interest and character to your vanity. After the legs are firmly attached, it’s time to incorporate these decorative elements. For the X-trim, we use 1/2″ craft boards, typically found alongside 1x pine boards at hardware stores. Pine is an excellent choice for this trim due to its workability and cost-effectiveness. The key to achieving perfect angles for these pieces lies in a simple, effective technique: lay each trim board directly onto the side of the vanity where it will be placed, and then accurately mark your cut lines with a pencil. This method eliminates complex angle calculations and ensures a custom fit. Once cut, attach each trim piece using a strong wood glue and secure it further with 3/4″ brad nails fired from a brad nailer (like the Ryobi 18V). This combination of glue and nails provides a durable bond and a clean finish.
Assembling the Main Frame
Once both side panels are fully assembled with their legs and X-trim, the next phase is to connect them to form the complete vanity structure. This is accomplished by attaching the front and back frame pieces. These pieces, cut according to your plans, bridge the gap between the two sides, providing stability and defining the overall dimensions of your vanity. Similar to earlier steps, these frame pieces are securely attached using 3/4″ pocket holes and 1.25″ pocket hole screws. Ensure that your measurements are accurate and that the frame is square before fully tightening the screws. This step brings the entire vanity together, transforming individual components into a cohesive, sturdy unit that will stand the test of time.
Installing the Vanity Base
With the primary frame assembled, it’s time to install the base of the vanity, which will provide internal support and serve as the floor of the cabinet. Like other structural components, the base is made from 3/4″ Purebond Plywood. Cut this piece to the precise dimensions specified in your plans. Before attaching it to the main cabinet, drill 3/4″ pocket holes around all four edges of the base. These strategically placed pocket holes will allow you to securely fasten the base from the inside of the cabinet, creating a strong, stable platform. Take care to ensure the base is level and flush with the bottom of the vanity frame before driving in the 1.25″ pocket hole screws. This step completes the fundamental structure, making your vanity ready for its door and internal fittings.
At this stage, your vanity truly starts to take shape! It’s a significant milestone in the build, and the structural integrity is now firmly established. The piece is standing tall, awaiting its door to complete the cabinet functionality and aesthetics. It’s exciting to see the vision come to life!
Building the Cabinet Door
The door is a crucial visual and functional component of your farmhouse vanity, providing enclosed storage and contributing significantly to the overall aesthetic. Begin by cutting the door frame pieces to the exact dimensions specified in your plans. These typically consist of two longer vertical stiles and two shorter horizontal rails. For strong, hidden joinery, drill 3/4″ pocket holes into both ends of each shorter rail board. These pocket holes will allow you to connect the rails to the stiles seamlessly. After drilling, assemble the four boards into a rectangular frame using wood glue on the joints and securing them with 1.25″ pocket hole screws. Ensure the frame is square before the glue sets, as this directly impacts how the door fits and operates.
Next, add the backing to your door frame. For this, use 1/4″ Purebond plywood, cut to fit snugly within the assembled door frame. Apply a generous bead of wood glue around the inside edges of the door frame where the plywood backing will sit. Then, carefully place the plywood panel onto the glue, ensuring it’s flush. Secure it permanently using a Ryobi 18-gauge stapler with 3/4″ staples. The combination of glue and staples creates a very strong and stable panel, preventing any movement or rattling. This step is essential for creating a solid door structure before adding the decorative X-detail.
To tie the door’s aesthetic back to the vanity sides, now add the X-detail to the door face. Using the same 1/2″ craft boards as before, employ the same marking technique: lay the board directly onto the door panel and mark the precise angles for your cuts. This ensures a perfect fit for each diagonal piece. Once cut, apply wood glue to the back of each X-trim piece and secure them with 3/4″ brad nails. This final decorative touch completes the farmhouse look of your cabinet door, adding texture and visual depth.
Creating the Custom Wood Countertop
The countertop is arguably the most prominent feature of your vanity, and building a custom wood top adds unparalleled warmth and character. Keep in mind that your design might call for a pre-fabricated drop-in sink top, similar to options used in many modern vanities. If that’s the case, you can bypass this section on building a custom wood countertop. However, for a truly integrated farmhouse look, a handcrafted wood top is ideal. We began ours with a piece of 3/4″ Purebond plywood, cut to the desired overall dimensions of the finished countertop, minus 1.25″ from each side. This slight reduction accounts for the upcoming trim that will encase the edges.
With the plywood base ready, the next step is to plank the top for that classic wood aesthetic. We used 1/2″ x 4″ oak boards for this, known for their beautiful grain and durability. Apply wood glue generously to the plywood base, then carefully lay down each oak plank, ensuring tight seams and consistent alignment. Secure each plank with brad nails, driven discreetly through the top surface into the plywood below. Work methodically, allowing the glue to set slightly between planks for better adhesion. This meticulous process transforms the plain plywood into a rich, natural wood surface.
To give the countertop a finished, substantial look, trim the outside edges with 1×2 oak boards. These boards not only provide a clean edge but also add to the perceived thickness and quality of the countertop. Miter cuts at the corners ensure seamless joints. Secure these trim pieces with wood glue and brad nails, creating a continuous, elegant frame around your planked oak surface. This step completes the construction of the solid wood countertop, ready for the sink cutout.
Precision Sink Cutout
With the countertop fully constructed, the next critical step is to cut the opening for your sink. Always refer to the template provided with your specific sink for the most accurate dimensions and shape. Lay the sink template precisely on the countertop, positioning it according to your desired placement and marking the cutting line clearly with a pencil. Using a Ryobi jigsaw, carefully cut along this marked line. To initiate the cut, drill a pilot hole in an inconspicuous corner of the marked area. This pilot hole provides an entry point for your jigsaw blade, allowing you to start cutting cleanly without damaging the surrounding wood. A fine-tooth blade designed for wood will ensure a smoother cut and minimize splintering. Take your time, follow the line meticulously, and let the jigsaw do the work. Once the cut is complete, test-fit your sink to ensure a perfect, snug fit. Minor adjustments can be made with sandpaper or a file if needed.
Finishing the Wood Countertop: Staining and Sealing
With the sink cutout complete, the wood countertop is ready for its protective and beautiful finish. First, thoroughly sand the entire countertop surface, starting with a coarser grit (e.g., 120-grit) and progressing to finer grits (e.g., 180 or 220-grit) for a silky-smooth feel. This prepares the wood to absorb stain evenly. For this farmhouse vanity, we chose Varathane Dark Walnut stain, which imparts a rich, deep color that beautifully complements the rustic aesthetic. Apply the stain according to the manufacturer’s instructions, typically using a rag or foam brush, allowing it to penetrate the wood, and then wiping off any excess. Allow the stain to dry completely, which can take several hours depending on humidity and product specifications.
After the stain has cured, apply a robust protective finish, especially crucial for a bathroom countertop exposed to water. We recommend two coats of Varathane Triple Thick Polyurethane. This product offers exceptional durability and moisture resistance with fewer coats, saving time and effort. While the image shows a “Gloss” label, we opted for a Satin finish, which provides a beautiful, subtle sheen without being overly reflective, perfect for a farmhouse look. Apply each coat thinly and evenly, allowing sufficient drying time between applications as per product instructions. Lightly sand with a fine-grit sandpaper (e.g., 220 or 320-grit) between coats for optimal adhesion and smoothness, then wipe clean before applying the next coat. This multi-layer approach ensures your countertop is well-protected against the rigors of bathroom use.
Note: While the label on the product image shows “Gloss,” we chose a Satin finish for this project.
Painting and Distressing the Vanity Cabinet
With the countertop finished, turn your attention to the cabinet base for its final coat of paint. For a classic farmhouse feel with a touch of character, we painted the entire cabinet with Varathane Chalked paint in Charcoal. Chalk paint is excellent for achieving a distressed look due to its matte finish and ease of sanding. Apply two thin coats for full coverage, allowing ample drying time between each. Once the paint is completely dry, lightly sand the edges and raised details of the cabinet. This subtle distressing technique allows some of the natural wood or primer to show through, creating an aged, well-loved appearance that enhances the farmhouse charm. To protect the painted finish and increase its durability against moisture, add a single coat of the Varathane Triple Thick Polyurethane (Satin finish) to the cabinet base as well. This final protective layer ensures longevity and makes cleaning easier.
Hardware Installation and Final Assembly
The right hardware can truly complete the farmhouse aesthetic and provide essential functionality. For the cabinet door, we selected classic hinges from Home Depot, which offer both durability and a suitable visual style. Install these hinges according to the manufacturer’s instructions, ensuring the door swings smoothly and aligns perfectly with the cabinet opening. For securing the door when closed, we opted for a simple yet effective door latch, also sourced from Home Depot. This type of latch complements the farmhouse theme beautifully and provides reliable closure.
With the door and its hardware installed, and the countertop securely fastened (using the top pocket holes on the vanity frame for our wooden top, or simply placed for a drop-in option), your DIY Farmhouse Bathroom Vanity is now fully assembled and ready to be installed in your bathroom. This is the moment to step back and admire your hard work – a truly custom, beautiful, and functional piece of furniture you built yourself!
Completing the Bathroom Aesthetic: Fixtures and Decor
The beauty of a custom vanity lies in its ability to anchor the entire bathroom design. To complement our newly built farmhouse vanity, we meticulously selected fixtures and decor that harmonized with the rustic charm. The faucet, a critical functional and aesthetic element, is a showstopper. We collaborated with Moen to select the Weymouth Oil Rubbed Bronze one-handle bathroom faucet. Its elegant design and rich finish perfectly match the farmhouse style, adding a touch of sophisticated antiquity. This faucet’s high arc design is not only stylish but also incredibly practical for everyday use.
Beyond the faucet, every detail contributes to the cohesive design. The toilet’s tank lever, often an overlooked element, was also chosen from the Moen Weymouth collection to ensure a unified look. The Moen Weymouth tank lever in oil rubbed bronze continues the beautiful metallic accents throughout the space. Even the toilet paper holder was carefully selected; the Weymouth pivoting paper holder is a game-changer! Its innovative design makes changing toilet paper rolls incredibly easy, proving that thoughtful design can elevate even the smallest conveniences in daily life.
The tiling choices further enhance the bathroom’s farmhouse ambiance. For this project, we collaborated with The Tile Shop to select high-quality tiles that contribute to both style and durability. The walls feature Pillowed Marble Subway Tile, which adds a subtle texture and classic elegance. Complementing these, Marble Trim Pieces provide a refined finish. For the floor, we chose the striking Adoni Black Slate Floor Tile, offering a beautiful contrast and robust practicality. This careful selection of tiles creates a harmonious backdrop for the custom vanity.
Rounding out the details for this impressive bathroom remodel, the vanity is specifically designed to accommodate a drop-in sink. We found ours on Wayfair, intentionally choosing a design that covers a significant portion of the countertop to minimize water exposure on the wood, a practical consideration for a busy household. HERE is the drop-in sink we selected. The mirror and lighting fixtures, equally important for both function and style, also came from Wayfair. The shower area features a shower faucet from the Moen Weymouth collection, maintaining continuity in hardware finishes. The Wall Mirror offers elegance, while the Progress Lighting Archie 2-Light Bath Vanity Light provides ample illumination and stylish appeal at an amazing price point. Even the soft furnishings like the shower curtain and its coordinating curtain rod were discovered on Wayfair, completing the look with cohesive textiles.
Phew! That was quite the journey, from raw lumber to a stunning, finished bathroom. We hope you love the results of this DIY Farmhouse Bathroom Vanity project as much as we do and feel inspired to create your own personalized space. There’s immense satisfaction in building something beautiful and functional that perfectly fits your home and style. Should you have any questions at all about the plans, materials, or steps involved, please don’t hesitate to reach out! Happy building!