
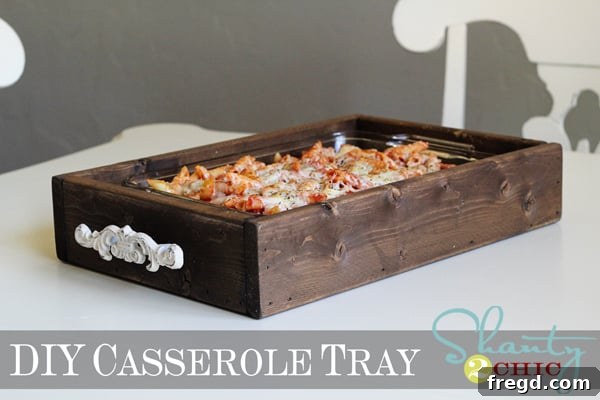
DIY Rustic Casserole Carrier & Serving Tray: The Perfect Budget-Friendly Gift for Any Occasion!
Hello crafting enthusiasts and budget-savvy DIYers! I hope you’re all enjoying a fantastic week. With Mother’s Day approaching, I’ve been busy putting the finishing touches on gifts for all the wonderful moms in my life. This particular project sprang to mind, and I immediately thought, “What an incredible and thoughtful gift this would make for so many special women out there!”
There’s something truly special about a handmade gift, isn’t there? It speaks volumes about the time, effort, and love poured into its creation. And when that gift is as practical, stylish, and incredibly affordable as this one, it’s a win-win situation. Today, I’m thrilled to share a project that will not only impress but also serve a fantastic purpose in any home: a beautiful, rustic casserole carrier that doubles as a serving tray.
Here’s a glimpse of the finished project…
Why Every Home Needs a DIY Casserole Carrier
This isn’t just any tray; it’s a specially designed carrier built to perfectly hold and transport a standard 9×13-inch baking dish. For all you “casserole cookin’ Mamas” out there, or anyone who loves to bring a warm dish to a potluck, family gathering, or neighbor’s house, this tray is an absolute game-changer. Imagine effortlessly carrying your lasagna, baked mac and cheese, or a comforting casserole straight from the oven to the table, and then serving it in style. No more fumbling with hot pads or worrying about scratching your countertop! Plus, it doubles as a charming trivet, protecting your surfaces from heat and adding a touch of rustic elegance to your dining experience.
The best part? This entire project cost me a mere $8 to create! That’s right, an impressive, functional, and beautiful handmade gift for less than the price of a fancy coffee. If you’re looking for a project that’s easy to tackle, won’t break the bank, and yields truly stunning results, you’ve found it. Let’s dive into how you can make one yourself.
Gather Your Materials and Tools
Before we begin, ensure you have all the necessary supplies and tools at hand. Being prepared makes the building process smooth and enjoyable.
Materials List:
- Wood: Two 1×4 inch furring strips. I sourced mine from Lowe’s, and they typically cost under $2 a piece. Furring strips are an excellent budget-friendly option, but you could also use common pine boards or reclaimed wood for a unique touch.
- Wood Glue: Gorilla Wood Glue or a similar strong wood adhesive. This provides robust bonds for a durable tray.
- Finish Nails: Approximately 1.5-inch long finish nails for securing the wood pieces.
- Handles: Two decorative pulls. I found mine at Hobby Lobby for about $1.50 each. If you don’t have a Hobby Lobby nearby, you can often find similar pulls online (check their website or other craft/hardware stores) or consider alternative handle types like rope, leather straps, or different metal styles. Keep an eye out for sales to maximize your savings!
- Wood Stain or Paint: Your preferred wood finish. I used Rust-Oleum Dark Walnut stain for a rich, classic look, and another favorite for the handles (often a metallic spray paint or chalk paint).
- Felt Pads: Small adhesive felt circles to protect tabletops.
Tools List:
- Miter Saw: Ideal for precise, straight cuts. A circular saw or even a hand saw with a miter box can work for this project.
- Measuring Tape and Pencil: For accurate measurements and marking cuts.
- Drill: To pre-drill pilot holes for screws (especially important for handles) and for attaching the handles themselves.
- Hammer or Nail Gun: For driving finish nails.
- Sanding Block or Sandpaper: To smooth rough edges and prepare the wood for finishing.
- Safety Glasses: Always wear eye protection when cutting or drilling.
- Gloves: Recommended when applying stain or paint.
Step-by-Step Guide to Building Your Casserole Tray
This project is surprisingly simple, making it perfect for beginners. Follow these steps, and you’ll have your carrier built in no time!
1. Plan and Make Your Cuts
First, we need to cut our wood pieces. Remember, we’re aiming for a tray that comfortably holds a standard 9×13-inch baking dish. The actual dimensions of a 1×4 furring strip are closer to 0.75 inches thick by 3.5 inches wide. To create a snug fit for the dish, and considering the thickness of the wood, I recommend the following cuts for the frame and bottom slats:
- Long Side Pieces: Cut two pieces of 1×4 wood to 14.5 inches each. These will form the longer sides of your tray.
- Short End Pieces: Cut two pieces of 1×4 wood to 9.75 inches each. These will fit between the long side pieces to form the ends.
- Bottom Slats: Cut five to six pieces of 1×4 wood to 9.75 inches each. These will form the supportive base for your baking dish.
2. Assemble the Frame (The Box)
Now that your wood is cut, it’s time to assemble the basic box frame. Apply a generous bead of Gorilla Wood Glue to the ends of the shorter pieces. Then, attach them to the inside faces of the longer side pieces. Use finish nails to secure the joints, driving them through the longer pieces into the ends of the shorter pieces. Ensure your corners are square for a professional-looking finish. Clamp the box gently if you have clamps available, allowing the glue to set for a stronger bond.
I attached mine using Gorilla Wood Glue and finish nails, creating a sturdy foundation.
3. Add the Bottom Slats
Once your frame is assembled and the glue has had a moment to grab, it’s time to add the bottom slats. Flip your box over. Evenly space the 9.75-inch slats across the bottom opening of the frame. The spacing allows for airflow, which is helpful when carrying a warm dish, and also reduces material usage while maintaining strength. Apply wood glue to the ends of each slat where it meets the frame, then secure each slat with finish nails. Ensure they are flush with the bottom edge of the frame.
4. Apply Your Chosen Finish
With the tray fully assembled, it’s time for the fun part: giving it some character! Before applying any finish, lightly sand all surfaces and edges to ensure they are smooth and free of splinters. Wipe away any dust. I gave the entire tray a coat of my very favorite Rust-Oleum Dark Walnut stain. This stain provides a rich, deep color that highlights the wood grain beautifully, giving it that perfect rustic charm. If you prefer a different look, you could paint it a vibrant color, use a whitewash technique, or simply apply a clear protective finish to let the natural wood shine through.
5. Customize with Handles
While the stain was drying, I moved on to preparing the handles. The pulls I found at Hobby Lobby were perfect for adding a touch of vintage flair. After acquiring your handles, consider how you want them to look. I chose to give them a coat of my other favorite finish (likely a spray paint or chalk paint for a distressed look). Once dry, I lightly sanded them just a bit to create a slightly distressed, “shanty chic” appearance, adding to the overall character of the tray.
Woohoo! Remember to wait for a sale at Hobby Lobby if you can!
So cute! I sanded them just a bit to make them a bit more “shanty” ;-)!
6. Final Assembly and Protection
The final step is to attach your handles securely to the short ends of the tray. Measure and mark the placement for your handles. It’s crucial to drill small pilot holes before driving the screws. This prevents the wood from splitting, especially with furring strips which can be softer. Attach them firmly with the screws provided with your handles. To complete the project and ensure your beautiful new carrier doesn’t scratch any surfaces, add a few adhesive felt circles to the bottom of the tray. These little pads provide excellent protection for your tables and countertops.
The Budget Breakdown: An $8 Marvel!
Let’s quickly recap how this project managed to stay so incredibly budget-friendly:
- Furring Strips: Approximately $4 for two (if bought at less than $2 each).
- Handles: Around $3 for two (if bought on sale at $1.50 each).
- Wood Glue/Nails/Stain: These are often items you might already have on hand from other projects. Even if purchased new, a small bottle of glue, a box of nails, and a small can of stain would likely put your total well under $10, with plenty left over for future projects!
This truly showcases the power of DIY – creating something highly functional and aesthetically pleasing without breaking the bank. It’s proof that a thoughtful, handmade gift doesn’t require a hefty investment.
Customization Ideas to Make It Truly Unique
While the design I’ve shared is a fantastic starting point, feel free to unleash your creativity! Here are a few ideas to customize your casserole carrier:
- Wood Type: Experiment with different types of wood. Reclaimed pallet wood can add extra character, or opt for a smoother pine for a more refined look.
- Finishes: Beyond stains, consider vibrant paint colors to match kitchen decor, a distressed chalk paint finish, or even a stencil design on the sides.
- Handles: Explore various handle styles – chunky rope handles for a nautical feel, leather straps for a modern rustic vibe, or sleek metal bar pulls for contemporary elegance.
- Personalization: Add a monogram, a family initial, or a sweet message using stencils or wood-burning tools.
- Size Variations: Adjust the dimensions to fit other favorite baking dishes, like pie plates or smaller casserole dishes.
Care and Maintenance for Longevity
To keep your casserole carrier looking its best for years to come, simply wipe it down with a damp cloth after use. Avoid submerging it in water. If you used a stain, a occasional re-application of a wood conditioner or wax can help maintain its luster. For painted surfaces, a clear protective topcoat will help prevent chips and scratches.
Your New Favorite Kitchen Essential
That’s it! Pretty easy, right? What do you think of this project? I absolutely adore how it functions as both a sturdy carrying tray for hot dishes and a protective trivet for serving. And did I mention again? It was only $8! It’s the kind of project that brings immense satisfaction and utility.
Whether you decide to keep this charming carrier for yourself (and I totally wouldn’t blame you!), it’s guaranteed to be a cherished gift for any of your special ladies, be it for Mother’s Day, a housewarming, or just because. The personal touch and practical appeal make it truly stand out.
I would love for you to share this project and Pin it below, friends! Your support means the world. Thanks so much for following along! Please don’t hesitate to leave a comment with any questions you might have or to share your own variations!
~Whitney