
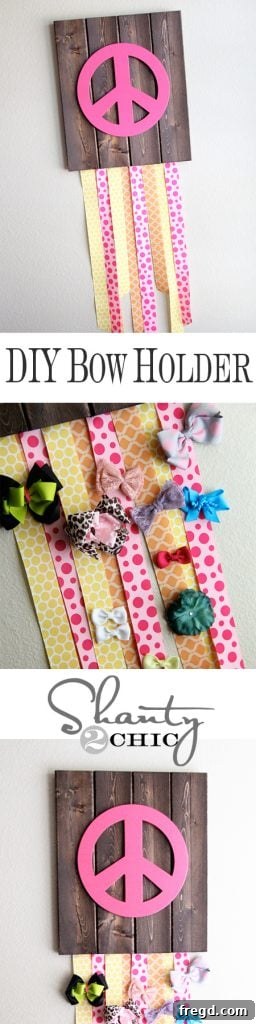
DIY Hair Bow and Clip Holder: The Ultimate Organizer for Girls’ Rooms
Hey amazing DIY community!
We’re absolutely thrilled by all the love and enthusiastic pins for the
Memo Board we crafted for our girls’ room! Your encouragement fuels our passion for creating practical and beautiful solutions for everyday household challenges. Today, we’re tackling another common problem in many homes, especially those with little fashionistas: the never-ending sea of hair bows and clips! If you have multiple girls, you know the struggle – bows and clips seem to multiply overnight, scattering across dressers, floors, and toy boxes. It’s time to bring order to the chaos with a charming, easy-to-make, and incredibly functional DIY hair bow and clip holder. And true to our style, we’re making it with that signature “shanty chic” touch!
Say Goodbye to Clutter: Why You Need This DIY Bow Organizer
The constant battle against clutter in a child’s room can be overwhelming. Hair accessories, while small, can quickly accumulate and become a source of frustration when trying to get ready in the morning. A dedicated storage solution like this DIY bow and clip holder not only declutters the space but also adds a personalized, decorative element to their room. Imagine all those beautiful bows, neatly organized and displayed, easy to find, and no longer lost in a drawer. This project offers a simple yet effective way to streamline your morning routine and teach your children the value of organization.
Beyond its practical benefits, crafting a custom organizer allows for complete personalization. Unlike generic store-bought options that might not match your decor or accommodate your specific collection of accessories, this DIY version can be tailored to any style, color scheme, and size requirements. It’s a rewarding project that’s kind to your wallet, utilizes readily available materials, and results in a unique piece that your girls will absolutely adore – and actually use!
Ready to transform that bow-tastrophe into a bow-tiful display? Here’s how our finished project looks:
The charming outcome: a stylish and functional organization solution.
Gather Your Simple Supplies: Everything You Need
One of the best aspects of this DIY hair bow and clip holder is how few materials it requires, many of which you might already have or can acquire for very little cost. This project is a testament to the idea that beautiful and practical home decor doesn’t have to break the bank or demand expert carpentry skills. You’ll be amazed at how easily these humble components come together to form a truly chic accessory for your girls’ room.
Here’s a detailed list of what you’ll need, along with some insights into why each item is chosen:
- One 1×4″ Board: We opted for a standard 1×4 pine board, which is widely available at any hardware store. Its dimensions provide a sturdy base for the holder without being too bulky. Pine is an excellent choice for its affordability and ease of cutting and staining. If a 1×4 isn’t available, two 1x2s or even scrap wood pieces can work if you adjust the assembly slightly. We cut our 1×4 into four 16-inch long pieces, creating a total surface area of approximately 16×16 inches when assembled. This size is versatile enough to hold a substantial collection of bows without taking up too much wall space.
- Two Paint Sticks: These are a fantastic, often free, resource! You can typically pick them up at the paint counter of hardware stores like Lowe’s or Home Depot. We use them as bracing on the back of the boards, adding structural integrity and making assembly super simple, especially for those who prefer not to use power tools. Their slim profile makes them ideal for this purpose.
- Gorilla Wood Glue: This is our secret weapon for strong, lasting bonds. Gorilla Wood Glue is known for its incredible strength and quick-setting properties. It creates a bond stronger than the wood itself, ensuring your bow holder remains durable for years to come.
- Staple Gun: A manual staple gun is perfect for securely attaching the boards and ribbons. It’s an easy-to-use tool that doesn’t require electricity, making this project accessible to everyone regardless of their power tool experience.
- Wood Stain: Our personal favorite is Rust-Oleum Dark Walnut, which provides a rich, warm finish that beautifully complements the “shanty chic” aesthetic. You can find this, and a wide array of other stains or paints, at Lowe’s. The choice of finish allows for incredible customization – a vibrant paint color could be perfect for a playful room, or a whitewash for a farmhouse look.
- Wooden Embellishment (e.g., Peace Sign): We found an unfinished wooden peace sign for under $3 in the wood craft section at Hobby Lobby. This is where you can truly personalize the holder. Consider initials, a flower, a star, or any shape that reflects your child’s personality or the room’s theme.
- Assorted Ribbons: Look for ribbons that match your color scheme or add a pop of fun! We scored some lovely patterned ribbons at Hobby Lobby during a 1/2 off sale – always keep an eye out for those craft store deals! Different widths and textures can add visual interest. You’ll need enough to create multiple hanging strips for your clips and bows.
- Sawtooth Hanger: This simple piece of hardware makes hanging your finished project a breeze, ensuring it sits flush against the wall.
- Painter’s Tape (optional): Useful for holding pieces in place while glue dries.
- Lighter (optional, for ribbon edges): To prevent ribbon fraying. Use with extreme caution.
Step-by-Step Guide: Crafting Your Bow and Clip Organizer
This project is designed to be straightforward and enjoyable, even for novice DIYers. Follow these steps to create a beautiful and functional hair accessory holder that will bring joy and order to your girl’s room.
Step 1: Prepare Your Wood Boards
Begin by preparing your 1×4″ board. We cut ours into four equal pieces, each 16 inches long. This creates a square-like shape when assembled, providing ample space for bows. If you don’t have a saw at home or prefer not to use one, most hardware stores offer a cutting service, often for free or a small fee. Simply ask them to cut your 1×4 into four 16-inch sections. This step is crucial for establishing the foundation of your bow holder.
Step 2: Assemble the Wooden Base
Now, it’s time to bring your boards together. Lay your four 16-inch pieces side by side on a flat surface, ensuring their edges are flush and aligned. Apply a generous, even bead of Gorilla Wood Glue along the long edges of each board where they will meet. Press them together firmly. Next, position your two paint sticks horizontally across the back of the assembled boards, one near the top and one near the bottom, spanning all four vertical boards. These paint sticks will act as powerful back braces. Use your staple gun to securely attach the paint sticks to each of the four vertical boards. Ensure the staples are driven in flush. The combination of wood glue and staples creates an incredibly strong bond without the need for complex joinery or power tools. Allow the glue to dry completely according to the manufacturer’s instructions. This usually takes a few hours.
The simplicity of assembly using glue and a staple gun.
This is what the back of your assembled boards will look like.
The front of your boards will present a seamless surface, ready for the next steps!
The clean front surface ready for finishing.
Step 3: Stain or Paint Your Wood
Once the glue is completely dry, it’s time to add character to your wood. We applied a coat of our beloved Rust-Oleum Dark Walnut stain. Before staining, you might want to lightly sand the wood with fine-grit sandpaper (180-220 grit) to ensure a smooth finish and help the stain adhere evenly. Apply the stain with a clean rag or a foam brush, wiping off any excess after a few minutes to achieve your desired shade. Always work in a well-ventilated area. If you prefer a painted look, now is the time to apply your chosen color. Allow the stain or paint to dry thoroughly, which may take several hours, or even overnight, depending on humidity and product instructions. This step brings out the natural beauty of the wood or adds a vibrant pop of color.
Our go-to stain for a rich, rustic finish, readily available at Lowe’s.
Step 4: Personalize with an Embellishment
While your stained wood base is drying, you can begin personalizing your decorative element. We chose a simple wooden peace sign from Hobby Lobby’s craft section. These unfinished wood pieces are inexpensive and offer endless possibilities for customization. Paint it a color that complements your room’s decor or contrasts beautifully with the stained wood. We gave our peace sign a vibrant coat of paint to make it stand out. Apply multiple thin coats for the best coverage, allowing each coat to dry thoroughly before applying the next. Once completely dry, center your embellishment on the stained wood and attach it securely with Gorilla Wood Glue. To ensure it stays perfectly in place while the glue sets, use a few strips of painter’s tape to hold it down. The tape is gentle and won’t damage your freshly stained surface. Let it cure fully.
A blank canvas for your personalization.
Adding a splash of color to the embellishment.
Securing the embellishment while the glue dries with painter’s tape.
Step 5: Add the Ribbons for Hanging Accessories
This is where your bow holder truly comes to life! We found some adorable patterned ribbons at Hobby Lobby during a great sale. The variety in color and pattern adds a playful touch. For optimal visual interest and functionality, cut three pieces of each ribbon color at varying lengths. This creates a staggered look and allows for different hanging heights for various sizes of bows and clips. Before attaching, cut the ends of each ribbon at an angle for a neat finish. To prevent fraying, you can carefully and *briefly* pass the cut edges of synthetic ribbons through a lighter flame. **Exercise extreme caution if using a lighter and ensure you have proper ventilation and no flammable materials nearby.** Once prepared, flip your wooden base over. Using your staple gun, attach the ribbons to the back and bottom edge of your boards. Space them evenly across the width of the holder, ensuring they hang straight and are securely fastened. You’ll want the ribbons to hang long enough to accommodate several rows of bows and clips.
Adorable ribbons to hold all those precious bows!
Angling the ribbon ends adds a professional touch and prevents fraying.
Ensuring the ribbons are securely fastened to the back.
Step 6: Add a Sawtooth Hanger and Display
The final structural step is to add a sawtooth hanger to the back of your bow holder. Center the hanger on the top paint stick and use the small nails provided to tap it into place. This type of hanger is very easy to install and allows the holder to hang flush against the wall. Once the hanger is in place, your DIY hair bow and clip holder is complete and ready to be displayed! Choose a prominent spot in your daughter’s room where it can be easily accessed and admired. This is the moment to step back and appreciate your hard work!
The final step before hanging: adding a sawtooth hanger.
The Big Reveal: Your New Organization Station!
Want to see the magic in action?
The bow holder takes its rightful place on the wall.
A detailed look at the finished product, ready for all the bows.
And with just a fraction of the bows that will eventually find their home here…
Even a few bows instantly showcase its potential.
Different angles showing the accessibility of the organized accessories.
Showcasing a fuller display of organized bows and clips.
Customize Your Creation: Tips for Personalization
The beauty of DIY lies in the ability to make it uniquely yours. While we opted for a rustic stain and a peace sign, your bow holder can reflect any style or theme. Consider these ideas:
- Paint it Bright: Instead of stain, paint the wood base a vibrant color to match your child’s room. Think pastels, bold primary colors, or even a whimsical ombre effect.
- Different Embellishments: Replace the peace sign with wooden letters to spell out your child’s initial, a cute animal shape, a glittery star, or a floral design.
- Ribbon Variety: Mix and match ribbon textures (grosgrain, satin, lace), patterns (polka dots, stripes, florals), and widths for a dynamic look. You could even add some wider ribbons for larger bows or thinner ones for clips.
- Add Hooks: For headbands or necklaces, consider screwing small decorative hooks into the bottom edge of the wooden board.
- Distressed Look: For an even more “shanty chic” or farmhouse feel, you can distress the painted wood with sandpaper after the paint has dried, revealing hints of the wood beneath.
Conclusion: A Tidy Room and a Happy Heart!
We truly hope you love this easy and impactful DIY project as much as we do! It’s incredibly satisfying to create something practical and beautiful with your own hands, especially when it solves an ongoing household dilemma. This bow and clip holder is more than just a storage solution; it’s a piece of personalized decor that will bring a touch of charm and organization to any girl’s room. Now, we’re off to round up the rest of those elusive bows and clips, finally giving them a designated, stylish home!
Thanks again for stopping by and being a part of our creative journey! We’d absolutely love for you to share your thoughts, photos of your own creations, and of course, pin this project to inspire others below!
Just a friendly reminder: Tomorrow marks the final day for our exciting
Silhouette Cameo and Tote bundle giveaway, so don’t miss out – make sure to enter before it’s too late!
~Whitney