
Unlock Creativity: Free Printable Letters & Numbers for DIY Room Decor
Welcome, fellow DIY enthusiasts! I hope your week has been filled with inspiration and creative sparks. Today, I’m thrilled to share a project that’s not only incredibly easy but also incredibly versatile. Imagine transforming any room in your home with personalized touches that reflect your unique style – and without breaking the bank! I’ve always been on the lookout for fun, affordable, and undeniably cute ways to decorate, especially when it comes to personalizing spaces like my son’s room. That’s why I poured my heart into creating these amazing Free Printable Letters & Numbers, and now I’m sharing them with you.
And the best part? These aren’t just ideas; they are actual, ready-to-use printables, absolutely free! Who doesn’t love a fantastic freebie, especially one that empowers your creative spirit? We all do! These printables are designed as standard 8×10 prints, making them incredibly convenient to print right from the comfort of your home. Alternatively, you can easily send them to a local photo center like Walmart or Walgreens for professional-quality prints. Simply click on the letter or number you need from the list below, and then hit the print icon from your browser. It’s truly that simple, and of course, it’s completely free. Currently, we’re offering these fantastic designs in the popular 8×10 size, with plans to release them in 5×7 dimensions very soon, providing even more flexibility for your decorating needs.
Your Collection of Free Printable Letters & Numbers
Transforming a room or creating a personalized gift has never been easier. Our comprehensive collection includes every letter of the alphabet, all numbers from 0 to 9, and even a charming ampersand and a heart symbol to add that extra special touch. These high-resolution PDFs are designed for crisp, clear printing, ensuring your projects look professional and polished every time. Whether you’re spelling out a name, creating a special message, or simply adding a decorative initial, you’ll find everything you need right here.
Printable Letters (8×10 Size)
Letter A
Letter B
Letter C
Letter D
Letter E
Letter F
Letter G
Letter H
Letter I
Letter J
Letter K
Letter L
Letter M
Letter N
Letter O
Letter P
Letter Q
Letter R
Letter S
Letter T
Letter U
Letter V
Letter W
Letter X
Letter Y
Letter Z
Printable Numbers & Symbols (8×10 Size)
In addition to the full alphabet, we’ve included essential numbers and special symbols to give you even more creative freedom for your DIY projects. Spell out important dates, ages, or simply add a stylish ‘&’ to connect names or words. These elements are perfect for custom signs, celebratory banners, or unique nursery art.
Number 0
Number 1
Number 2
Number 3
Number 4
Number 5
Number 6
Number 7
Number 8
Number 9
Ampersand
Heart
Simple & Chic: Frame Your Printables in Seconds
Even if the idea of a full DIY wood project feels a bit intimidating, don’t worry! These printables are designed for instant gratification too. You can easily print them out and place them directly into an 8×10 frame. This quick and elegant solution allows you to create beautiful, personalized wall art in mere seconds. It’s perfect for those who want a stylish touch without any crafting tools. Just imagine these crisp, classic designs adorning your walls, adding character and warmth to any space. It’s an effortless way to achieve a high-end look on a budget.
Crafting Personalized Wood Letters: A Step-by-Step Guide
Now, for those ready to dive into a hands-on project, let me walk you through how I created these custom wood letters for my son’s room. This project is surprisingly straightforward and offers a wonderfully rustic, personalized touch to any nursery, kid’s room, or even a living space. It’s an excellent way to use these free printables to their full potential, creating durable and charming decor pieces.
Step 1: Gathering Your Materials – The Perfect Wood Base
The foundation of this project is a good quality wood board. I recommend starting with 1×12 whitewood or pine board. These types of wood are widely available at hardware stores like Lowe’s and are incredibly easy to work with. They come in convenient 4-foot pieces, making them simple to transport in almost any car. A 4-foot piece typically costs around $6 and is usually enough to create at least five individual letters, offering incredible value. Choosing pine or whitewood ensures a smooth surface that readily accepts stain and gives a beautiful finished look. Here’s a peek at my little helper assisting me with selecting our wood – a fun family activity!
Step 2: Precision Cutting for Each Letter
For each individual letter you plan to create, you’ll need to cut a 9-inch long piece from your 1×12 board. My son’s name has six letters, so I carefully measured and cut six 9-inch sections. This dimension works perfectly for the 8×10 printable letters, leaving a slight border for a clean, framed appearance once the paper is applied. Don’t be intimidated by the cutting! Many hardware stores offer cutting services, so you can have them prepare your wood pieces for you. If you prefer a DIY approach, a simple and affordable hand saw will do the trick. For those with a workshop, a miter saw makes the process even quicker and more precise. I personally used my Ryobi 10″ Compound Miter Saw, and all my cuts were completed in mere minutes, ensuring a perfectly uniform set of bases for my letters.
Step 3: Staining for a Beautiful Finish
Once your wood pieces are cut, it’s time to add character with stain. For this project, I opted for my absolute favorite: Rust-Oleum Ultimate Wood Stain in Early American. This product is a dream to work with! It typically requires just one coat to achieve a rich, consistent color, and the best part? It dries in under an hour. This means less waiting time and more crafting time, which is always a win in my book. Apply the stain evenly with a brush or cloth, following the wood grain, and wipe off any excess to prevent a sticky finish. The Early American shade provides a warm, classic look that complements a variety of decor styles, from rustic farmhouse to cozy traditional.
Step 4: Preparing Your Printable Letters
While your stained wood pieces are drying, you can print and prepare your chosen letters. I highly recommend printing these free designs on white cardstock. Cardstock provides a sturdy base, preventing wrinkles and giving the final product a more professional, substantial feel. However, you’re welcome to experiment with other paper types such as plain printing paper for a softer look, kraft paper for an organic touch, or even photo paper for a glossy finish. Each option offers a different aesthetic, allowing for further customization. Once printed, simply use a sharp pair of scissors to carefully cut out each letter. Precision here will ensure a clean look when they are adhered to the wood.
Step 5: Distressing for a Charming, Worn Look
Before attaching the printed letters, I like to add a distressed finish to the wood. This step gives the letters a charming, vintage appeal and makes them feel like they have a story. To achieve this, I liberally sanded down the edges and corners of each wood piece, making them soft and rounded. I also strategically sanded away some of the stain from the surfaces, allowing the natural wood to peek through and creating a beautifully aged effect. My go-to tool for this part of the process is my beloved Ryobi Corner Cat Finish Sander. This tool is truly fantastic; it’s the best sander I’ve ever used, allowing me to achieve the perfect distressed finish every time, and it’s surprisingly affordable. The small size and unique shape make it ideal for getting into corners and creating those perfectly worn edges.
Step 6: Attaching Letters and Preparing for Hanging
With the wood distressed and the letters cut, it’s time to bring them together. I used small silver furniture tacks, easily found at any hardware store, to attach my printed letters to the center of each wooden board. Simply place one tack in each corner of the paper and use a hammer to lightly tap them into the wood. Be gentle to avoid damaging the paper. These tacks not only secure the letters but also add a charming, industrial accent to the overall design. For hanging, I screwed a small screw eye into the top center of each board. This creates a secure loop for attaching twine or other hanging mechanisms. Voila! The main construction is complete, and it’s remarkably simple, isn’t it?
Step 7: The Art of Hanging Perfectly Straight
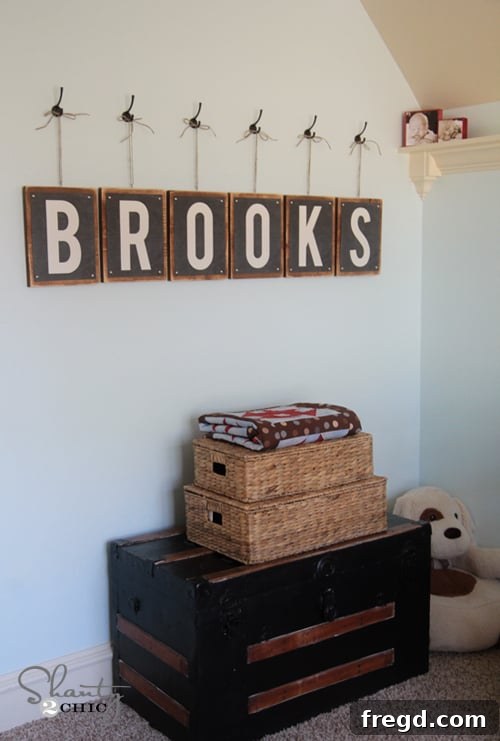
Next, I used rustic twine to hang each letter from a decorative hook, creating a cohesive and charming display. This step is also incredibly easy and adds to the handmade aesthetic. I often get asked how I manage to keep my frames and decor pieces hanging perfectly straight without constantly readjusting. My secret weapon, and a tried-and-true ‘Shanty’ tip, is Gorilla Tape! You can find this incredibly strong and reliable tape at any hardware store. I simply tear off a small piece, roll it into a ball, and stick it to the back of the wood board. Then, I firmly press the board against the wall. This tape is truly phenomenal – it holds securely for a very long time, and I’ve rarely encountered any issues with it leaving residue or damaging paint upon removal. It’s the perfect solution for keeping your DIY creations perfectly aligned and stable.
Your Finished Personalized Decor!
And there you have it – the finished project! Each custom wood letter, adorned with our free printables, comes together to create a stunning, personalized display. This project perfectly embodies my crafting philosophy: super easy, incredibly cute, and wonderfully cheap. It’s the ideal way to add a unique and heartfelt touch to any room without a significant investment of time or money. Imagine these beautiful letters spelling out a child’s name in a nursery, a meaningful word in a living room, or a welcoming message in an entryway. The possibilities are truly endless, limited only by your imagination.
Remember, if the full DIY wood project feels like too much, these versatile printables can also be framed directly in seconds for an equally charming and effortless display. Whether you choose to craft them onto wood or simply frame them, you’re guaranteed a super easy, super cute, and super cheap decor solution. This truly is my kind of project!
Thank you so much for joining me on this creative journey. I genuinely hope these free printable letters and numbers inspire you to personalize your space in wonderful new ways. If you enjoyed this project, I would be incredibly grateful if you would share this post and PIN these letters for others to discover and enjoy. Your support means the world, and you all truly rock! Happy crafting!
~Whitney