
Unlock Your Creativity: The Ultimate Guide to Free Printable Alphabet Banners
Welcome, fellow crafters and DIY enthusiasts! If you’re anything like us, you adore discovering free, easy, and incredibly versatile projects that add a personal touch to your home and celebrations. Today, we’re thrilled to re-introduce and significantly expand upon one of our most beloved offerings: the Free Printable Whole Alphabet Banner. This isn’t just an update; it’s a comprehensive guide to crafting beautiful, personalized banners for every occasion imaginable!
We’ve been overwhelmed by the incredible response and heartfelt messages regarding our original “Thankful” Free Printable Banner. Your enthusiasm clearly showed a strong desire for more customization options, and we listened! We’ve worked hard to bring you the complete alphabet, ensuring you can design a banner for literally *any* event, holiday, or room theme. And for those of you who’ve been asking for more, we’ve already rolled out printable numbers and additional decorative shapes to further enhance your creative projects. You can explore those exciting additions
right here!
Don’t miss out on future updates, new printables, and inspiring DIY ideas! Be sure to follow us on
Pinterest and
Facebook to stay connected with our latest posts and connect with a vibrant community of makers.
Why Choose DIY Printable Banners?
In a world full of mass-produced decorations, there’s something truly special about a handmade touch. Printable banners offer an unparalleled blend of convenience, affordability, and personalization. Imagine crafting a unique birthday message for a loved one, spelling out an inspiring quote for your living room, or adding festive flair to your holiday decor – all without breaking the bank or spending hours on complicated crafts.
This project is designed to be as straightforward as possible, making it perfect for beginners and seasoned crafters alike. With just a few basic supplies and about 10 minutes of your time, you can transform simple paper into a stunning, custom decoration. It’s an ideal way to express your creativity, save money on party supplies, and add that coveted “designer look” to any space.
A Touch of Whimsy: The Free Printable Heart Banner
Beyond letters, we’ve also included a delightful heart banner printable to add an extra layer of charm to your creations. These cute heart shapes are perfect for expressing love, celebrating Valentine’s Day, anniversaries, or simply adding a touch of sweetness to any banner.
Ready to spread some love? You can download the Heart Banner printable instantly:
Print Heart Banner
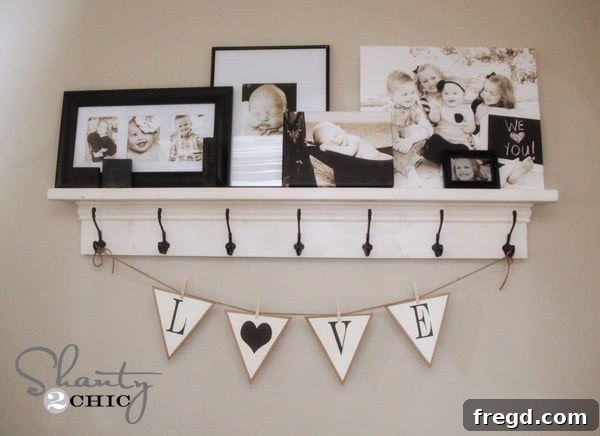
We love seeing how these hearts can transform a simple message. For instance, we’ve used them to craft a beautiful “LOVE” banner, bringing warmth and cheer to our space.
Your Complete Collection: Free Printable Whole Alphabet Banner Letters
Now for the main event! Below, you’ll find links to download each individual letter of the alphabet, ready for you to print at home. Creating your custom banner is incredibly straightforward: simply click on the link for the desired letter, and then use your browser’s print function to send it to your printer. It’s truly that easy!
Download Each Letter:
Print Letter A Banner
Print Letter B Banner
Print Letter C Banner
Print Letter D Banner
Print Letter E Banner
Print Letter F Banner
Print Letter G Banner
Print Letter H Banner
Print Letter I Banner
Print Letter J Banner
Print Letter K Banner
Print Letter L Banner
Print Letter M Banner
Print Letter N Banner
Print Letter O Banner
Print Letter P Banner
Print Letter Q Banner
Print Letter R Banner
Print Letter S Banner
Print Letter T Banner
Print Letter U Banner
Print Letter V Banner
Print Letter W Banner
Print Letter X Banner
Print Letter Y Banner
Print Letter Z Banner
Essential Punctuation for Your Custom Messages
And because a well-crafted message often needs a little extra flair, we’ve also included essential punctuation marks. A little exclamation or question mark can make all the difference in conveying the perfect sentiment!
Print ! Banner
Print ? Banner
Crafting Your Free Printable Alphabet Banner: Step-by-Step Guide
Now that you have all your printable elements, let’s walk through the simple steps to bring your custom banner to life. These tips will help ensure your finished project looks polished and professional.
Step 1: Printing Your Banner Elements
First things first: print all the letters, hearts, and punctuation marks you’ll need for your chosen message. While regular printer paper works perfectly fine, consider using a slightly heavier paper for a more substantial feel and better durability. We often opt for cream-colored printer paper, as its subtle hue adds a touch of rustic elegance, enhancing the overall aesthetic of the banner. If you want an even sturdier banner, cardstock (65lb or 80lb) is an excellent choice, especially if your banner will be displayed for an extended period or outdoors.
Step 2: Precisely Cutting Out Each Banner Shape
Once your printables are ready, it’s time to carefully cut out each individual banner piece. A sharp pair of scissors will be your best friend here. Take your time to follow the outline, ensuring clean and crisp edges. For even greater precision, especially if you’re making many banners, you might consider using a craft knife and a cutting mat. This allows for perfectly straight lines and sharp corners, giving your banner a professional, store-bought finish.
Step 3: Mounting Your Letters to Create Impact
This step is where your banner truly begins to take shape and gain dimension. Select a contrasting or complementary color of backing paper to mount your cut-out letters onto. We frequently use double-sided tape to adhere each letter onto Kraft paper. Kraft paper is fantastic because it’s a wonderfully neutral brown, incredibly affordable, and readily available at any craft supply store. A standard 12×12 inch sheet of Kraft paper can comfortably accommodate two letters, making it an economical choice.
However, don’t feel limited! You could use colorful cardstock to match a party theme, patterned scrapbook paper for added texture, or even fabric scraps for a truly unique look. Experiment with different adhesives too: a glue stick, spray adhesive, or even a thin line of craft glue will work well. The goal is to create a sturdy base that makes your letters pop!
Step 4: Creating Your Distinctive Border
With your letters securely mounted, the final cutting step involves creating a border around each piece. Using your scissors, carefully cut around the mounted letter, leaving a consistent margin of your backing paper visible. There’s no need for exact measurements here – embrace the “eyeball method” for a charming, organic look. This border adds depth and defines each banner segment beautifully. You can make your borders thick or thin, uniform or varied, depending on the aesthetic you’re aiming for.
For hanging, we’re big fans of rustic twine and small wooden clothespins. This combination is not only incredibly affordable and available at any craft store but also adds a lovely, farmhouse-chic touch to your banner display. Simply string your twine across your desired space and clip each banner piece onto it with the clothespins. This method also allows for easy adjustments if you need to re-space your letters!
Creative Applications for Your Custom Banners
The beauty of a customizable alphabet banner lies in its endless versatility. Once you’ve mastered the basic technique, a world of decorative possibilities opens up!
- Party Decorations: Spell out “Happy Birthday,” “It’s a Boy/Girl,” “Congratulations,” or “Merry Christmas.” These banners instantly elevate any party theme.
- Home Decor: Create inspirational quotes for your office, welcome signs for your entryway, or seasonal messages for your mantelpiece. A “FALL” banner in autumn or “SPRING” in warmer months can change the mood of a room.
- Nursery & Kids’ Rooms: Personalize a child’s space with their name, a sweet saying, or even use the letters as an educational tool.
- Holiday Celebrations: From “Happy Halloween” to “Easter Blessings” or “Happy New Year,” custom banners make holiday decorating a breeze.
- Special Events: Anniversaries, graduations, engagement parties – a tailored banner adds a thoughtful and celebratory touch.
We recently got our dining room ready for Christmas, and a festive banner was the perfect addition. What do you think? These banners truly transform a space with minimal effort.
Advanced Tips for Your Printable Banners
Want to take your banners to the next level?
- Laminate for Durability: If your banner will be used repeatedly or displayed outdoors, consider laminating each finished piece before punching holes and stringing.
- Glitter & Embellishments: Add a touch of sparkle with glitter glue, attach small rhinestones, or use decorative punches for intricate edges on your backing paper.
- Alternative Hanging Methods: Instead of clothespins, you can punch two holes in the top corners of each banner piece and thread ribbon, yarn, or invisible fishing line through them.
- Varying Sizes: While these printables are standard, you can adjust the print scale on your printer settings to create smaller or larger banner pieces for different impacts.
Thank you so much for stopping by and exploring the wonderful world of free printable banners with us! We hope this expanded guide inspires you to get creative and craft something beautiful.
If you have any questions or need further assistance, please don’t hesitate to reach out in the comments below! We love hearing from you.
We would be absolutely thrilled if you could help us spread the joy of crafting by sharing and pinning this post! Your support helps us continue to create and share free resources with our amazing community.
Also, make sure to keep up with all our latest projects and inspiration by following us on
Facebook!