
Hello, fellow DIY enthusiasts and home cooks!
I hope you all had a wonderfully relaxing and productive weekend. Mine was certainly a whirlwind, spending it in beautiful San Antonio with my two eldest daughters for an energetic cheer competition. While I’m still recovering my hearing and catching up on sleep, the joy of watching them compete and spending quality time together made every moment worth it!
Today, I’m thrilled to share a project that has been on my mind for quite some time. If you’re anything like me, you’ve probably found yourself in the middle of a recipe, covered in flour or butter, desperately reaching for your phone to Google a quick measurement conversion. It’s a common kitchen frustration, right? The struggle to find the exact equivalent for a tablespoon in milliliters, or cups to ounces, can really break your cooking rhythm. Well, I decided it was high time to put an end to that little problem with a stylish and incredibly practical solution!
Introducing Your New Kitchen Essential: The DIY Conversion Chart
Imagine a world where all your kitchen measurement conversions are just a glance away, elegantly displayed and perfectly within reach. No more sticky phone screens or frantic searches! My latest DIY endeavor brings exactly that convenience right into your kitchen. This project combines functionality with a charming rustic aesthetic, making it not just a useful tool but also a beautiful piece of kitchen decor. It’s designed to simplify your cooking process and add a touch of handmade charm to your culinary space.
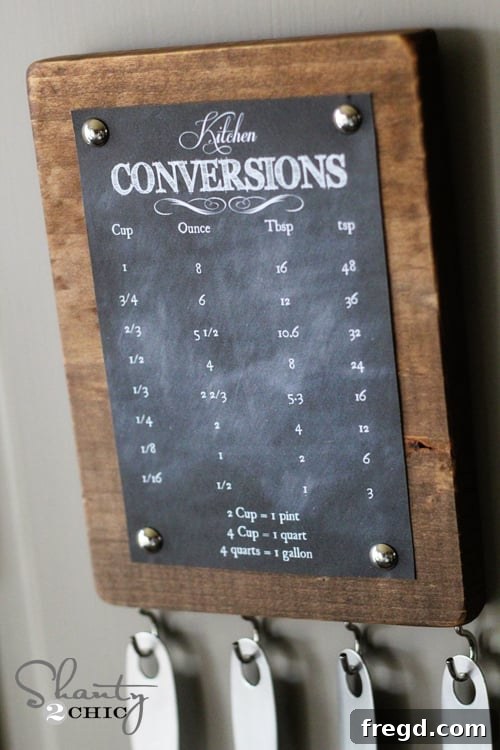
Here’s a sneak peek at how my very own Kitchen Conversion Chart turned out:
This project is truly designed to be super easy and accessible for everyone, regardless of your DIY experience level. The heart of this helpful tool is a fantastic free printable that I’ve designed just for you!
Step 1: Grab Your Free Printable Kitchen Conversion Chart
Who doesn’t love a free printable, especially one that makes your life easier in the kitchen? This essential conversion chart is available to you at no cost. It’s perfect for quickly referencing common kitchen measurements, from liquids to dry ingredients, ensuring your recipes turn out perfectly every time. The design is clean, clear, and has that lovely chalkboard aesthetic that complements so many kitchen styles.
This particular printable is sized at a versatile 4×6 inches, making it incredibly flexible for various uses. If you’re looking for an even quicker solution, you could simply print it and pop it into a standard 4×6 photo frame. It’s a great way to get instant kitchen organization without any extra crafting. For those ready to dive into the full DIY experience, this 4×6 printable will be the perfect centerpiece for your rustic wood board.
To get your copy, simply click on the photo below. Once the image opens in your browser, look for the print icon or option in your browser’s top bar and hit print. It’s truly as easy as pie!
Once printed, carefully cut out your conversion chart using a pair of sharp scissors. Take your time to get clean edges, as this will contribute to the overall polished look of your finished project.
Step 2: Prepare Your Wood Base
For this charming and practical project, I opted to use a 1×8 inch whitewood scrap. Whitewood is an excellent choice for DIY projects because it’s readily available, inexpensive, and easy to work with. You can typically find a 4-foot piece of whitewood at your local hardware store for around $5. The best part? A single 4-foot board can yield enough material to make approximately eight of these conversion charts, making it an incredibly cost-effective craft or a fantastic idea for handmade gifts!
To start, you will need to cut a 5-inch piece from your whitewood board. This will serve as the perfect base for your 4×6 inch printable, allowing a nice border around the edges for the hardware we’ll add later.
If you’re new to woodworking and don’t yet own a large power saw, don’t worry! Projects like this one are ideal for getting started with simpler tools. A basic hand saw or a compact electric saw (often referred to as a “craft saw” or “hobby saw”) can effortlessly handle cuts for small pieces like this. These smaller saws are fantastic for a multitude of DIY and craft projects and are a great entry point into the world of woodworking without needing a significant investment in heavy machinery. Always remember to prioritize safety when cutting wood, wearing appropriate protective gear and ensuring your work piece is stable.
Step 3: Sanding for a Smooth Finish
Achieving a professional and polished look for your DIY projects often comes down to the details, and sanding is a crucial step that shouldn’t be overlooked. After cutting your wood piece, I highly recommend sanding the corners and edges to remove any splinters, rough patches, or sharp points. This step not only makes the piece safer to handle but also creates a smoother surface that will beautifully absorb the stain.
This process is incredibly easy and quick to do! You can use a small hand sanding block paired with 220-grit sandpaper. The 220-grit sandpaper is fine enough to smooth the wood without leaving deep scratches, providing an ideal surface for staining. Simply rub the sandpaper along all the cut edges and corners until they feel smooth to the touch. You’ll be amazed at how a few minutes of sanding can transform the raw wood into a refined base for your project.
Step 4: Staining for Rustic Charm
Once your wood piece is smooth and clean, it’s time to add character with stain. I absolutely adore the rustic, warm look of stained wood, which perfectly complements the chalkboard style of our printable chart. For this project, I used just one coat of my absolute favorite wood stain: Rust-Oleum Ultimate Wood Stain in “Early American.” This particular shade provides a rich, classic hue that adds depth and authenticity to the wood grain, creating that beloved farmhouse or rustic kitchen aesthetic.
You can easily find this fantastic wood stain at your local Lowe’s home improvement store or other major hardware retailers. Its widespread availability makes it a convenient choice for any DIY enthusiast.
Rust-Oleum’s wood stain truly stands out for its quality and ease of use. What makes it so remarkable is its efficiency – you only need a single coat to achieve a beautiful, consistent color. Moreover, it dries incredibly fast, typically in under an hour, which means you can move on to the next steps of your project without long waiting periods. This quick-drying formula is a huge time-saver and makes the staining process much more enjoyable.
On top of its existing excellent range, Rust-Oleum is continually innovating! They have some exciting new colors, like Ash, hitting the shelves really soon. Ash and I even had the amazing opportunity to test them out last week. We spent a fun day in North Carolina, getting our hands dirty and experimenting with these gorgeous new shades. Trust me, you guys are going to absolutely love them as much as we do!
Applying the stain is simple: just follow the instructions on the can, usually wiping it on with a cloth and then wiping off any excess for an even finish. Ensure you work in a well-ventilated area and allow the stain to dry completely before proceeding.
Step 5: Adding Functional Cup Hooks
Once your beautifully stained wood base is completely dry and cured, it’s time to add the practical element that truly brings this kitchen conversion chart to life: the cup hooks! These small but mighty additions will allow you to neatly hang your measuring spoons and cups, keeping them organized and always within easy reach. This eliminates the clutter of rummaging through drawers and ensures you have all your essential tools right where you need them when cooking or baking.
I was particularly delighted when I found these elegant silver cup hooks at Target. The silver finish perfectly complements the rustic wood and the clean design of the printable, adding a touch of understated sophistication. However, you can choose cup hooks in various finishes – brass, bronze, or black – to best match your existing kitchen hardware and personal style.
For this project, I strategically placed four cup hooks along the bottom edge of the board. This spacing is ideal for hanging a standard set of measuring spoons and potentially a few small measuring cups. To install them, simply mark your desired spots, then gently screw the hooks into the wood. Pre-drilling a small pilot hole with a drill bit slightly smaller than the hook’s screw base can make this process even easier and prevent the wood from splitting, though whitewood is soft enough that you can often screw them in directly with a bit of force.
Observe the placement of the four hooks at the bottom of my board:
Step 6: Attaching Your Conversion Chart Printable
With the stained wood base ready and the cup hooks in place, the next step is to secure your free printable conversion chart. This is where the aesthetic appeal really comes together! To hold my printable firmly in place, I opted for charming silver furniture tacks. These tacks not only provide a strong hold but also add a decorative, rustic touch that perfectly complements the overall design of the board.
You can find these versatile furniture tacks at most hardware stores, as well as a variety of craft stores. They often come in different finishes, so you can choose ones that best match your cup hooks or your kitchen’s existing metal accents. To attach the printable, carefully position it onto the stained wood board, ensuring it’s centered and straight. Once you’re happy with the placement, use a hammer to gently nail a tack into each corner of the printable. Make sure to tap them in firmly so they are flush with the paper and wood, creating a neat and secure attachment.
Alternatively, if you prefer a different look or don’t have furniture tacks, you could use a strong spray adhesive for a seamless finish, or small decorative nails. The key is to ensure the printable is smoothly adhered and won’t peel or wrinkle over time, especially in a busy kitchen environment.
Step 7: Mounting Your DIY Kitchen Conversion Chart
Now that your kitchen conversion chart is assembled and looking fabulous, the final step is to mount it in your desired location. Deciding where to hang it is key to maximizing its convenience in your kitchen. I initially considered using magnets on the back of the board, but I had some concerns about whether they would be strong enough to hold the weight of the measuring spoons once they were hung. Plus, I already have a slight (okay, maybe not so slight!) obsession with Command strips, so my second choice was an obvious and reliable solution!
Command strips are truly a DIYer’s best friend. They offer a damage-free hanging solution, which is perfect for renters or anyone who likes to rearrange their decor without leaving holes or sticky residue behind. For this project, I used two Command strips on the back of my board, placing them near the top corners for optimal stability. Then, I simply attached the entire unit to the side of my refrigerator. This location is incredibly convenient, putting the chart and measuring tools right at arm’s length while I’m cooking.
The beauty of Command strips is their versatility and reliability. When I eventually decide to move the chart or redecorate, these amazing strips peel off cleanly, leaving absolutely no mess or damage behind. It’s a fantastic way to ensure your DIY creation is both functional and adaptable to your evolving home decor needs. Other mounting options could include a sawtooth hanger for wall mounting, or stronger magnets if you’re confident in their holding power for heavier utensils.
Your Finished Kitchen Companion!
And that’s it! Your stylish, functional, and completely DIY kitchen conversion chart is ready to revolutionize your cooking experience. No more pausing mid-recipe to hunt for conversions – everything you need is now beautifully displayed and easily accessible. This project proves that practical solutions can also be incredibly charming additions to your home decor.
Ready to see some finished pictures of this amazing kitchen hack in action? Get ready to be inspired!
I truly hope you LOVE this project as much as I do! It has made such a difference in my daily cooking routine, adding both efficiency and a touch of personalized rustic charm to my kitchen. This DIY kitchen conversion chart is not just a tool; it’s a testament to how simple crafts can significantly enhance your home.
If you’re inspired to create your own, I would absolutely love for you to share your finished project with me and the entire DIY community! Please feel free to share this post with your friends and family, and don’t forget to PIN it to your favorite Pinterest boards. Spreading the word helps others discover these fun and practical ideas!
You guys are truly amazing, and I hope you enjoy creating and using this fantastic kitchen organization solution. Happy crafting and even happier cooking!
Thanks so much for stopping by!
~Whitney