
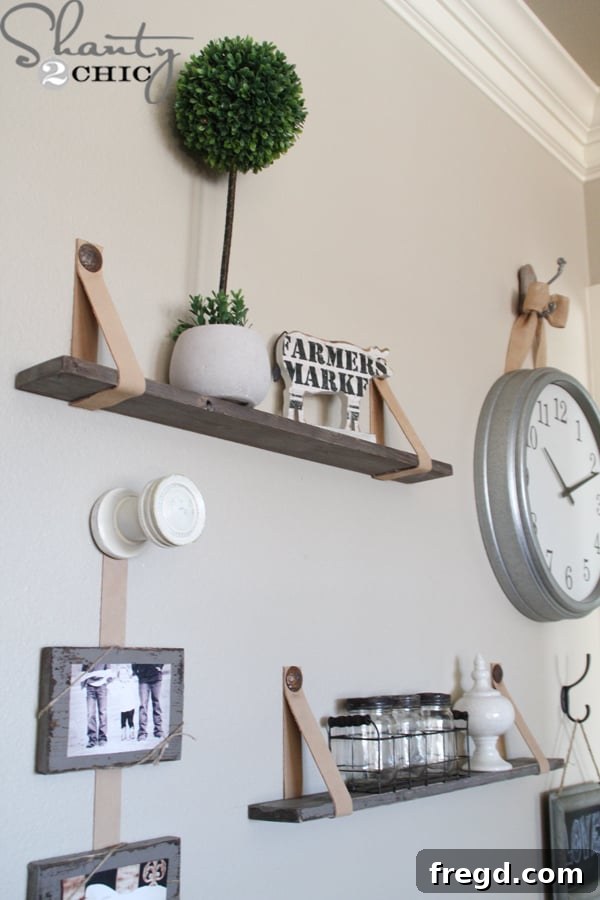
Stylish & Affordable: Craft Your Own DIY Leather Strap Shelves for Under $5!
Are you staring at a blank wall, yearning for a touch of character, organization, and a dash of rustic charm? Do you wish for functional yet fashionable storage that doesn’t break the bank? Look no further! This weekend, embark on an incredibly satisfying and budget-friendly DIY project: crafting beautiful shelves suspended with elegant leather straps. Perfect for narrow hallways, cozy nooks, or any space needing a stylish upgrade, these DIY leather strap shelves combine a modern farmhouse aesthetic with incredible affordability, costing less than $5 per shelf in materials!
This project is designed for everyone, from seasoned DIY enthusiasts to beginners looking for a quick and rewarding build. Forget bulky, expensive shelving units; our design is sleek, doesn’t protrude too much into your living space, and offers endless customization possibilities. Get ready to transform your walls with a unique blend of wood and leather that speaks volumes about your personal style.
These rustic yet refined shelves are ideally suited for tight spots, making them a fantastic solution for adding storage and display areas without overwhelming your room. Whether you envision a single floating shelf or a series of multiple tiers, you have complete control over their length and number to perfectly suit your space and organizational needs. The process is straightforward, and the result is a custom piece of decor that looks far more expensive than its actual cost. Let’s dive into creating these stunning DIY leather strap shelves!
Gather Your Materials and Tools
Before beginning any DIY project, a well-organized workspace and all necessary materials are crucial. This ensures a smooth, efficient, and enjoyable crafting experience. For these budget-friendly leather strap shelves, you’ll be working with readily available items from your local hardware and craft stores.
Materials You’ll Need:
- Wood Boards: 1×4 lumber for each shelf. The example uses 32-inch lengths, but you can adjust this to your desired dimensions. Consider pine or a similar inexpensive wood.
- Wood Stain: Varathane Kona stain (or your preferred dark wood stain) to achieve a rich base color.
- Vaseline: A small amount for the distressing technique.
- Paint: A dark gray paint (or any color of your choice) to create the distressed layered effect.
- L-Brackets: Two metal L-brackets per shelf. These will provide the hidden structural support for mounting. Look for them in the lumber or hardware aisle; they are typically very inexpensive.
- Leather Straps: One full leather strap per shelf. Craft stores like Hobby Lobby often have these on sale, making them an affordable choice. Faux leather can also be an alternative.
- Screws: Wood screws for attaching brackets to the shelves, and 2-inch screws for mounting the brackets to the wall.
- Wall Anchors (Optional but Recommended): If you cannot secure your shelves directly into wall studs, quality wall anchors are essential for stability and safety.
- Hot Glue Sticks: For securing the leather straps to the L-brackets.
- Decorative Clavos or Bolts: Iron clavos (available on Amazon or at specialty hardware stores) or any decorative bolt to add a finished touch to the leather straps.
Tools You’ll Need:
- Saw: A miter saw, circular saw, or even a hand saw for cutting the wood boards to size.
- Clean Cloths: Several for applying and wiping off stain.
- Sanding Tool: A Ryobi Corner Cat Sander with an 80-grit sanding pad (or sandpaper of similar grit) for distressing the wood.
- Power Drill/Driver: Essential for predrilling holes and attaching screws.
- Staple Gun: An Airstrike Stapler (or heavy-duty stapler) for attaching leather straps. Alternatively, small finish nails and a hammer can be used.
- Hot Glue Gun: For neatly securing the leather over the brackets.
- Scissors: Heavy-duty scissors for cutting the leather straps.
- Measuring Tape and Pencil: For accurate measurements and marking cuts.
- Safety Gear: Safety glasses and gloves are always recommended when working with power tools, stains, and paints.
- Leveling Tool: A Ryobi Phone Works Laser Level (or a standard spirit level) to ensure your shelves are perfectly straight on the wall.
- Stud Finder: A Ryobi Phone Works Stud Finder (or any reliable stud finder) to locate wall studs for secure mounting.
Having all these items ready will streamline your project and help you achieve professional-looking results for your DIY leather strap shelves.
Step-by-Step Guide to Crafting Your Shelves
Now that you have all your materials and tools, let’s begin the exciting process of bringing your DIY leather strap shelves to life. Follow these detailed steps to create your custom wall decor.
1. Prepare Your Wood Boards
Start by measuring and cutting your 1×4 lumber to the desired length for each shelf. The original project used boards cut at 32 inches, which offers a good balance between stability and display space. If you’re creating multiple shelves, ensure all cuts are consistent for a cohesive look. Use a saw to make clean, straight cuts. Once cut, briefly sand the edges and faces of the boards with a fine-grit sandpaper (around 150-220 grit) to remove any splinters and prepare the surface for staining and painting. This will help the finishes adhere better and give a smoother final product.
2. Apply the First Layer: Wood Stain
Next, apply a single coat of wood stain. The original tutorial suggests Varathane Kona stain, which provides a beautiful, deep brown tone. Using a clean, lint-free cloth, wipe the stain generously over all surfaces of your cut boards. Allow the stain to penetrate the wood for about 5 minutes, then use a separate clean cloth to wipe off any excess and blend the stain evenly. This technique ensures a rich, consistent color and allows the wood grain to show through, forming a perfect rustic base for the distressing process. Ensure the boards are completely dry before moving to the next step; consult your stain product’s instructions for exact drying times, though typically a few hours is sufficient.
3. Prepare for Distressing with Vaseline
Once the stain is thoroughly dry, it’s time to apply Vaseline. This might seem unconventional, but it’s a clever trick for achieving an authentic distressed look. Rub a thin, even layer of Vaseline along all the edges of the board. Then, lightly dab or rub small amounts onto the face of the board, focusing on areas where natural wear and tear would typically occur. The Vaseline acts as a resist, preventing the subsequent layer of paint from adhering completely, allowing the rich stained wood to peek through after distressing. Be mindful not to apply too much, as a little goes a long way in creating this effect.
4. Apply the Top Coat: Paint
With the Vaseline applied, it’s time for the final color layer. Apply one coat of your chosen dark gray paint over the entire board, ensuring even coverage over both the stained wood and the Vaseline-treated areas. The dark gray provides a sophisticated contrast to the warm wood stain. You can use a brush or a roller for this step, depending on your preference and the paint type. Allow the paint to dry completely. This is crucial; rushing this step can lead to a messy distress when you begin sanding. Again, refer to your paint’s drying instructions, but typically several hours or overnight is best.
5. Achieve the Distressed Look
Now for the magic! Once the paint is completely dry, use your Ryobi Corner Cat Sander with an 80-grit sanding pad (or a piece of 80-grit sandpaper) to distress the board. Focus on the edges and areas where you applied Vaseline. The Vaseline will help the paint easily flake off in those spots, revealing the rich wood stain beneath and creating a beautifully aged, worn-in appearance. Vary your pressure and sanding motion to achieve a natural, authentic distress. This step allows for a lot of creative freedom, so sand until you are happy with the level of distressing. This technique is what gives these DIY leather strap shelves their charming rustic character.
Preparing for Installation: Brackets and Leather
With your wood boards stained, painted, and distressed, the next phase involves preparing them for hanging and adding the defining leather straps. This stage focuses on structural integrity and the unique aesthetic of the project.
6. Secure the L-Brackets to the Shelves
The L-brackets are the unsung heroes of this project, providing robust, hidden support. These inexpensive brackets, often found near the lumber section at hardware stores, are perfect. Flip your shelf board upside down. Position the L-brackets two inches from each end of the board. Ensure the longer side of the L-bracket is aligned with the bottom of the shelf. Predrill pilot holes through the bracket holes into the bottom of the shelf board using a drill bit slightly smaller than your screws. This prevents the wood from splitting. Then, use wood screws to firmly attach the brackets to the bottom of the shelves. This careful placement ensures maximum support and stability for your finished shelves.
7. Prepare Your Leather Straps
The leather straps are what give these shelves their distinctive character. You’ll need one full leather strap for each shelf you’re building. If you plan to make multiple shelves, purchasing a longer roll or several individual straps during a sale can be cost-effective. Use a pair of sturdy scissors to cut the straps to size. For each shelf, you will need two shorter pieces and two longer pieces. The example project used two 12-inch pieces and two 9-inch pieces per shelf. The shorter pieces will be stapled to the back edge of the shelf, creating a loop, while the longer pieces will wrap around the front to conceal the L-brackets. Precise cutting is important here for a clean, symmetrical look.
8. Attach the Back Leather Straps
Take the two shorter pieces of leather (e.g., 9 inches) and attach them to the back edge of your shelf. Position them directly above where the L-brackets are located on the underside. The leather strap should extend upwards from the edge of the board, forming a loop that will eventually be secured to the wall. An Airstrike Stapler is ideal for this, providing quick and secure attachment. If you don’t have a staple gun, small finish nails hammered carefully into the edge will work, or a strong hot glue application can also suffice for light decorative purposes. Ensure the leather is taut and evenly spaced for a professional appearance.
9. Integrate L-Brackets with Leather
Now, carefully place the L-brackets onto the bottom of the shelf, ensuring that the previously attached short piece of leather is sandwiched between the board and the bracket. This is a crucial detail for the “hanging” illusion. The bracket is still attached to the underside of the shelf, but the leather now runs up behind it. Predrill again if necessary, and use wood screws to secure the L-brackets firmly to the shelf. This creates a strong attachment point while allowing the leather to appear as the primary support.
10. Conceal Brackets with Long Leather Straps
Take your two longer leather strap pieces (e.g., 12 inches). Apply a generous amount of hot glue to one end of each strap. Carefully attach these glued ends to the underside of the shelf, directly over the L-brackets. The goal here is to completely cover the metal brackets with the leather, making them invisible from the front and sides of the shelf. Press firmly to ensure a strong bond. These straps will then wrap around the front edge of the shelf, creating the look of a continuous leather loop that seemingly supports the shelf. This step truly elevates the aesthetic of your DIY leather strap shelves, transitioning them from functional to stylish.
Installation: Mounting Your Stylish Shelves
The final stage is mounting your beautifully crafted shelves to the wall. This requires precision to ensure they are level, secure, and look fantastic. Proper installation is key for both safety and aesthetics.
11. Mark Your Mounting Points and Locate Studs
First, decide on the exact placement of your shelves. Use a laser level (like the Ryobi Phone Works Laser Level) or a traditional spirit level to draw perfectly straight lines on the wall where the top of your shelves will sit. Next, and perhaps most importantly, use a stud finder (such as the Ryobi Phone Works Stud Finder) to locate the wall studs along your marked lines. Securing your shelves into studs provides the strongest and most reliable support. Mark the stud locations clearly with a pencil. If studs aren’t available at your desired mounting points, don’t worry, but be prepared to use robust wall anchors.
12. Attach the L-Brackets to the Wall
Now, align the L-brackets that are attached to your shelf with your marked stud locations or anchor points. Use 2-inch screws to securely fasten the other end of the L-brackets to the wall. If you were fortunate enough to hit a stud, drill directly into it. If not, you must use appropriate wall anchors (e.g., toggle bolts, self-drilling anchors) to reinforce the screws and ensure the shelf can bear weight without pulling out of the drywall. Always predrill pilot holes for screws and anchors to prevent damage to your wall. Repeat for all brackets, making sure the shelf remains level as you attach it.
13. Trim and Position Leather Straps
With the shelf firmly mounted, it’s time to create the illusion of hanging leather. Pull the long leather strap (the one covering the front of the bracket) up so it meets the short strap that was stapled to the back edge of the shelf. You want the ends of both straps to be even with each other where they meet on the wall. If the longer strap extends too far, use your scissors to carefully trim it down to match the length of the shorter strap. This step is about refining the visual appeal, ensuring the leather appears to loop gracefully around the shelf and extends up the wall as if providing the primary support.
14. Secure Leather Straps to the Wall and Add Decorative Touches
Finally, gather the two ends of the leather straps where they meet on the wall. Use your Airstrike Stapler to firmly attach both pieces of leather to the wall, right where they meet. If you don’t have a staple gun, small finish nails hammered in carefully will also work. The goal is to secure the leather flush against the wall. To complete the rustic aesthetic, add an iron clavo (decorative bolt) to each strap where it’s secured to the wall. These decorative elements hide the staples/nails and add a touch of authentic craftsmanship. You can find clavos online or at specialty hardware stores, or choose any decorative bolt that complements your style.
Decorating Your New DIY Leather Strap Shelves
Congratulations! You’ve successfully built and installed your own stunning DIY leather strap shelves. Now comes the truly fun part: styling them to reflect your personality and enhance your home decor. These versatile shelves are perfect for showcasing a variety of items, adding both functionality and aesthetic appeal to any room.
Ideas for Styling Your Shelves:
- Greenery: Add small potted plants, succulents, or trailing ivy for a touch of natural freshness.
- Books: Display your favorite small books or decorative journals, perhaps with some stylish bookends.
- Art & Photos: Lean small framed photos or minimalist artwork against the wall.
- Collectibles: Showcase treasured trinkets, ceramic figures, or unique souvenirs.
- Storage Baskets: Use small, decorative baskets to hold keys, mail, or other small essentials, especially in an entryway.
- Candles & Diffusers: Create a cozy ambiance with scented candles or essential oil diffusers.
- Mirrors: A small round mirror can be leaned against the wall on a shelf, adding light and dimension.
The beauty of these shelves lies in their adaptability. You can effortlessly update their look with seasonal decor or by simply rearranging your display items. Whether you’re aiming for a minimalist, bohemian, or modern rustic vibe, these leather strap shelves provide the perfect backdrop. Add a few decorative pieces that you love, and you’ll instantly elevate the style and functionality of your space.
Conclusion: Elevate Your Home with DIY Style
Creating these DIY leather strap shelves is more than just a home improvement project; it’s an opportunity to inject personality and custom craftsmanship into your living space without a hefty investment. For less than $5 per shelf, you’ve achieved a high-end, bespoke look that is both functional and incredibly chic. From selecting your wood to the final decorative touches, each step allows for personal expression, ensuring your shelves are truly one-of-a-kind.
Whether you’re filling a blank wall in a hallway, adding a touch of rustic elegance to your living room, or enhancing storage in a bathroom, these shelves are a versatile and stylish solution. Their narrow profile makes them ideal for spaces where traditional shelving might feel too bulky, while the combination of distressed wood and supple leather offers a unique blend of modern farmhouse and industrial aesthetics.
We encourage you to try this accessible and rewarding DIY project. It’s a fantastic way to enhance your home, learn new skills, and create something truly beautiful with your own hands. Enjoy your new stylish storage, and don’t hesitate to share your creative results!