
Build Your Dream Farmhouse Dining Table: A Step-by-Step DIY Guide with Turned Legs
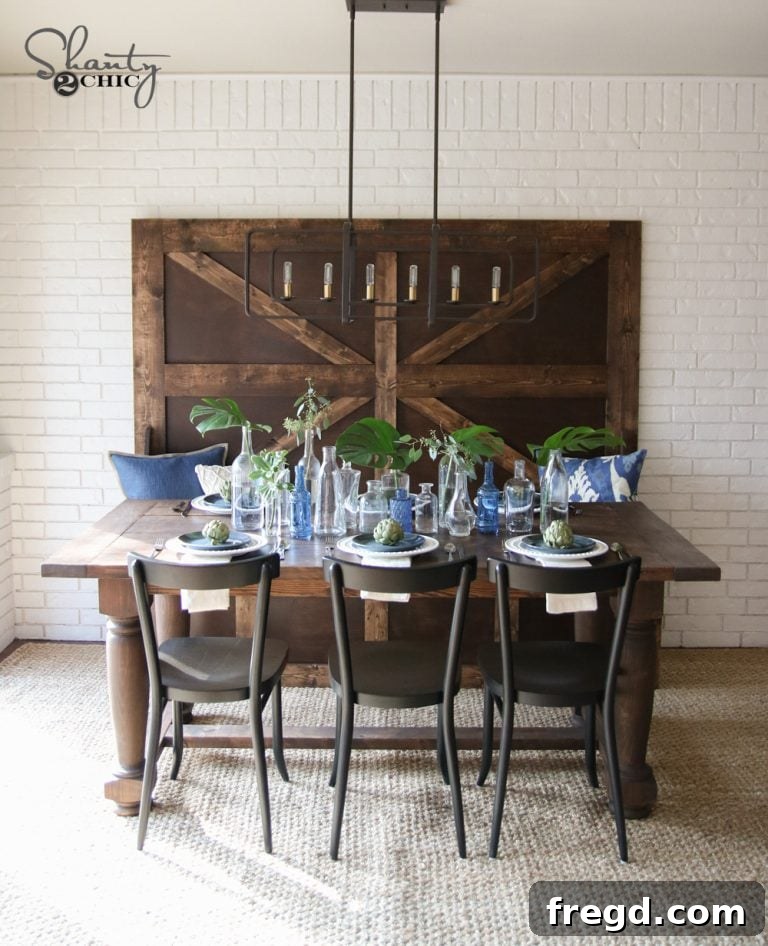
Welcome, DIY enthusiasts! We are absolutely thrilled to share an incredibly rewarding project with you today: building a stunning turned leg farmhouse dining table. This isn’t just any table; it’s a centerpiece that brings warmth, character, and a touch of rustic elegance to any home. We recently had the pleasure of crafting a similar masterpiece for the Davis family’s new kitchen, featured on HGTV, and the results were truly breathtaking. Imagine having a custom-built, high-quality dining table that perfectly suits your style and space, all created with your own hands. Get ready to embark on a journey to create a beautiful, durable, and highly functional piece of furniture that will be cherished for years to come. Let’s dive in and see how incredible this table turned out!
Isn’t it absolutely magnificent? We are completely in love with this table, and truthfully, the entire setup radiates charm and comfort. This project delivers the timeless appeal of a farmhouse aesthetic, combined with the sturdy construction of a handcrafted piece. It’s more than just a table; it’s an invitation for family gatherings, memorable meals, and lively conversations. The turned legs add an undeniable touch of sophistication, elevating it beyond a simple rustic design to something truly special.
Why Choose a DIY Farmhouse Dining Table?
Building your own dining table offers a wealth of advantages over purchasing a mass-produced one. First and foremost, it’s an incredibly cost-effective solution, allowing you to achieve high-end furniture aesthetics without the hefty price tag. Beyond the savings, the pride of creating something with your own hands is immeasurable. You get to select the exact wood, the perfect stain, and ensure the quality of every joint, resulting in a piece that’s built to last for generations. A custom-built table means it will perfectly fit your space, whether you need specific dimensions for a cozy nook or a grand statement piece for an open-plan kitchen. Moreover, the farmhouse style is incredibly versatile, blending seamlessly with various decor themes from rustic to modern industrial. This project empowers you to personalize your home with furniture that truly reflects your taste and craftsmanship.
Essential Features of Our Turned Leg Design
This particular farmhouse dining table design stands out with its elegant turned legs, which are the cornerstone of its classic appeal. These legs, designed in collaboration with Osborne Wood, provide a beautiful blend of traditional craftsmanship and sturdy support. The generous tabletop offers ample space for family meals and entertaining guests, while the robust base ensures unwavering stability. The construction method utilizes pocket holes, making it an accessible project for intermediate DIYers and even confident beginners. By following our detailed plans, you’ll construct a table that is not only visually appealing but also incredibly durable and functional.
Download Your Free Plans & Get Started!
This project is designed to be fairly straightforward, making it an achievable build for many skill levels. The most important first step is to get your hands on the detailed instructions. Be sure to download the FREE PLANS by Clicking HERE! These plans provide all the necessary measurements, cut lists, and additional guidance to ensure your build is successful. Don’t skip this crucial step!
For your convenience, here are the overall dimensions for this magnificent table, as detailed in the plans:
Tools & Materials You’ll Need
Before you begin, gather your tools and materials. Having everything ready will make the building process much smoother. Here’s a quick checklist:
- Power Tools: Miter Saw (for precise cuts), Drill (for pocket hole screws), Kreg Jig (K5 model recommended for 1.5″ pocket holes).
- Hand Tools & Accessories: Tape Measure, Pencil, Safety Glasses, Ear Protection, Clamps (essential for holding pieces while joining), Sandpaper (various grits).
- Materials:
- Wood: Lumber for the tabletop planks, aprons, and bottom supports. (Specific dimensions in the FREE PLANS).
- Turned Legs: These are a highlight! We collaborated with Osborne Wood to design these incredible legs. You can find them and purchase them directly HERE on Osborne’s site!
- Fasteners: Wood Glue (for strong, lasting joints), 2.5″ Pocket Hole Screws.
- Finishing Supplies: Wood Stain (e.g., Varathane Stain in Dark Walnut), Protective Topcoat (Polyurethane or similar), Rags, Brushes.
Investing in quality materials and ensuring you have the right tools will make all the difference in the final product. Your Osborne Wood turned legs will arrive ready to be integrated into your beautiful table base. Don’t underestimate the impact of good quality wood and the right fasteners for the longevity of your furniture.
Step-by-Step Construction: Building Your Farmhouse Table
Step 1: Assembling the Leg Sets
You’ll want to begin your build by focusing on the legs and forming the two end assemblies of the table base. This involves attaching the bottom supports to the turned legs. Using your K5 Kreg Jig, create 1.5″ pocket holes on the ends of your apron pieces and bottom support pieces. The Kreg Jig is an invaluable tool for creating strong, concealed joints, perfect for furniture building. Ensure your jig is set correctly for the thickness of your wood (typically 1.5 inches for standard lumber). Once the pocket holes are drilled, apply a generous amount of wood glue to the mating surfaces of the legs and supports. Wood glue is crucial for the overall strength and durability of the table; it creates a bond stronger than the wood itself. Then, secure these pieces together using 2.5″ pocket hole screws. Clamp everything firmly in place before driving the screws to ensure a tight, square joint. Repeat this process to create two identical leg assemblies.
Step 2: Connecting the Leg Assemblies with the Long Bottom Runner
With your two leg assemblies ready, it’s time to connect them and give the base its full length and rigidity. Take your long bottom runner piece and position it between the two assembled leg sets. This runner will span the length of the table base, providing crucial structural integrity. As before, ensure that you’ve drilled 1.5″ pocket holes into the ends of this runner. Apply wood glue generously to all mating surfaces before attaching the runner to the bottom supports of each leg assembly. Use 2.5″ pocket hole screws to secure the connection. Again, clamps are your best friend here to hold everything snugly while you drive the screws. Double-check that your base is perfectly square and level at this stage – precision now will save you headaches later.
Step 3: Attaching the Aprons
Next, you’ll attach the aprons that run along the longer sides of the table base. These aprons connect the top of the leg assemblies, forming the frame that will support the tabletop. Just like with the bottom supports, these apron pieces will have 1.5″ pocket holes drilled into their ends. Apply wood glue to the joints and attach them to the inside of the turned legs using 2.5″ pocket hole screws. This step completes the structural integrity of your table base, creating a solid and stable foundation for your tabletop. Take a moment to admire your work; the base is now fully assembled and should feel incredibly sturdy!
At this point, the base of your farmhouse dining table is complete! Pretty darn easy, right? The beauty of pocket hole joinery is its simplicity and strength, allowing you to create robust furniture without complex traditional joinery techniques.
Step 4: Crafting the Tabletop
Now for the star of the show – the tabletop! We opted for a planked tabletop design, which adds to the authentic farmhouse charm. This involves joining multiple boards side-by-side to create a wide, continuous surface. For this step, you’ll again utilize your Kreg Jig. Drill 1.5″ pocket holes along the long edges of your tabletop planks. When joining the planks, ensure you apply a liberal amount of wood glue along the entire length of the edges that will meet. This creates a strong, seamless bond. Use 2.5″ pocket hole screws, spaced evenly, to draw the planks together. Clamps are crucial here to keep the boards flat and tightly aligned as you drive the screws, preventing any gaps or unevenness. Once assembled, allow the glue to dry completely according to the manufacturer’s instructions. A flat and smooth tabletop is essential for both aesthetics and functionality.
Step 5: Uniting the Base and Top
With both the base and tabletop completed, it’s time to bring them together. Carefully center the assembled base on the underside of your tabletop. Take your time to ensure it’s perfectly aligned and equidistant from all edges. Once positioned, you will attach the base to the top. This is done by driving 2.5″ pocket hole screws up through the apron pieces of the base and into the underside of the tabletop. Distribute these screws evenly along all four aprons to ensure a strong and stable connection. Avoid over-tightening the screws to prevent splitting the wood, but make sure they are snug. With the base securely attached, your farmhouse dining table will truly begin to take its final form!
Finishing Your Farmhouse Masterpiece
Step 6: Sanding and Staining
The final step, and arguably one of the most transformative, is the finishing process. Start by thoroughly sanding your entire table. Begin with a coarser grit sandpaper (e.g., 80 or 100 grit) to smooth out any imperfections or glue residue, then progressively move to finer grits (150, then 220 grit) for a silky-smooth finish. Proper sanding is key to an even and beautiful stain application. Once sanded, clean off all dust thoroughly with a tack cloth or a damp cloth. We stained our table using Varathane Stain in Dark Walnut, which provides a rich, deep hue that perfectly complements the farmhouse style. You can easily find this high-quality stain at your local Home Depot. Apply the stain according to the manufacturer’s instructions, usually wiping it on with a rag and then wiping off the excess for an even coat. You may apply multiple coats to achieve your desired depth of color.
This week, we also shared a quick Q&A session offering a few invaluable tips on staining techniques, as well as practical advice on how we manage the sawdust generated from our miter saws. Mastering these techniques will greatly enhance the quality of your finish and make your woodworking experience more enjoyable and tidy. You can check it out HEREor simply watch the video below:
Step 7: Applying a Protective Topcoat
After your stain has dried completely, it’s essential to apply a protective topcoat. This not only enhances the beauty of the stained wood but also shields your table from spills, scratches, and everyday wear and tear. Options include polyurethane, lacquer, or a durable clear coat. Apply several thin coats, lightly sanding with a very fine grit sandpaper (e.g., 320 or 400 grit) between coats for a super smooth, professional finish. Follow the product instructions for drying times and application methods. A well-applied topcoat will ensure your farmhouse dining table remains stunning and resilient for many years to come.
Your Finished Farmhouse Table Awaits!
And there you have it! Your very own handcrafted, turned leg farmhouse dining table is now complete. Stand back and admire the beauty and craftsmanship you’ve poured into this project. It’s truly a rewarding experience to create such a significant piece of furniture for your home. This table isn’t just a place to eat; it’s a statement piece, a gathering spot, and a testament to your DIY skills. Enjoy countless meals, conversations, and cherished memories around your new centerpiece.
Here are a few more shots of our finished table, ready to inspire your own:
Beyond This Project: Explore More DIY Dining Table Plans!
Loved this project? Ready to tackle another one or perhaps looking for a different style to match another room? Don’t stop here! We offer an extensive collection of DIY dining table plans, providing inspiration and detailed instructions for every skill level and aesthetic preference. Whether you prefer a more modern design, a robust rustic look, or something uniquely customized, we have something for everyone.
Want to find more styles and expand your woodworking repertoire? Check out our full collection of DIY Dining Tables Plans! We have over 25 free tutorials for you to pick from, ensuring you find the perfect project to bring your next furniture vision to life. Each plan is designed with clarity and simplicity in mind, guiding you through every step of the process.
Empower yourself to create beautiful, functional, and durable furniture for your home. See all of our incredible DIY Dining Table Plans and start building your next dream piece today!