
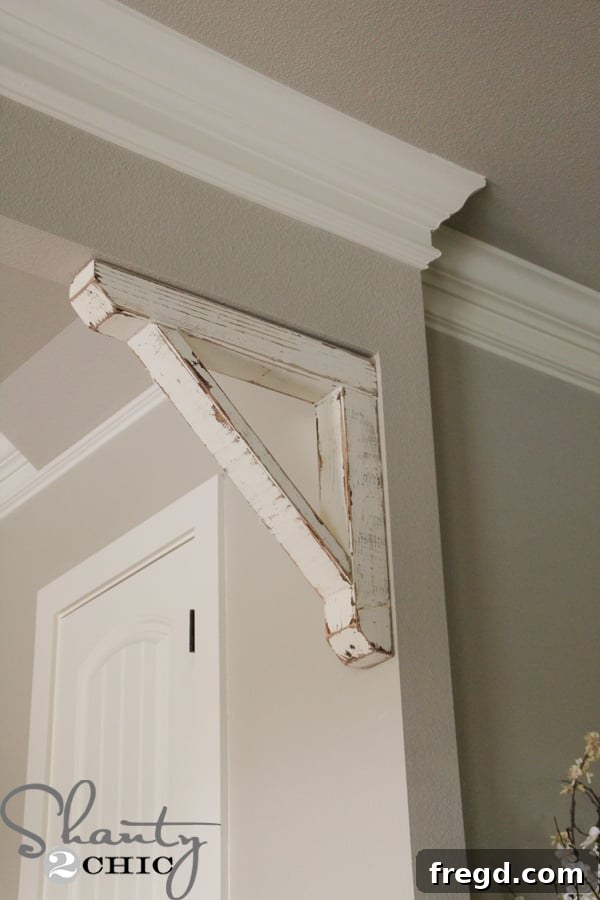
Welcome, home decor enthusiasts and DIY aficionados! Have you ever stumbled upon a design element that instantly captivates your eye, making you imagine it adorning your own living space? For me, it was the timeless elegance of wooden corbels, gracing the facades of beautifully restored homes. These architectural accents, often found holding up roof eaves or adding decorative flair beneath shelves, possess a unique charm that can elevate any interior or exterior design. While often seen as high-end fixtures or expensive flea market finds, I discovered a way to bring this sophisticated touch into my home, leveraging ingenuity and a trusty pile of scrap wood. The result? A stunning, free, and incredibly satisfying DIY Rustic Corbel that perfectly filled an empty corner in my walkway between the living room and kitchen.
The inspiration struck during a leisurely drive through Dallas, admiring the intricate details of vintage homes. Whitney and I were captivated by the beautiful wooden corbels positioned gracefully beneath the roofs. These salvaged pieces often fetch a high price at antique markets, but my mind immediately drifted to the treasure trove of possibilities waiting in my workshop’s scrap pile. Why buy when you can build, especially when the materials are already at hand? This project not only allowed me to create a custom accent piece but also embraced the ethos of repurposing and sustainable crafting. If you’re ready to add character, warmth, and a touch of rustic elegance to your home without breaking the bank, follow along as I guide you through crafting your very own.
What is a Corbel and Why Choose DIY?
A corbel is essentially a structural piece of material jutting from a wall to carry a weight, or, in many modern applications, a decorative element mimicking this function. Historically, corbels were integral to supporting balconies, shelves, or roof structures. Today, they are prized for their aesthetic appeal, adding depth, texture, and a sense of architectural grandeur to any setting. From farmhouse chic to industrial modern, a well-placed corbel can anchor a space, draw the eye, and infuse personality.
Opting for a DIY approach to creating a rustic corbel offers numerous advantages. First and foremost is the incredible cost-saving potential. By utilizing leftover wood from previous projects, you can transform what would otherwise be discarded into a valuable decorative item. This project, for example, cost me absolutely nothing beyond my time and existing supplies! Beyond the financial benefits, building it yourself allows for complete customization. You control the dimensions, the choice of wood, and the finish, ensuring the final piece perfectly complements your existing decor. There’s also an immense sense of accomplishment and satisfaction that comes from crafting something beautiful and functional with your own hands.
Planning Your Rustic Corbel Project
Before diving into the construction, a little planning goes a long way. Consider the space where your corbel will reside. Is it a grand entryway, a cozy nook, or a functional support for a shelf? This will help you determine the appropriate size and material for your project.
Tools & Materials You’ll Need
Gathering your tools and materials upfront ensures a smooth and uninterrupted crafting process. For this rustic corbel project, here’s what I recommend:
- Wood Stock: Two pieces of 4×4 lumber (or 2x4s for a smaller corbel). I used one cut to 24 inches and another to 20.5 inches. A 2×4 piece for the diagonal brace, cut to approximately 20 inches long (measurement varies based on assembly).
- Miter Saw: Essential for precise 45-degree angle cuts.
- Kreg HD Pocket Hole Jig: For creating strong, hidden pocket holes. (Alternatively, a standard Kreg Jig or simply wood screws for attachment if not using pocket holes).
- Drill: To drive pocket hole screws and for pre-drilling.
- Measuring Tape and Pencil: For accurate marking.
- Safety Glasses: Always protect your eyes when working with power tools.
- Wood Glue: For extra strong joints.
- HD Pocket Hole Screws: To join the main pieces (if using Kreg HD).
- Ryobi Airstrike 16-Gauge Nailer with 2 1/2-inch Nails: (Optional, wood screws or finishing nails can be used instead for the diagonal brace).
- Varathane Early American Stain: For the base coat.
- Clean Cloths: For applying and wiping stain.
- Vaseline (Petroleum Jelly): The secret ingredient for the distressed, chippy paint look.
- Latex Paint: Your choice of color. I used Valspar Ivory Lace (my trim paint).
- Ryobi Corner Cat Sander with 80-grit Sanding Pad: For distressing.
- 3 1/2-inch Spax Screws: For securely mounting the corbel to wall studs.
- Wood Putty: To conceal screw holes.
- Touch-up Paint: To match the corbel’s finish after filling holes.
Design Considerations
My particular space, a spacious walkway, called for a substantial accent piece, which is why I opted for robust 4×4 lumber. However, the beauty of this design lies in its adaptability. If your area is more compact, or if 4×4 scraps aren’t readily available, you can easily scale down the project using 2x4s. This flexibility allows you to tailor the corbel’s presence to perfectly fit your home’s aesthetic and available resources. When selecting your wood, embrace imperfections. Knots, small cracks, and varied grain patterns will only enhance the rustic charm of your finished corbel.
Step-by-Step Guide: Crafting Your Rustic Corbel
Let’s roll up our sleeves and begin the transformation of simple wood scraps into a captivating piece of home decor.
Step 1: Preparing Your Main Structural Pieces
Begin by cutting your primary wood pieces. For my 4×4 corbel, I cut one piece to a length of 24 inches and another to 20.5 inches. These will form the main vertical and horizontal elements of the corbel. The next crucial step involves creating a 45-degree mitered cut on one end of each 4×4. This angled cut is fundamental to the corbel’s classic profile, creating a visually pleasing slope that is both decorative and reminiscent of traditional architectural supports. To achieve this, set your miter saw to 45 degrees. The cut should start approximately 1.75 inches from one edge of the 4×4, creating a symmetrical angle across the end of the board. Precision here ensures a tight, attractive joint later on.
Step 2: Drilling Pocket Holes for Strong Joints
For robust and aesthetically clean joinery, I utilized my Kreg HD Pocket Hole Jig. This tool allows for drilling angled holes into one piece of wood, enabling you to join it to another with self-tapping screws from the inside, resulting in a virtually invisible fastening method. On the 20.5-inch piece of 4×4, drill two pocket holes into the flat (uncut) end. These holes will be used to attach it to the 24-inch piece. If you don’t own a Kreg HD or a standard Kreg Jig, fear not! You can still achieve a sturdy joint by using wood screws driven straight through, though they will be visible. For a truly rustic look, visible fasteners can even add to the charm. Ensure your drill settings are appropriate for the depth of the pocket holes and the length of your screws to avoid drilling through the other side.
Step 3: Assembling the Corbel Base
Now it’s time to bring the two main pieces together. Apply a generous amount of wood glue to the mitered end of the 24-inch 4×4 piece. Then, align the flat end of the 20.5-inch piece (with the pocket holes) perpendicular to the mitered end of the longer piece, forming an ‘L’ shape. Use HD pocket hole screws to firmly attach the two pieces. The wood glue will provide additional strength, creating a durable bond that will withstand the test of time. If you’re not using pocket holes, apply wood glue and then drive appropriate wood screws through the side of one piece into the end grain of the other, ensuring they are long enough to bite securely without poking through the opposite side. Clamp the pieces together while the glue dries for maximum adhesion.
Voila! The basic structure of your corbel is now taking shape. It’s rewarding to see your design come to life with just a few cuts and connections.
Step 4: Integrating the Diagonal Support
To enhance both the structural integrity and the classic aesthetic of the corbel, a diagonal support piece is essential. This brace adds a traditional touch and reinforces the joint between the vertical and horizontal components. Measure the distance from the inside corner where the two 4x4s meet diagonally to the point where the brace will meet the opposite 4×4. My measurement came out to 20 inches from long point to long point. Crucially, both ends of this 2×4 diagonal piece need to be cut at a 45-degree angle, but *not parallel* to each other. Instead, they should be cut so that they fit snugly against the inner faces of the 4x4s, creating a perfect brace. This requires careful measurement and precise miter saw work to ensure a tight, gap-free fit.
Step 5: Securing the Diagonal Brace
With the diagonal brace cut to perfection, it’s time to attach it. Apply wood glue generously to both ends of the 2×4 where it will meet the 4x4s. Then, position the brace firmly into place. For attachment, I used my Ryobi Airstrike 16-gauge nailer with 2 1/2-inch nails, which provides a fast and secure fastening. If you don’t have a nailer, wood screws or even finishing nails can be used effectively. Ensure the nails or screws are long enough to provide a strong hold without protruding through the wood. The combination of wood glue and fasteners will create an exceptionally strong and stable structure.
Achieving the Perfect Distressed Finish
The true magic of this rustic corbel lies in its distressed, chippy paint finish, designed to mimic the well-loved appearance of a truly salvaged antique. This multi-step finishing process is what gives the corbel its unique character and charm.
Step 6: Applying Your Base Stain
To begin the distressing process, apply a single, even coat of Varathane Early American stain to the entire corbel. This particular shade offers a warm, rich base that will peek through the paint layers, adding depth and authenticity to the distressed look. Allow the stain to sit for approximately 5 minutes, giving the wood fibers enough time to absorb the pigment. Then, using a clean, lint-free cloth, thoroughly wipe off any excess stain. This step is crucial for preventing a sticky finish and ensuring the wood’s grain remains visible. Let the stained corbel dry completely, ideally overnight, before moving on to the next step. Adequate drying time ensures the stain is fully cured and won’t interfere with subsequent layers of paint and Vaseline.
Step 7: The Vaseline Distressing Technique
This is where the “chippy” magic truly begins. Once the stain is completely dry, apply a thin, even coat of Vaseline (petroleum jelly) to the areas where you want the underlying stain to show through the paint. Think strategically about where natural wear and tear would occur on an old piece of furniture: edges, corners, prominent facets, and any raised details. I focused on applying it along all the edges of the corbel, both the mitered and flat surfaces, ensuring a natural-looking flaking effect. The Vaseline acts as a resist, preventing the paint from adhering properly to these specific spots. There’s no need for a thick layer; a thin film is perfectly sufficient to achieve the desired outcome. This technique is a simple yet incredibly effective way to create an aged, weathered appearance.
Step 8: Painting for a Vintage Aesthetic
Now, it’s time to apply your chosen topcoat of paint. I used two coats of latex paint, specifically Valspar’s Ivory Lace, which is the same paint I use for my home’s trim. This choice not only allowed for continuity in my home’s color scheme but also meant I didn’t need to purchase new paint. You can, of course, use any latex paint color that complements your decor. Apply the paint evenly, allowing each coat to dry thoroughly according to the manufacturer’s instructions before applying the next. Be mindful that the paint will not fully adhere to the areas treated with Vaseline, which is precisely what we want for the distressed effect. Don’t worry if it looks a bit messy at this stage; the next step will reveal the beautiful chippy finish.
Step 9: Revealing the Chippy, Distressed Look
Once the paint has dried completely and cured for a few hours (or as recommended by the paint manufacturer), it’s time for the exciting reveal. Grab your Ryobi Corner Cat sander fitted with an 80-grit sanding pad. Gently but firmly sand the entire corbel, paying particular attention to the areas where you applied the Vaseline. As you sand, you’ll witness the paint flaking off where the Vaseline was applied, revealing the underlying stain and raw wood beneath. This process creates that coveted “chippy,” naturally worn look, giving your corbel instant vintage appeal. Continue sanding until you achieve your desired level of distress. The 80-grit pad is aggressive enough to remove paint effectively but not so coarse as to deeply scratch the wood unless excessive pressure is applied. After sanding, wipe down the corbel with a clean, dry cloth to remove any dust and paint flakes.
Installation: Mounting Your Rustic Corbel
With your beautifully distressed corbel complete, the final step is to securely mount it in its designated spot. Proper installation ensures both safety and stability.
Step 10: Securely Mounting Your Corbel
To hang the corbel, locate the wall studs behind your desired mounting area. Using a stud finder is highly recommended for this crucial step. Once the studs are identified, position your corbel and mark the spots for drilling. I used 3 1/2-inch Spax screws, drilling them diagonally into both mitered ends of the corbel and directly into the wall studs. Using two screws on each end provides exceptional stability and ensures the corbel is firmly anchored. The diagonal drilling helps to conceal the screws somewhat and distributes the load effectively. After the corbel is securely mounted, cover the screw holes with wood putty. Once the putty dries, lightly sand it smooth and touch up with your latex paint to seamlessly blend the repairs with the distressed finish. This final touch creates a polished, professional appearance, making the screws virtually disappear.
And that was it! Your stunning, free, and rustic corbel is now complete and ready to add character to your home.
Showcasing Your Handiwork
The beauty of this project truly comes to life once installed. Observe how this single accent piece transforms an ordinary corner into a focal point, imbuing the space with a sense of history and handcrafted elegance. The distressed finish and robust form create an inviting warmth, perfectly bridging the living room and kitchen walkway. It’s more than just a piece of wood; it’s a conversation starter, a testament to the power of DIY, and a personalized reflection of your style.
Beyond the Walkway: Customization and Placement Ideas
I absolutely adore the character this corbel adds to my home, and I’m already envisioning adding more throughout the house, perhaps even experimenting with different sizes and finishes! The versatility of a rustic corbel extends far beyond a simple corner accent. Imagine two smaller corbels elegantly supporting a floating shelf in a living room or bedroom, perfect for displaying books or decorative items. Consider adding a pair beneath an entryway console table for an instant upgrade, or flanking a doorway to create an architectural statement. They can even be incorporated into fireplace mantels, kitchen island designs, or outdoor patio spaces for a cohesive farmhouse or rustic aesthetic. Don’t be afraid to experiment with paint colors—a bold hue could make a modern statement, while a softer shade might suit a shabby chic look. You could also explore different distressing techniques, or even incorporate carved details if you’re feeling adventurous. The possibilities for personalization are truly endless, allowing each corbel you create to be a unique reflection of your taste and home decor vision.
Thank you so much for joining me on this creative journey! I hope this detailed guide empowers you to craft your own beautiful and free rustic corbel, transforming your space with a touch of handmade charm and architectural elegance.
~Ashley
Curious about other elements you’ve spotted in these photos? Explore some of my other popular DIY projects that beautifully complement this rustic aesthetic:
- DIY Console Table
- DIY Square Coffee Table
- DIY Industrial Pipe Plate Rack
- DIY Wooden Mirror
- How to Install Laminate Flooring
- DIY Interior Lighting and Fan Update