
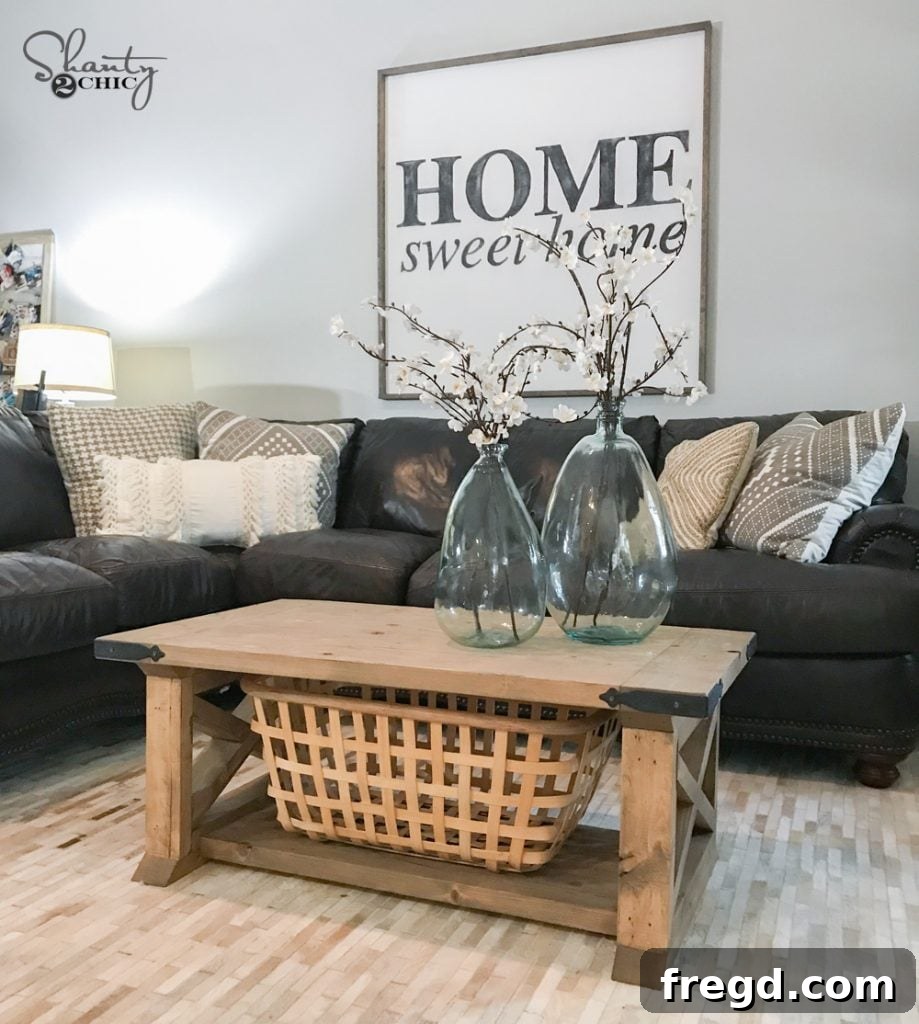
Are you ready to transform your living space with a touch of rustic elegance? Discover how to build a stunning DIY farmhouse coffee table that combines timeless design with practical functionality, all while being incredibly budget-friendly. This comprehensive guide provides everything you need to construct a beautiful, sturdy coffee table using just 8 boards and for under $40 in lumber. With free plans and easy-to-follow instructions, even novice woodworkers can achieve professional-looking results. Say goodbye to expensive store-bought furniture and hello to the satisfaction of crafting your own masterpiece!
The farmhouse style has captivated homeowners with its inviting warmth, natural textures, and classic appeal. A farmhouse coffee table serves as a captivating centerpiece, grounding your living room with its robust presence and charming details. This particular design features iconic X-bracing on the leg assemblies, reminiscent of traditional barn doors, coupled with a solid, expansive tabletop perfect for gathering around. Whether you’re a seasoned DIY enthusiast or just embarking on your woodworking journey, this project is designed to be accessible, rewarding, and a fantastic way to add character to your home.
Before diving into the build, we want to ensure you have all the resources at your fingertips. At the bottom of this post, you’ll find a link to download and print the free, detailed plans for this 8-board farmhouse coffee table. These plans will be your essential companion, providing precise measurements and cut lists to guide you through each stage of construction.
Build Your Own Rustic X Farmhouse Coffee Table: A Step-by-Step Guide
Step 1: Building the Leg Assemblies
The foundation of your farmhouse coffee table begins with robust leg assemblies. You will construct two identical leg structures, each featuring a sturdy box frame. To begin, cut your lumber according to the free plans. For each leg, you’ll create a rectangular box by joining horizontal boards to vertical boards. Apply a generous amount of wood glue to all mating surfaces before securing them with 2.5-inch pocket hole screws. A key detail here is to ensure your pocket holes are oriented towards the outside of the box. This strategic placement will allow you to conceal them with decorative elements later, resulting in a clean, professional finish.
For creating pocket holes, we highly recommend the Kreg Jig K5. It’s an invaluable tool for any DIY project involving joinery, making connections strong and virtually invisible. We often receive questions about which Kreg Jig to start with, and the K5 is consistently our top recommendation due to its versatility and ease of use across nearly all our builds. You can find the Kreg Jig K5 available HERE on Amazon.
Once the basic leg boxes are assembled, it’s time to add the charming decorative pieces to the top and bottom. These pieces are cut with 45-degree angles at their ends to create mitered corners, providing a clean, finished look. Attach them to each leg assembly using a combination of wood glue and 2.5-inch wood screws, driving the screws through the decorative pieces and into the leg frame. Ensure a tight fit and clean corners for the best aesthetic.
The distinctive X-bracing is a hallmark of the farmhouse style. For this step, you will cut the diagonal X-boards to fit precisely within the framed sections of your leg assemblies. This often requires careful measurement and marking with a pencil directly on the boards to ensure a perfect fit. Once the diagonal pieces are cut, join them together in an ‘X’ shape using wood glue and finish nails. Then, fit this assembled X-piece into the leg box. Secure it firmly with additional wood glue and nails driven through the box frame and into each end of the X-piece. Don’t hesitate to refer to the free plans and any accompanying video tutorials for visual guidance on this critical step, as precise fitting is essential for a polished look.
Step 2: Crafting the Table Top and Shelf
With the leg assemblies complete, your next task is to construct the robust table top and the convenient lower shelf. The table top is formed by joining five longer boards together. Using your Kreg Jig, create 1.5-inch pocket holes along one side of four of these boards. Additionally, drill pocket holes at both ends of all five boards. This double set of pocket holes ensures maximum strength and stability. Begin by attaching the five main boards to each other along their lengths using 2.5-inch pocket hole screws, creating a wide, solid surface. Next, attach the breadboards (the end pieces that run perpendicular to the main boards) to both ends of the assembled top, also using 2.5-inch pocket hole screws. This construction method helps to prevent warping and provides a finished, cohesive look.
Now, repeat a similar process to create the bottom shelf assembly. This shelf will be made from three boards. Attach these three boards to each other using 2.5-inch pocket hole screws, just as you did for the table top. Remember to also add pocket holes to each end of this shelf assembly. These end pocket holes are crucial, as they will be used in a later step to securely attach the shelf to the leg assemblies, ensuring a unified and strong structure for your finished coffee table. This shelf not only adds storage but also contributes significantly to the overall stability and rigidity of the table’s base.
Step 3: Connecting with the Horizontal Runner
The next step brings the main components of your table together. You will now attach the horizontal runner, a key structural piece that spans between the two leg assemblies. This runner not only provides crucial support and stability but also connects the leg structures into a single, cohesive base. Apply wood glue to the ends of the runner board and secure it to each leg assembly using 2.5-inch pocket hole screws. Ensure these pocket holes face downwards to remain hidden once the table is upright, preserving the clean aesthetic.
Concurrently with attaching the runner, you will also secure the previously built bottom shelf. Position the shelf between the two leg assemblies, ensuring it is flush and level. Use the pocket holes you drilled at the ends of the shelf to attach it to the leg assemblies, again using 2.5-inch pocket hole screws. Just like with the runner, make sure these pocket holes face downwards. This step is vital for locking the entire base structure together, providing immense strength and preventing any wobble. Double-check all connections for tightness and alignment before moving on.
Step 4: Securing the Table Top
You’re almost there! The final major assembly step involves attaching the beautiful table top to the sturdy base you’ve just constructed. Carefully place the table top face down on a clean, protected surface. Then, invert the assembled base and center it precisely on top of the table top. Take your time to ensure the top is perfectly lined up and evenly distributed over the base, checking all sides for consistent overhangs.
Once aligned, firmly attach the base to the table top. Apply wood glue along the top edges of the horizontal runner and the leg assemblies where they meet the table top. Then, drive 2.5-inch wood screws upwards through the horizontal runner and into the underside of the table top. For extra security and rigidity, you can also add a few 2-inch finish nails through the top edges of the leg assemblies and into the table top. This combination of glue and screws/nails creates an incredibly strong bond, ensuring your coffee table will withstand years of use. At this point, your farmhouse coffee table should feel remarkably solid and complete in its raw form, ready for its finishing touches.
Step 5: Applying the Perfect Finish
With the entire coffee table fully assembled, it’s time to bring out its natural beauty and protect it for years to come. The finishing process is where you truly personalize your creation. Start by thoroughly sanding your entire table, working your way up through progressively finer grits of sandpaper (e.g., 120, then 180, then 220 grit) until the wood feels smooth to the touch. Remove all sanding dust with a tack cloth or vacuum before applying any finish.
For a beautiful, nuanced rustic look, we recommend using Varathane Briarsmoke stain. To achieve a slightly lighter, more subtle tone that complements many decor styles, we created a custom mix: combine Varathane Briarsmoke stain with an equal part (50/50 ratio) of a natural stain. Stir this mixture thoroughly until it’s perfectly blended. This combination creates a rich, smoky gray-brown that is incredibly popular in modern farmhouse designs. You can find Varathane Briarsmoke stain HERE on Amazon.
Apply the stain evenly using a clean cloth or foam brush, working in the direction of the wood grain. Allow it to penetrate for a few minutes, then wipe off any excess with a clean rag. For deeper color, you can apply a second coat after the first has dried completely. After staining, consider applying a protective topcoat, such as a polyurethane or polycrylic, to shield the wood from spills, scratches, and daily wear and tear. This is especially important for a high-traffic item like a coffee table.
The final touch that truly elevates this coffee table’s farmhouse charm is the decorative hardware. We found elegant corner accent pieces at Hobby Lobby that perfectly complement the rustic aesthetic. These simple additions can transform the look of your table, adding a touch of antique flair. This link will direct you to a similar corner accent piece at Hobby Lobby.
And now, behold your magnificent, handcrafted farmhouse coffee table, ready to become the focal point of your living room!
To complete the styling, we sourced beautiful glass vases HERE and lifelike flower stems HERE. If you’re interested in making other coordinating decor items, the tutorial for the sign can be found HERE, and the tutorial for the corner corbel can be found HERE.
Why This Farmhouse Coffee Table is a Must-Build Project
We absolutely adore how this coffee table turned out! It strikes the perfect balance between rustic charm and modern farmhouse elegance. The use of robust framing lumber ensures exceptional durability, making it an ideal choice for busy households with kids and pets. Beyond its aesthetic appeal and strength, the cost-effectiveness is unbeatable. For under $40 in materials, you get a custom piece of furniture that would cost hundreds, if not thousands, in a retail store.
Building your own furniture provides immense satisfaction and allows for complete customization. You can choose your preferred wood species, stain color, or even paint it to match your existing decor perfectly. This project empowers you to create a functional and beautiful item that truly reflects your style and craftsmanship. Plus, the process itself is a rewarding experience, teaching valuable woodworking skills that you can apply to future projects.
Ready to get started? You can download and print the FREE PLANS HERE to begin your journey to a stunning DIY farmhouse coffee table!
Still searching for the ideal centerpiece for your living room? Explore our extensive collection of over 15 diverse DIY Coffee Table Plans to find the perfect design to suit your taste and skill level. Happy building!