
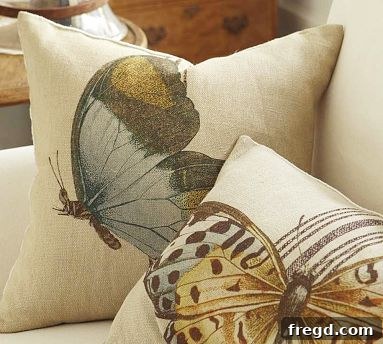
There’s an undeniable charm that high-end home decor brands like Pottery Barn bring to a living space. Their designs often strike a perfect balance between comfort and sophistication, creating an aesthetic many of us aspire to replicate. However, the price tags associated with these coveted pieces can often feel out of reach, turning dream decor into an expensive fantasy. What if I told you there’s a way to capture that same designer elegance without breaking the bank? Welcome to the world of creative DIY, where tools like the Silhouette cutting machine empower enthusiasts to transform ordinary items into extraordinary home accents. Today, I’m thrilled to share my journey of crafting a Pottery Barn-inspired stenciled pillow, a project that not only satisfied my craving for stylish decor but also proved that luxury looks don’t have to come with a luxury price tag.
For years, I’ve admired those beautifully crafted, custom-looking pillows that grace the pages of high-end catalogs. Their unique patterns and textures instantly elevate a room, adding a touch of personalized style that ready-made options often lack. The desire to own such a piece was strong, but my budget had other ideas. That’s precisely where my Silhouette machine entered the scene, transforming what seemed like an unattainable decor dream into an exciting and achievable DIY reality. This incredible tool has quickly become an indispensable part of my crafting arsenal, opening up a world of possibilities for custom home furnishings and personalized gifts. Its precision cutting capabilities make intricate designs accessible to anyone, regardless of their artistic skill level, proving that you don’t need to be a professional designer to create stunning, bespoke pieces for your home.
The first step in any successful DIY project, especially one aiming for a high-end look on a budget, is selecting the right foundation. For this particular endeavor, I needed a blank canvas that would complement the sophisticated stencil design I had in mind. My search led me to Target, where I discovered a plain yet perfectly sized pillow for just $17.00. This was a significant win, as a similar pillow from a designer brand could easily cost upwards of $50 or more, even before any customization. Choosing an affordable base allows you to allocate more of your budget to quality paints, stenciling materials, and even additional embellishments if desired. When selecting your pillow, consider the fabric type – natural fibers like cotton or linen tend to absorb paint better and offer a more professional finish. Opt for a neutral color that will allow your stencil design to truly pop, creating a focal point that captures attention.
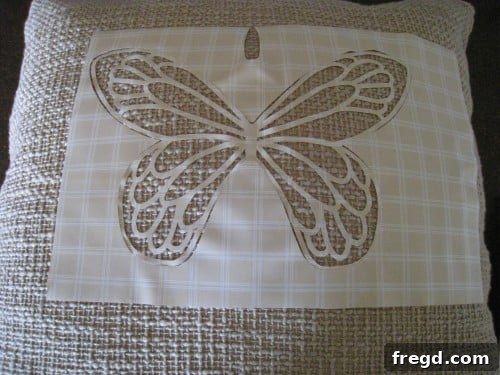
With our blank canvas ready, the next exciting phase involves creating the stencil itself. This is where the magic of the Silhouette machine truly shines. For this project, I opted for contact paper, a remarkably versatile and budget-friendly material that makes an excellent stencil. Its adhesive backing ensures a secure placement on the fabric, minimizing the risk of paint bleeding under the edges, which is a common concern with stenciling. Using the Silhouette software, I designed a beautiful butterfly pattern, carefully scaled to the desired size for my pillow. The machine then precisely cut out the intricate details, transforming a roll of contact paper into a professional-grade stencil in a matter of minutes. The ability to create custom stencils of any design opens up endless possibilities for personalizing textiles, walls, furniture, and so much more. This precise cutting capability is what truly elevates DIY projects, allowing for results that rival store-bought items.
Once the stencil was meticulously positioned and pressed firmly onto the pillow fabric, it was time for the painting process. To achieve that coveted crisp, clean look without any unsightly paint bleed, the dry brushing technique is absolutely essential. I selected Americana’s Lamp (Ebony) Black acrylic paint, a versatile choice known for its excellent coverage and durability. The dry brushing method involves applying a minimal amount of paint to your stencil brush, then dabbing off any excess onto a paper towel until the brush feels almost dry. This technique prevents the paint from seeping underneath the stencil edges, ensuring sharp lines and a professional finish. It’s a subtle but crucial step that makes all the difference in the final outcome of your stenciled projects. The goal is to build up thin layers of paint rather than saturating the brush, which can lead to blotchy results or uneven coverage.
Executing the dry brushing technique correctly is key to achieving flawless stenciled results. After loading your stencil brush with a small amount of paint, gently blot it onto a paper towel or an old cloth until most of the paint has been removed. You want the brush to feel almost dry to the touch; this ensures that only a fine amount of pigment is transferred to the fabric, layer by layer. Then, using a light, circular, or dabbing motion, carefully brush over your stencil. It’s better to apply multiple thin coats than one thick coat. This build-up of color not only prevents bleeding but also allows you to control the intensity and depth of your design. Take your time, working steadily across the entire stencil, ensuring even coverage. This meticulous approach guarantees sharp, professional-looking edges and a beautifully rendered design that truly mimics high-end craftsmanship.
With a thin, even coat of acrylic paint applied and slightly dry to the touch, the moment of truth arrived: carefully peeling away the contact paper stencil. This step is always exciting, as it reveals the crisp, clean design that has been meticulously crafted. Gently lift one edge of the contact paper and slowly pull it away from the fabric, making sure not to smudge any freshly painted areas. The beauty of using contact paper with the Silhouette machine is the precision it offers; the clean lines are a testament to the cutting accuracy and the proper dry brushing technique. Once the stencil is fully removed, you’re left with a stunning, professionally stenciled design that looks like it could have come straight from a high-end boutique. Allow your newly stenciled pillow ample time to dry completely before handling or placing it in your living space. For added durability, especially if the pillow will see a lot of use, you might consider heat-setting the paint according to the manufacturer’s instructions, though for decorative pillows, this is often optional.
For designs with multiple elements or those requiring specific sizing, it’s often necessary to create and apply more than one stencil. In my case, to achieve the perfect scale and detail for the butterfly, I cut two separate stencils: one for the main wing structure and another for the intricate body and antennae. This approach allows for greater flexibility and precision, especially when dealing with complex patterns or when you need to align distinct parts of a design. After applying the first stencil and allowing the paint to dry slightly, I carefully positioned the second stencil for the butterfly’s body, ensuring perfect alignment with the previously painted wings. I then repeated the dry brushing process, meticulously filling in the new details. This multi-stencil technique, while requiring a bit more patience, ensures that every element of your design is sharp, well-defined, and perfectly proportioned. It’s a testament to the versatility of the Silhouette machine and a valuable skill for any DIY enthusiast looking to tackle more elaborate projects.
And just like that, with a few simple steps and the incredible assistance of my Silhouette machine, my Pottery Barn-inspired stenciled pillow was complete! The transformation from a plain, inexpensive pillow to a sophisticated, custom piece of home decor was incredibly satisfying. This project exemplifies the beauty of DIY: the ability to bring your creative visions to life, tailored exactly to your taste and budget. There’s a unique sense of accomplishment that comes with crafting something with your own hands, especially when the result looks every bit as good as, if not better than, its high-end counterpart. This butterfly design adds a subtle touch of nature-inspired elegance to my living space, creating a focal point that feels both personal and stylish. The simplicity of the process, coupled with the dramatic impact of the finished product, makes this an ideal project for both seasoned crafters and those new to the world of DIY home decor.
A single beautiful pillow can certainly make a statement, but to truly elevate a room’s aesthetic, thoughtful styling and layering are key. My newly stenciled butterfly pillow, with its elegant black design, became the perfect anchor for a curated pillow arrangement. I paired it with two gorgeous ruffled pillows I discovered at Pier 1 during a 20% off sale. This strategic combination of a DIY centerpiece and carefully selected sale items allowed me to achieve a cohesive, designer-inspired look for a fraction of the cost. The ruffled textures added a touch of softness and visual interest, complementing the crisp lines of the stenciled design beautifully. It’s a testament to the power of mixing and matching: a high-impact DIY piece, combined with smart shopping for complementary accents, can create an entirely personalized and luxurious feel. My new pillow collection isn’t just an “exact match” to those initial high-end inspirations; it’s something even better – a unique reflection of my style, achieved entirely within a sensible budget.
The satisfaction of creating beautiful, personalized home decor pieces with a tool like the Silhouette machine is truly unmatched. It not only saves money but also injects your unique personality into your living space. If you’ve been inspired by this project and are dreaming of exploring the endless creative possibilities that a Silhouette machine offers, you’re in luck! We’re currently hosting a fantastic giveaway, offering you the chance to win your very own machine and embark on your crafting journey. Don’t miss this incredible opportunity to unlock your creative potential and start making your own designer-inspired pieces. Enter our giveaway HERE for your chance to win a FREE machine!
As we wrap up this creative journey, we want to extend our warmest wishes to you and your loved ones. We hope you all have a wonderful Easter Sunday, filled with joy, reflection, and perhaps even some creative inspiration! Thank you so much for taking the time to stop by and share in our passion for DIY and home decor. Your support means the world to us, and we’re always delighted to connect with fellow enthusiasts. Keep an eye out for more budget-friendly decor ideas and crafting tutorials!
Matthew 28:5-7: A Message of Hope
In the spirit of renewal and joy, we share this timeless passage:
5 The angel said to the women, “Do not be afraid, for I know that you are looking for Jesus, who was crucified. 6 He is not here; he has risen, just as he said. Come and see the place where he lay. 7 Then go quickly and tell his disciples: ‘He has risen from the dead and is going ahead of you into Galilee. There you will see him.’ Now I have told you.”