
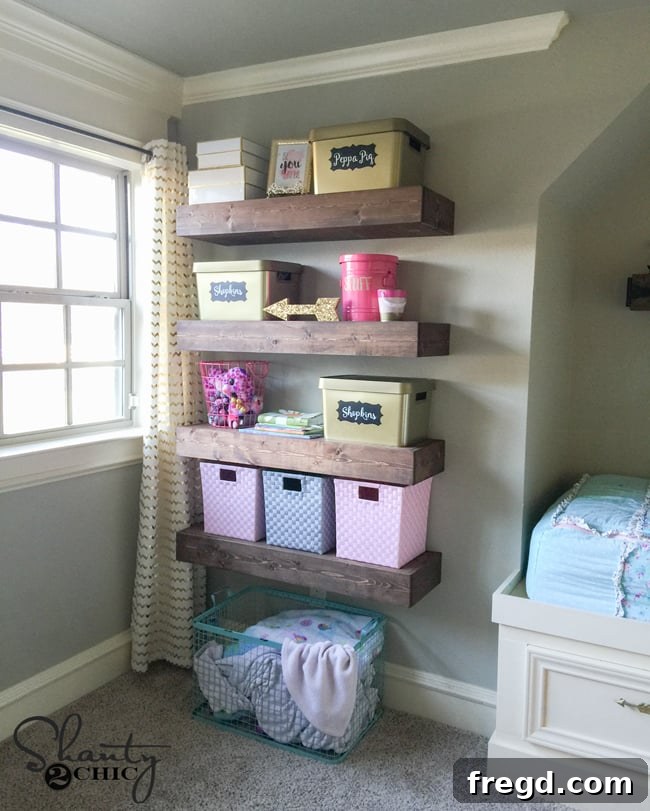
Unlock Your Walls: DIY Floating Shelves That Elevate Your Space
Hello, fellow DIY enthusiasts! Are you looking for a stylish yet practical solution to declutter and organize your home? Floating shelves are an absolute game-changer, offering incredible storage and display opportunities without taking up valuable floor space. Today, I’m thrilled to share a project that brought both charm and functionality to my youngest daughter’s room: a set of custom-built floating shelves designed to hold all of her treasured possessions. This project is not just about building shelves; it’s about creating personalized storage that enhances any room’s aesthetic.
What made this project particularly exciting was my recent discovery of 1×5 pine boards at my local Home Depot. These boards proved to be perfect for the shelf boxes, and the entire construction process was made incredibly straightforward thanks to my trusty Kreg Jig. If you’re passionate about woodworking, or even if you’re just starting your DIY journey, a Kreg Jig is an essential tool. Ash and I absolutely swear by ours! It simplifies joinery, creating strong, professional-looking connections with ease. For newcomers, we highly recommend the K5 model as your first investment. It truly transforms the building process. But enough about tools for a moment – let’s dive into how these beautiful DIY floating shelves turned out!
Your Comprehensive Guide to Building DIY Floating Shelves
Ready to transform your walls? This step-by-step guide will walk you through the entire process, from cutting your wood to the final installation. We’ve made it even easier for you to follow along by providing downloadable plans. You can access and print your FREE PLANS by clicking HERE!
Prefer to see it in action? Don’t miss our detailed video tutorial!
***Check out our How to Build a Floating Shelf Video HERE!***
Step 1: Constructing the Sturdy Shelf Braces
The secret to truly “floating” shelves lies in their hidden support braces. For this crucial component, we’ll be using 2×3 lumber. You can typically find these with other dimensional lumber and studs at your hardware store, though some stores might stock them in the landscaping or fencing sections. Each individual shelf requires one 2×3 piece of wood to form its robust inner brace. Precision is key here, so take your time with your measurements and cuts. Here’s a visual guide for the cuts you’ll need to make for each brace:
Once your 2×3 pieces are cut, it’s time to prepare them for assembly using the Kreg Jig. I set my Kreg Jig to create 1.5-inch pocket holes. These holes are strategically placed on the short pieces of the brace, as shown in the image below. These pocket holes will allow us to securely fasten the brace components together, creating incredibly strong and concealed joints. This method is fundamental to achieving that clean, seamless floating look.
With the pocket holes drilled, the next step is to assemble the brace. I carefully attached the shorter pieces to the longer 2×3 board. For maximum strength and durability, I used a combination of high-quality wood glue and 2.5-inch pocket hole screws. The Kreg driver bit, paired with my reliable Ryobi 18V drill, made this task quick and effortless. This drill is another tool I can’t recommend enough for its versatility and power!
It’s important that the brace pieces are assembled evenly, forming a perfectly rectangular frame. This ensures that your shelf will sit flush against the wall and appear truly level. Take a moment to verify your alignment before fully tightening the screws. Consistency across all braces will guarantee a professional finish for your entire floating shelf unit.
Occasionally, depending on the exact location of your wall studs, you might need to slightly adjust the position of that center small piece on the brace to align perfectly with a stud. This flexibility ensures maximum stability when mounting. After completing my first brace, I proceeded to build the remaining three, ensuring each was identical in construction and strength, ready for installation.
Step 2: Building the Elegant Shelf Boxes
With the sturdy braces ready, it’s time to construct the outer shelf boxes. These boxes are designed to be slightly wider than the braces, allowing them to effortlessly slide over the installed supports. This clever design offers a fantastic advantage: if you ever decide to redecorate, relocate the shelves, or simply take them down, they can be easily removed without complicated deconstruction. We’ll start by cutting the 1×12 pine boards that will form the top and bottom of each shelf box. These larger pieces provide the main surface area of your floating shelves.
Next, I prepared these 1×12 boards by adding 3/4-inch pocket holes. These holes are essential for assembling the shelf boxes seamlessly. I placed pocket holes along one long edge and both short edges of both the top and bottom boards. This strategic placement ensures that the side and front pieces of the shelf box will connect securely, creating a strong and attractive finished product.
Now, let’s turn our attention to the 1×5 pine boards, which will form the crucial side and front panels of your shelf boxes. These boards provide the “height” of your floating shelves and contribute significantly to their aesthetic appeal. Just like with the 1x12s, precise cuts are paramount here to ensure all edges meet perfectly. Refer to the diagram below for the specific lengths required for these cuts.
Similar to the 2×3 braces, the short 1×5 pieces also require 3/4-inch pocket holes. These holes will be used to attach the short side pieces to the longer front board, completing the box frame. The consistent use of pocket hole joinery throughout this project ensures both structural integrity and a clean, hidden fastener system that doesn’t detract from the finished look of your DIY floating shelves.
Now, it’s time to bring these pieces together. I started by attaching the short 1×5 side boards to the 1×12 top board. For this connection, I used 1.25-inch pocket hole screws, ensuring a snug and secure fit. Remember to use wood glue here as well for added strength and longevity. This step begins to give your floating shelf its distinctive box shape, showcasing the clean lines that make these shelves so appealing.
Following the attachment of the side pieces, I proceeded to connect the long front 1×5 boards to the assembly. This step uses the same method – pocket hole screws and wood glue – ensuring consistency and strength across the entire shelf box. You’ll quickly see your floating shelf take on its final form, ready for its top or bottom panel.
As you assemble the shelf boxes, ensure all joints are tight and flush. The beauty of pocket hole joinery is its ability to pull pieces together strongly, minimizing gaps and maximizing structural integrity. Your diligent work now will pay off with beautifully finished floating shelves.
Here’s a closer look at how the sides are attached to both the top and bottom panels. This demonstrates the boxing out process, creating a hollow, lightweight, yet incredibly strong shell that will eventually slide over your wall-mounted braces. Patience and careful alignment during these steps will yield the best results for your DIY floating shelves.
The final step in assembling the shelf box involves attaching the remaining 1×12 board – whether it’s the top or bottom, depending on your assembly order. This part can sometimes feel a little snug as you close up the box, but a compact tool can make all the difference. I utilized my Ryobi TEK4 screwdriver, coupled with my Kreg driver bit, to easily access and fasten the pocket holes in these tighter spots. This combination provides excellent control and ensures all connections are solid.
Having a smaller, maneuverable screwdriver like the Ryobi 4V is incredibly helpful for these finishing touches where a larger drill might be awkward. It allows for precise control, ensuring you don’t strip screws or damage your perfectly crafted shelf boxes. Once all sides are attached, your shelf boxes are complete and ready for the next exciting phase.
Step 3: The Art of Staining and Finishing
With all the shelf boxes meticulously assembled, it’s time to add character and protection through staining. For this project, I chose Varathane Ultimate Wood Stain in the rich hue of American Walnut. This particular stain is a standout choice for several reasons: it delivers incredible depth of color, dries in under an hour, and, remarkably, only requires a single coat for a stunning finish. We consistently turn to this brand for all our staining projects due to its superior performance and ease of use. A single application transforms the raw pine into a beautiful, warm, and inviting shade that complements nearly any decor style.
Step 4: Securely Mounting the Braces to Your Wall
While your beautifully stained shelf boxes are drying, you can begin the critical process of attaching the braces to the wall. This is where the “floating” magic truly begins. First and foremost, safety and stability are paramount. I highly recommend using a reliable stud finder to accurately locate the wall studs. Attaching your braces directly into studs ensures maximum strength and prevents your shelves from sagging or pulling away from the wall, especially when loaded with items.
Once the studs are marked, I used my powerful Ryobi Impact Driver to fasten the braces. I drove robust 3-inch Spax screws directly through the pre-built brace and into each identified wall stud. Spax screws are an excellent choice for this task due to their superior holding power and ease of driving. For a row of shelves, ensure consistent spacing and height for a cohesive look.
Here’s how the brace looks once it’s firmly attached to the wall. Notice how the design allows for a sturdy, hidden support system. This is the foundation upon which your elegant floating shelves will rest, providing both aesthetic appeal and practical storage.
Repeat this process for all your braces, ensuring each one is mounted with care and precision. The collective strength of these properly installed braces is what gives your floating shelves their impressive weight-bearing capability and longevity. A well-installed brace system is key to the success of your project.
Critically, before moving on, double-check that each brace is perfectly level using a spirit level. This step is non-negotiable for achieving truly stunning floating shelves. Any deviation here will result in crooked shelves, which will be noticeable and detract from your hard work. Take the extra minute to ensure everything is spot-on.
Step 5: Final Assembly and Securing Your Floating Shelves
Once your stained shelf boxes are completely dry and your wall braces are perfectly level and secure, it’s time for the exciting final assembly! Carefully slide each finished shelf box over its corresponding brace on the wall. The snug fit is intentional, ensuring a seamless and stable installation. To permanently secure the boxes, I drilled a 1.5-inch screw through the top of the shelf box and directly into each brace. For optimal stability, I used two screws per shelf – one on each side, ensuring that the shelf box is firmly anchored to the brace. This final fastening step ensures that your shelves are not only beautiful but also incredibly robust and ready to hold your favorite items.
My Ryobi Impact Driver was, once again, the perfect tool for driving these screws quickly and efficiently. Its power ensures that each screw is driven fully and securely, without stripping or straining the wood. This final step brings your DIY floating shelf project to a triumphant close, leaving you with elegant and functional storage.
The Beautiful & Functional Result!
And just like that, they’re all finished! I absolutely adore the blend of storage and minimalist function that floating shelves provide. They offer ample space for organization and display without consuming precious floor area or making a room feel cluttered. My daughter’s room, with its unique and somewhat unconventional shape, truly benefited from these shelves. They were the perfect, tailored solution for that particular wall, adding both visual interest and much-needed practicality. I genuinely hope you’ll find as much joy and utility in these DIY floating shelves as I do!
Here are a few more inspiring shots of the finished project:
Start Your Own Floating Shelf Project Today!
Thank you so much for taking the time to explore this DIY floating shelf tutorial! We hope you feel inspired and confident to tackle this rewarding project yourself. Floating shelves are more than just storage; they’re an expression of creativity and a fantastic way to personalize your living spaces. They provide a modern, clean look while maximizing your wall utility. Whether you’re enhancing a bedroom, living room, office, or even a bathroom, these shelves are a versatile and stylish addition.
If you enjoyed this guide and found it helpful, we would absolutely LOVE for you to share it with your friends, family, and fellow DIY enthusiasts! Pin this post to your favorite Pinterest boards, share it on social media, and spread the word about how easy and rewarding it is to build your own custom floating shelves. Your support helps us continue to create valuable content for our amazing community. Have a wonderful and productive weekend, and happy building!
Warmly,
Whitney