
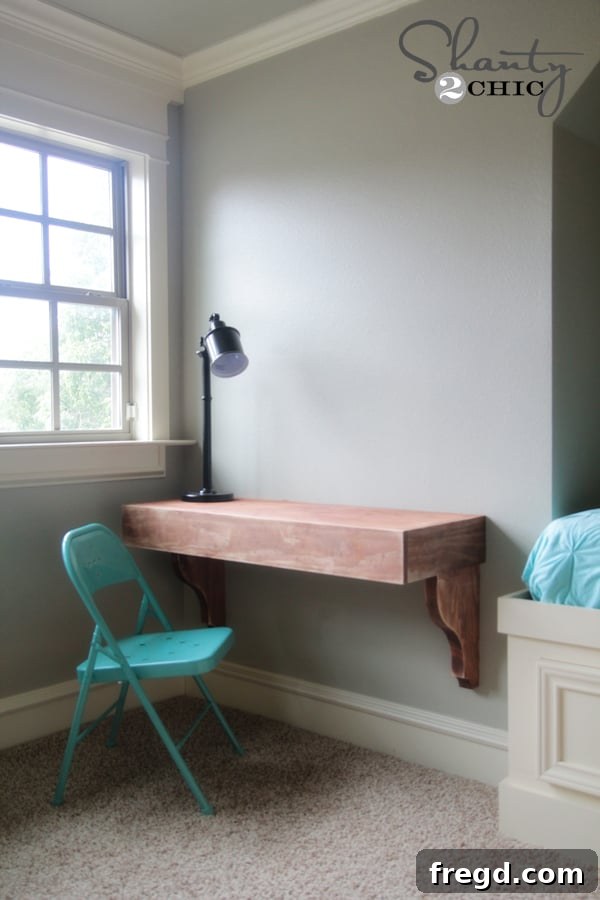
Build Your Dream Space: Crafting an Affordable & Stylish DIY Corbel Desk
Greetings, fellow DIY enthusiasts! As you might know, I recently embarked on an exciting home transformation journey, carving out a charming new bedroom for one of my daughters from a previously unused loft space. The progress has been incredibly rewarding, and I’m absolutely delighted with how this unique room is taking shape. Given its distinctive layout, designing and building custom furniture has presented a wonderfully creative challenge, allowing me to explore innovative solutions for maximizing both style and functionality.
Today, I’m thrilled to unveil a key piece from this endeavor: a chic, space-saving desk that I crafted using just a few pieces of wood and a couple of decorative corbels. This isn’t just any desk; it’s a testament to budget-friendly design, coming in at an incredible $85! Get ready to be inspired by this fantastic DIY corbel desk project!
Why a DIY Corbel Desk is a Game-Changer for Any Room
Isn’t it just amazing? This project truly showcases how simple ideas can lead to stunning and highly functional results. This DIY corbel desk is not only an incredibly easy build, but it also offers a perfect, stylish solution for adding a dedicated workspace or creative nook to virtually any room, regardless of its size or unique characteristics. Whether you’re furnishing a child’s bedroom, creating a compact home office, or adding a stylish vanity to a master suite, this design offers immense versatility.
The beauty of a wall-mounted or “floating” desk like this lies in its ability to save precious floor space. Unlike traditional desks with bulky legs, our corbel design creates an open, airy feel, making even smaller rooms appear more expansive. Plus, the custom height ensures ergonomic comfort for anyone using it, whether for homework, crafting, or browsing online.
The Secret Ingredient: Affordable & Stylish Corbels
For this project, I had the pleasure of collaborating with one of my go-to companies for quality woodworking components, Osborne Wood Products. Together, we designed the perfect corbels that serve as both a foundational support and a beautiful decorative element for this desk. The best part? These fantastic corbels are readily available for purchase, making this project accessible to everyone!
You can purchase these gorgeous corbels directly HERE on Amazon!
I cannot stress enough how much more affordable these corbels are compared to many of the options you might find at typical hardware stores. Beyond their cost-effectiveness, their generous size is truly my favorite feature. Large corbels add a significant presence and classic charm to the desk, ensuring it doesn’t just blend in but rather stands out as a focal point in the room.
Free Plans & Step-by-Step Guide for Your DIY Corbel Desk
I’m excited to walk you through this straightforward build process in detail below. To make things even easier, you can also download and print the complete FREE PLANS for this very desk! Just click HERE or on the image below to get started. These plans are meticulously designed to guide you through every cut and joint, ensuring a smooth and successful project.
Gather Your Materials: Supply List
Before diving into the build, ensure you have these essential pieces of wood ready. Choosing good quality lumber will make a significant difference in the final look and durability of your desk.
Supply List
1 – 2 x 4 x 10′ dimensional lumber
1 – 1 x 6 x 8′ dimensional lumber
1 – 16″ x 48″ pine project panel
Step 1: Making Your Cuts for the Desk Frame
I began this project by precisely cutting the wood pieces that would form the sturdy frame of the desk. Accuracy in this initial step is crucial for a desk that is level and perfectly assembled.
2 x 4 Cuts
4 pieces @ 14.5″ (for the side supports)
1 piece @ 44″ (for the main back support)
1 x 6 Cuts
2 pieces @ 16″ (for the side trim)
1 piece @ 45.5″ (for the front trim)
Step 2: Assembling the Frame with Pocket Holes
My next step involved creating pocket holes, which are an incredible method for strong and hidden joinery. I relied on my trusty Kreg Jig to construct this foundational part of the desk frame. For those unfamiliar, a Kreg Jig allows you to drill angled holes, creating incredibly secure joints with pocket hole screws. This is a game-changer for DIY furniture building, offering professional results with relative ease.
You can find the specific Kreg Jig model that Ash and I frequently use HERE!
I set my Kreg Jig for 1.5″ pocket holes, which is the ideal depth for joining 2×4 lumber. I then drilled two pocket holes into one end of each of my four 14.5″ pieces. These holes will allow us to securely attach these shorter pieces to the longer back support.
With the pocket holes ready, I attached these 14.5″ side pieces to the 44″ back piece using 2.5″ pocket hole screws and a generous amount of wood glue. The wood glue is just as important as the screws for a strong, lasting bond. I spaced the side supports approximately 12.5″ apart, ensuring even weight distribution and structural integrity for the desk surface.
Step 3: Preparing and Mounting the Corbels
At this stage, I shifted my focus to the beautiful corbels. A small tip that makes a big difference: I decided to stain my corbels *before* attaching them to the wall. This made the finishing process significantly easier, allowing for an even coat without worrying about drips or getting stain on the wall. I’ll share the exact stain color I used a little later on!
My first crucial step for mounting the corbels was to determine the precise placement of the desk top. I held the assembled frame up to the wall at the desired height – 30″ from the ground, which is standard desk height – and used a level to ensure it was perfectly straight. Then, I carefully traced the outline of the desk frame onto the wall with a pencil. This visual guide is essential for accurate corbel placement.
Next, I measured the hanging hardware located on the back of each corbel. These specific corbels come equipped with pre-attached hanging hardware, which is a fantastic time-saver! After noting the exact measurements, I transferred these points onto the wall, marking precisely where each corbel would align with the traced desk outline. These marks indicate where our anchors will be placed.
For securing the corbels, I used my absolute favorite wall anchors – they are incredibly simple and effective! With my trusty Ryobi 18V drill, I drove each anchor into the marked spots on the wall until it was perfectly flush. These anchors provide a robust base for supporting the desk, especially when wall studs aren’t precisely where you need them.
Here’s a look at what the installed anchors looked like on each side, ready to receive the screws.
Next, I used my drill to drive screws into each anchor, leaving approximately 1/2″ of the screw exposed. This exposed portion will act as the hanging point for the corbel hardware.
And just like that, the beautiful corbels are hung securely from these screws, ready to support our desk!
Step 4: Attaching the Desk Frame to the Wall
Now for the main event: attaching the prepared wooden frame to the wall. This step was surprisingly easy thanks to the previously installed corbels. I simply rested the assembled frame directly on top of the sturdy corbels, which provided immediate support and helped immensely with alignment.
To ensure maximum stability and safety, attaching the frame directly into wall studs is paramount. I used my reliable stud finder to locate and mark the studs within the desk’s footprint. Then, I pre-drilled two holes into the frame at each point where a stud lined up. Pre-drilling prevents the wood from splitting and makes driving the screws much easier.
Finally, I used my incredibly powerful Ryobi Impact Driver to attach the frame securely to the wall. I opted for 3″ torx screws, known for their superior gripping power. These long screws passed straight through the back of the frame and into the wall studs, creating an incredibly sturdy and immovable desk foundation. This robust attachment guarantees that the desk can withstand daily use without wobbling or shifting.
Step 5: Adding the Desktop and Trim Pieces
With the frame firmly in place, it was time to add the finishing touches that truly make this desk functional and beautiful – the desktop and trim pieces. I started with the top surface. For this, I used a four-foot 16″ pine project panel, which provides a smooth, ready-to-use surface. I cut this panel down to 44″ to fit perfectly onto the frame. I then attached it using a combination of wood glue for a strong bond and my trusty nail gun for quick and secure fastening.
Next, I focused on the side trim pieces. Similar to the desktop, these were attached using a combination of wood glue and my Ryobi AirStrike nail gun. I used 1×6 dimensional lumber for these sides, cutting both pieces to 16″. I secured them with 1.25″ nails, ensuring a flush and neat finish.
My very final piece was the front 1×6 trim piece. This completes the desk’s visible structure, giving it a polished and finished appearance. I attached this piece using the same reliable method: wood glue for an extra strong bond and my nail gun for precise fastening. This step not only adds to the aesthetic but also helps to conceal the raw edges of the desktop, giving it a custom, built-in look.
The Finishing Touches: Staining and Distressing
Woohoo! The build is officially complete! Now for the exciting part – bringing out the character of the wood with stain and adding that signature rustic touch. I chose Varathane Stain in American Walnut for its rich, warm tone that beautifully complements many decor styles. I applied the stain evenly, allowing it to penetrate the wood and highlight its natural grain. Once the stain was completely dry and cured, I brought out my Corner Cat sander to gently distress the entire piece. This step is key to achieving that perfectly “shanty chic” look, giving the desk a charming, aged appearance with subtle wear marks.
Admire Your Handiwork: The Finished Corbel Desk!
Here are a few more glimpses of the finished DIY corbel desk. I know that wall might look a little bare in some of these shots, but trust me, just you wait! I literally cannot wait to share the next phase of this room transformation and show you what incredible things I did to that wall!
How absolutely charming is that?! This project truly delivers on its promise: a perfect, space-saving, and incredibly stylish way to integrate a desk into any room or uniquely shaped space. It’s ideal for a child’s bedroom, a small apartment, or any area where you want to maximize functionality without sacrificing aesthetic appeal.
I am also completely enamored with the lamp I found for it at Birch Lane! It’s quickly become our new favorite spot for accessories that add just the right touch of elegance and warmth. You absolutely have to check out their incredible online store HERE!
Share the Inspiration & Explore More DIY Projects!
I would be absolutely thrilled if you would share and PIN this fantastic DIY corbel desk project with all your friends and fellow DIY enthusiasts! Your support means the world to us, and you guys truly are the BEST! Don’t forget, you can download the comprehensive free plans to build your own desk by clicking HERE! A massive thank you goes out to Jay of Jay’s Custom Creations for his incredible work in translating Shanty 2 Chic’s original ideas and designs into these easy-to-follow, free printable plans for all our amazing readers. Be sure to visit his site too for more woodworking inspiration!
And while you’re here, make sure to check out the other exciting projects I’ve been tackling in this very room! Creating a cohesive and custom space is all about these interconnected DIY endeavors.
DIY Board and Batten Wall – A Classic Touch
DIY Built-In Daybed – Maximizing Comfort and Storage
DIY Floating Shelf or Mantle – Rustic Charm Elevated
DIY Barn Door Media Console – Stylish Entertainment Solution
Large Wood Wall Letters – Personalized Decor