Mastering Home Decor: Your Comprehensive Guide to Building Easy DIY Floating Shelves
Transform your living space with stylish and functional storage you can build yourself! This detailed guide will walk you through creating beautiful, sturdy DIY floating shelves in approximately one hour per shelf. Perfect for beginners and seasoned DIY enthusiasts alike, this project offers a rewarding experience, enhanced by our step-by-step instructions and practical tips. Say goodbye to cluttered countertops and blank walls, and hello to elegant, customized storage solutions.
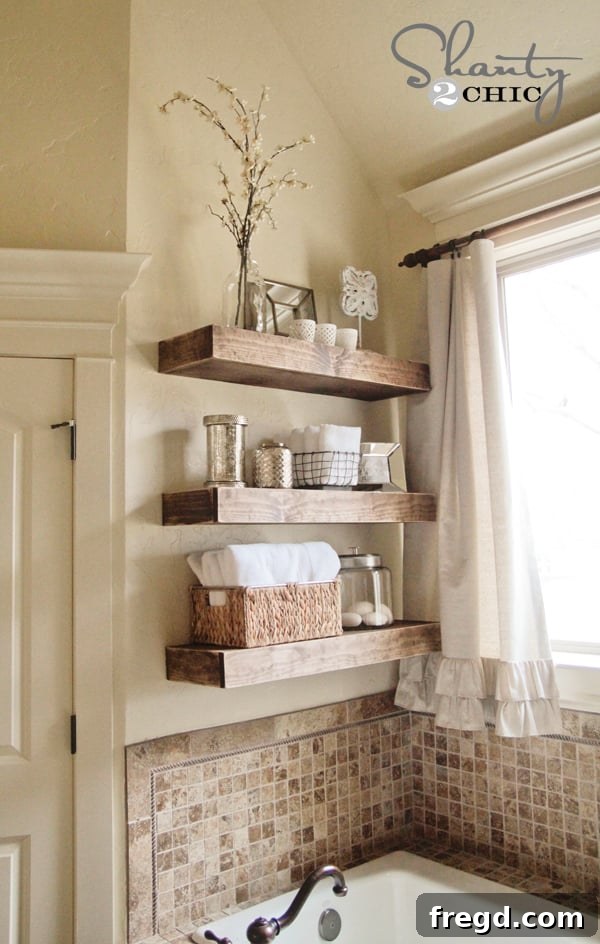
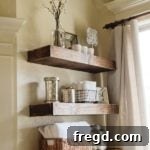
For too long, that empty wall in my bathroom stared back at me, a blank canvas awaiting purpose. Finally, I decided to tackle it with these incredibly easy-to-build floating shelves, and the results are absolutely stunning! I’m truly loving how they transformed the space. Whether you’re aiming to revitalize a bathroom, add character to a living room, or enhance a kitchen, these floating shelves are a fantastic solution. They combine aesthetic appeal with robust functionality, ensuring they look great and stand the test of time.
CLICK HERE TO JUMP TO THE FREE PRINTABLE PLANS
Why Choose This DIY Floating Shelf Design? Sturdy, Stylish, and Simple!
Aren’t these shelves fantastic? When designing them, I prioritized two key elements: a thick, substantial, or “beefy” appearance, and uncompromising sturdiness. The goal was to create shelves that not only looked beautiful but could also withstand the rigors of daily life—even if a curious two-year-old decided they were an impromptu ladder (because, let’s be honest, it’s bound to happen!). This particular design successfully achieves both objectives, offering a robust structure concealed by a sleek, minimalist exterior.
Floating shelves are celebrated for their ability to maximize space, especially in smaller rooms where traditional bookcases might feel overwhelming. They provide an open, airy feel, allowing your decor to truly shine without bulky supports. Furthermore, building them yourself allows for complete customization in terms of length, depth, and finish, ensuring they perfectly complement your home’s aesthetic.
Table of Contents
Easy DIY Floating Shelves Tutorial and Plans
This project is designed with the beginner in mind, featuring straightforward cuts and a simple assembly process. Don’t be intimidated by woodworking; these floating shelves are an excellent entry point into DIY, offering a high-impact result with minimal complexity. Let’s gather our materials and get started on building functional beauty!
Supply List for Your Floating Shelves
Supply List for 3 Shelves (Adjust Quantities for More or Fewer Shelves)
- 1 – 1″ x 10″ x 8′ pine boards or common boards: These will form the top surface of your shelves, providing a wide and sturdy platform.
- 2 – 2″ x 3″ x 8′ pine boards or common boards: Essential for building the internal support frame that mounts to your wall, ensuring robust stability.
- 1/4″ hardwood plywood material: We recommend a 4′ x 4′ sheet. You can ask your local home improvement store (like Home Depot) to rip this into 9.25″ strips for convenience, which will form the bottom panel of your shelves.
- 3 – 1″ x 4″ x 6′ pine boards or common boards: These are used for the decorative front and side trim, giving your floating shelves their chunky, finished appearance.
- Brad nailer: An invaluable tool for quickly and securely attaching trim and thinner panels.
- Kreg Jig: This pocket hole jig is a game-changer for creating strong, concealed joints, making your assembly much cleaner and stronger.
- 2.5″ pocket hole screws: Specifically designed for use with the Kreg Jig to join the frame components.
- 3.5″ torx or wood screws: Heavy-duty screws crucial for securely mounting the shelf support frame directly into your wall studs.
- Gorilla Wood Glue: An essential adhesive to reinforce all your joints, significantly increasing the overall strength and longevity of your shelves.
Essential Tools for This Project
Having the right tools makes all the difference in a DIY project. Here’s what you’ll need:
- Miter Saw: For precise and clean cross-cuts on your lumber, ensuring all your pieces fit together perfectly.
- Drill: Necessary for pre-drilling pilot holes and driving screws, especially when attaching the frame to the wall.
- Kreg Jig: As mentioned, this pocket hole system simplifies creating strong, hidden joints. If you’re serious about woodworking, it’s a worthwhile investment.
- Stud Finder: Absolutely critical for safely and securely mounting your shelves by locating wall studs.
- Impact Driver (Optional, but highly recommended): While a drill can work, an impact driver provides more torque, making driving long screws into studs much easier and faster.
- Brad Nailer (Cordless recommended): For quick and efficient fastening of panels and trim without marring the wood.
Considering the investment, the cost of wood for all three shelves in this project was approximately $45. This breaks down to about $15 per shelf for materials, excluding tools you might already own. This makes them an incredibly cost-effective way to add substantial value and style to your home. Knowing the affordability only makes me appreciate their beauty even more!
Step 1: Precision Cuts for Your Lumber
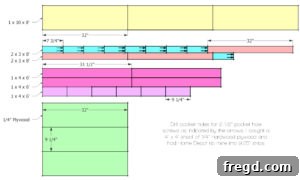
The foundation of any successful woodworking project lies in accurate cuts. Begin by preparing all your lumber according to the provided plans. Each floating shelf will be constructed around an internal frame. For this frame, the back piece, which will be firmly attached to your wall, should be a 2×3 board cut to 32 inches in length. Additionally, each shelf will require three support brackets, each precisely 7.75 inches long. Remember, careful measurement and clean cuts here will ensure a professional finish. If you need a refresher on using a miter saw, you can find many helpful tutorials online, like this one (Watch our How to Use a Miter Saw video HERE).
Step 2: Drilling Pocket Holes with a Kreg Jig
Now it’s time to create the strong, hidden joints that will hold your shelf frame together. Using your Kreg Jig pocket hole jig, drill 1.5-inch pocket holes on one end of each of the 7.75-inch bracket pieces. This tool is an absolute marvel in the world of DIY woodworking; it streamlines the assembly process and dramatically enhances the structural integrity of your projects. If you’re currently using an older Kreg Jig model like the K3 or K4, I highly recommend exploring the K5. I recently upgraded to it myself and am thoroughly impressed with its improved features and ease of use. It truly makes joinery a breeze. Check it out HERE! If you’re new to the Kreg Jig, this video tutorial can guide you: Watch our How to Use a Kreg Jig video HERE!
For consistent and secure results, I carefully lined up each bracket in the Kreg Jig to ensure the two pocket holes were perfectly drilled on the designated end.
Step 3: Assembling the Robust Shelf Brackets
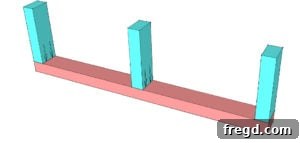
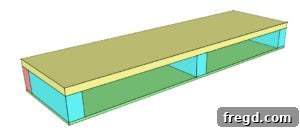
With your pocket holes drilled, the next step is to assemble the internal support frame. Carefully attach the 7.75-inch bracket pieces to the 32-inch back piece using 2.5-inch pocket hole screws. To enhance the overall strength and longevity of your floating shelves, I strongly recommend applying a generous amount of Gorilla Wood Glue to each joint before screwing the pieces together. The combination of pocket screws and wood glue creates an incredibly sturdy bond that will prevent wobbling and ensure your shelves can support a substantial amount of weight. Ensure all pieces are square as you assemble.
Step 4: Securely Mounting the Shelf Support to the Wall
Your internal frames are now complete and ready to be mounted! This is a critical step for the safety and stability of your floating shelves. First, you’ll need to accurately locate the wall studs in your desired mounting location. The easiest and most reliable method for this is using a stud finder. This is the stud finder I use; it’s a simple, effective tool that beeps when it detects a stud, indicating a solid point for attachment.
Once you’ve identified the studs, hold each shelf frame against the wall at your desired height and mark the exact points on the frame where it aligns with the wall studs. Next, using your Ryobi drill, pre-drill two pilot holes through the back of the frame at each marked stud location. Pre-drilling is essential as it prevents the wood from splitting when you drive the screws and ensures a smoother, more secure attachment.
For driving the screws, while your drill can handle it, I highly recommend using an impact driver. This tool delivers a powerful, rotational force that makes driving long, stubborn screws effortless, especially into dense wall studs. If you already own a compatible battery, the tool itself is often very affordable (around $69), and you’ll be astonished by how often you reach for it over your regular drill for driving tasks. I chose to use 3 1/2-inch torx screws to attach each of my frames, known for their excellent grip and reduced cam-out, but standard wood screws of the same length will also work effectively. Ensure the screws penetrate deep into the studs for maximum holding power.
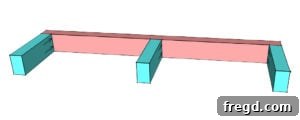
Here is the shelf support frame securely attached to the wall, demonstrating the invisible mounting system:
You can clearly see where I drilled straight through the back of the frame and into the wall studs, ensuring a robust and reliable connection.
And here they are—all three frames mounted and ready for the next stage of construction!
Step 5: Attaching the Top and Bottom Panels
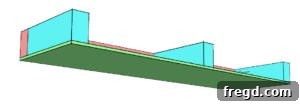
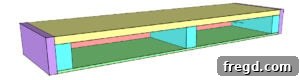
Now that the internal support frames are securely mounted, it’s time to create the box-like structure of your floating shelves. First, I added the bottom panel, using 1/4-inch hardwood plywood. As mentioned in the supply list, I had my local home improvement store cut my large plywood sheet into 9.25-inch wide strips, which saved me considerable time and ensured perfectly straight edges. Each of these strips was then cut to 32 inches in length to match the frame. I attached these plywood pieces to the bottom of the internal frame using a combination of wood glue and 1 1/4-inch brad nails. For this task, my cordless Ryobi AirStrike nailer was invaluable. Cordless tools, especially nailers, offer unparalleled convenience for indoor projects like this, eliminating the need for air compressors and tangled hoses. This significantly speeds up the process and reduces hassle.
Once the bottom panels were securely in place, I moved on to the top piece. For this, I used a 1×10 pine board. Each top board was cut to 32 inches long. Similar to the bottom panel, I attached these top pieces to the frame using a strong wood glue, followed by 1 1/4-inch brad nails driven with my nail gun. The glue provides a lasting bond, while the brad nails hold the pieces firmly in place while the glue dries, ensuring a tight and seamless fit. This layering creates the illusion of a solid, thick floating shelf.
Step 6: Adding the Finishing Trim for a Seamless Look
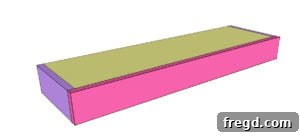
The final step in constructing the physical shell of your floating shelves is to add the decorative trim. This trim covers the exposed edges of the internal frame and the plywood, giving the shelves their clean, chunky, and polished appearance. I opted for 1×4-inch select pine boards for this part, though whitewood is a more budget-friendly alternative. While whitewood can be a great option, I sometimes find it challenging to locate enough perfectly straight pieces, which is why I occasionally choose select pine for its consistent quality.
Begin by cutting your side trim pieces. For these shelves, each side piece was cut to 9 1/4 inches long. Attach these pieces to the sides of your shelf structure using both wood glue and 1 1/4-inch brad nails. The glue ensures a strong bond, while the brad nails hold the trim in place as the glue sets.
Next, tackle the front trim piece. You’ll want to measure for the exact length needed for your specific shelf, but it typically falls around 33.5 inches long. Precise measurement here is crucial to ensure a snug fit and a seamless look across the front of your shelf. Attach the front trim piece using the same method: apply wood glue generously to the contact surfaces and secure it with brad nails. Once all the trim is in place, you’ll immediately see the transformation as your shelves take on their distinctive floating appearance.
Step 7: Finishing and Protecting Your Floating Shelves
With the construction complete, it’s time to give your floating shelves their desired finish. This step is where you truly personalize your project and protect it for years to come. First, if your shelves are already mounted to the wall, carefully tape off the surrounding wall area with painter’s tape to protect it from any finishing products. Then, use wood filler to meticulously fill all the nail holes left by the brad nailer. Allow the wood filler to dry completely, then sand the entire surface of your shelves smooth with fine-grit sandpaper (around 120-grit). This ensures a flawless surface for your chosen finish.
For the stain, I used this wood stain, which is readily available at most home improvement stores like Home Depot. I particularly love it for its quick drying time—advertised as 1 hour, similar to Rust-Oleum products found elsewhere, but I often find it dries even faster! Apply the stain evenly according to the product instructions, wiping off any excess for a consistent color.
Here they are drying, showcasing the rich depth the stain adds to the wood!
You can choose to leave your shelves with this beautiful stained finish, or you can take it a step further and distress them for a charming, vintage-inspired look, as I did. To distress, I used my Ryobi Corner Cat sander equipped with 120-grit sandpaper to gently go over all the edges and corners. This technique subtly removes some of the stain, mimicking natural wear and tear. To protect the finish and ensure durability, especially in a bathroom environment, I followed up with one coat of polyurethane. This protective topcoat seals the wood, guarding against moisture and daily use, ensuring your ‘shanty’ chic shelves remain beautiful for years.
Step 8: Decorating Your New Floating Shelves
With your new DIY floating shelves built and finished, the most enjoyable part begins: decorating them! This is your opportunity to infuse personality and style into your space. Floating shelves are incredibly versatile, perfect for displaying decorative accents, storing essentials, or a combination of both. Think about the room they are in; for a bathroom, neatly folded towels, decorative soaps, and small plants work wonderfully. In a living room, books, framed photos, and unique curios can create a curated display.
I found all the charming baskets, soft towels, and delightful decor pieces at HomeGoods. That place is truly a treasure trove for home enthusiasts! I always walk in with a specific item in mind, and inevitably leave with a cart full of unexpected, delightful finds. Don’t be afraid to mix textures, heights, and materials to create visual interest. Balance is key: arrange items with varying sizes and shapes to prevent a cluttered appearance, and leave some negative space to allow each piece to breathe.
What do you think of the finished look? I am absolutely thrilled with them! Their simple elegance and practical functionality have made a huge difference in my space. I’m already contemplating making some for every room in my house – that’s how much I love them!
If you’ve found this tutorial helpful, I would be absolutely delighted if you could pin these Easy DIY Floating Shelves and share them with your friends and fellow DIY enthusiasts! Your support helps spread the joy of creating beautiful things for our homes. You all are awesome!
Thank you so much for following along!
~Whitney
Explore Other Free DIY Floating Shelf Plans!
If you enjoyed building these shelves, you’re in luck! We have a wide array of other free shelf project plans available, each offering a unique design challenge and aesthetic. Which one will inspire your next woodworking adventure?
- DIY Floating Shelves with Hardware
- DIY Floating Shelves with Pipe
- DIY Floating Shelves with Pulleys
- DIY Floating Corner Shelves
DIY Floating Shelves Printable Plans
This easy tutorial provides comprehensive instructions on how to build these stunning DIY floating shelves. Just follow the free printable plans to get started. You can click the link below to download and print the full set of plans, including detailed cut lists and diagrams!
Download Free Printable Plans (PDF)
Keyword: diy floating shelve, free plans
Supply List for One Shelf (Adjust as needed for multiple shelves)
- 1x10x8 Pine or Whitewood (for top)
- 2x3x8 Framing Lumber (for frame and brackets)
- 4’x4’x1/4″ Hardwood Plywood (for bottom panel, cut into 9.25″ strips)
- 1x4x6′ Pine or Whitewood (for trim)
- 1 1/4″ Brad Nails
- 2 1/2″ Pocket Hole Screws
- 3 1/2″ Wood Screws (for wall mounting)
- Wood Glue
Instructions
-
Cut List: Prepare all your lumber according to the dimensions provided in the free printable plans. Ensure precise cuts for a clean build.

-
Assemble Frame: Screw the three 7 3/4″ bracket pieces to the 32″ back piece using 2 1/2″ pocket hole screws and wood glue, creating the internal frame.
-
Mount to Wall: Locate your wall studs and mark their positions on the back piece of the frame. Pre-drill two holes at each stud location. Use 3 1/2″ wood screws to securely attach the shelf frame to the wall studs.
-
Attach Bottom Panel: Add the bottom 1/4″ plywood panel. This piece and the remaining decorative panels will be attached using wood glue and 1 1/4″ brad nails.
-
Attach Top Panel: Securely attach the top 1×10 shelf board using wood glue and 1 1/4″ brad nails.
-
Add Side Trim: Attach the side 1×4 trim pieces (approximately 9 1/4″ long) using wood glue and 1 1/4″ brad nails.
-
Add Front Trim: Attach the 1×4 front trim piece (measure for exact fit, around 33.5″ long) using wood glue and 1 1/4″ brad nails. Once the construction is complete, you’re ready to tape off the walls, fill nail holes, sand, stain, and finish your beautiful new floating shelves.