
Transform Your Dining Room: Easy DIY Floating Shelves with Free Plans!
Embarking on a home renovation project can be incredibly rewarding, especially when you have the chance to infuse your personal style into every corner. Right now, I’m deep into a dining room remodel, and it’s exhilarating to clear the slate and build new, custom pieces from the ground up. There’s nothing quite like the satisfaction of crafting something beautiful and functional with your own hands. This time around, I felt an undeniable urge to rethink everything, to create a space that truly reflects modern aesthetics and efficient design. First up on my list, and a cornerstone of contemporary home decor, are these stunning DIY floating shelves!
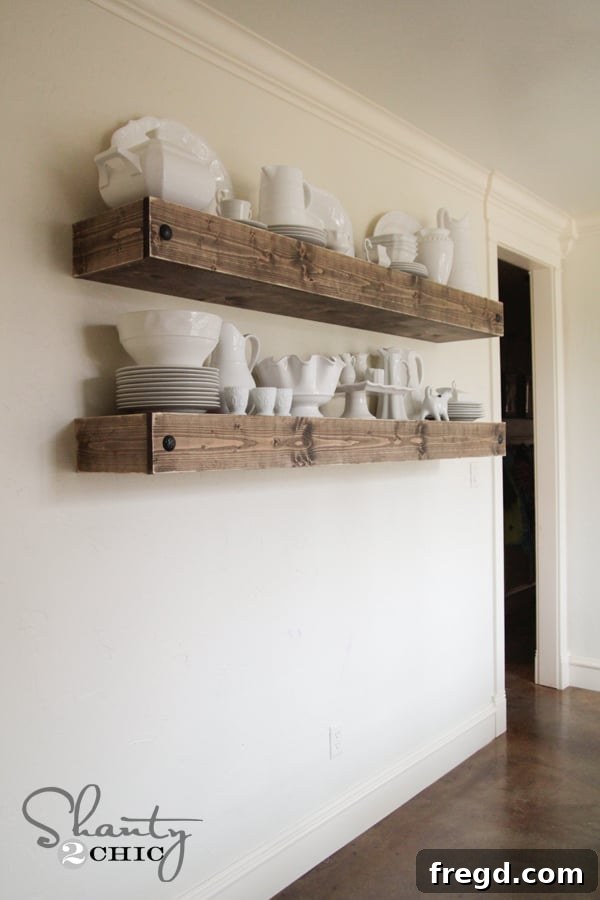
Aren’t these shelves absolutely fantastic? I’m thrilled with how they instantly opened up the entire dining room, giving it a much airier and more spacious feel. Beyond their aesthetic appeal, floating shelves offer incredible versatility, allowing you to showcase your favorite decorative items, store dinnerware, or even display cherished family photos. The clean lines and seamless integration into the wall create a sophisticated look that can elevate any room. And believe me, this is just the beginning – you’ll have to wait until you see what beautiful pieces are going to complement them underneath! This project is perfect for anyone looking to add custom storage and a touch of modern elegance to their living space.
Watch the Full Floating Shelf Build Tutorial!
To ensure you have all the visual guidance you need, we’ve created a comprehensive video tutorial walking you through every step of building these sturdy and stylish floating shelves. Watching the process can clarify details that might be harder to grasp from text alone, making your DIY journey even smoother. Whether you’re a visual learner or just want to see the tools in action, this video is an invaluable resource for your project.
Check out our How to Build a Floating Shelf Video HERE!
Access Your Free Printable Floating Shelf Plans
To make this project even more accessible, I’ve collaborated with my good friend, Jamison, over at Rogue Engineer, to bring you detailed, printable plans for these very shelves. Jamison is an incredibly talented author and builder, known for his clear instructions and practical designs. He, along with his sweet wife, offers a plethora of fantastic plans that cater to a wide range of DIY enthusiasts. These free plans are meticulously crafted to guide you through accurate cuts and assembly, ensuring your floating shelves are not only beautiful but also structurally sound. I highly recommend visiting his site, exploring his other projects, and telling him Shanty sent you for these awesome DIY shelf plans! Having these plans in hand will be a tremendous asset as you gather your materials and begin your build.
Building the Foundation: Sturdy Floating Shelf Frames
The secret to truly “floating” shelves that can hold substantial weight lies in their robust internal framework. Just like all my previous floating shelf projects, I began by constructing the hidden support frames. For this crucial structural component, I opted for durable 2×4 lumber. These frames will bear the full weight of the shelves and anything you place on them, so using strong, straight lumber is essential. Throughout the entire build, my trusted Kreg Jig was an indispensable tool. If you’re new to woodworking or looking to upgrade your joinery tools, I cannot recommend the Kreg Jig K5 model enough. It’s incredibly versatile, easy to use, and creates incredibly strong, hidden pocket-hole joints that are perfect for projects like this.
For the 2×4 frames, I set my Kreg Jig to create 1.5-inch pocket holes. This setting is ideal for the thickness of 2×4 lumber, ensuring maximum screw engagement and strength. Each joint was then securely fastened using Gorilla Wood Glue, which provides an incredibly strong bond, and 2.5-inch pocket hole screws. The combination of glue and screws creates a joint that is virtually unbreakable, ensuring your shelves will stand the test of time and carry significant loads without sagging. Always ensure your pieces are square before tightening to maintain the integrity of your frame.
To ensure even weight distribution and structural integrity, I carefully spaced all the smaller support pieces evenly along the long back piece of the frame. Precision in this step is key to a balanced and stable shelf. Take your time to measure and mark accurately. When you’re finished assembling this part of the frame, it should present a consistent and robust structure, ready to be mounted to the wall and support the outer shelf box. This meticulous construction is what gives floating shelves their signature strong, clean look.
These completed frames will serve as the hidden anchors for your floating shelves, attaching directly to your wall. Before mounting them, however, it’s best to proceed with constructing the outer shelf boxes. This allows you to work more comfortably on a flat surface and ensures that the boxes are ready to slide over the wall-mounted frames seamlessly.
Crafting the Shelf Boxes: The Visible Elegance
With the sturdy internal frames ready, it was time to move on to the visible part of the floating shelves: the boxes themselves. These boxes are essentially an aesthetic shell that fits snugly over the wall-mounted frames, creating the seamless “floating” effect. I started by precisely cutting my 1×12 boards to the dimensions specified in the free plans. After cutting, I added pocket holes to the appropriate edges of the boards. Since this material is 3/4-inch thick, I adjusted my Kreg Jig to the 3/4-inch setting and used 1.25-inch pocket hole screws. Correct pocket hole settings are vital for creating strong, flush joints that are easy to hide. Ensure your cuts are clean and straight for a professional finish.
The assembly of the box begins with attaching the smaller side pieces. These pieces connect the top and bottom panels of your shelf, defining its depth. Apply a generous amount of wood glue to the edges before securing with pocket hole screws. Glue is a vital component for long-term durability, preventing any potential creaking or separation over time. Use clamps to hold the pieces tightly together while you drive in the screws, ensuring a tight, gap-free joint.
Once the side pieces are firmly in place, you’ll start to see the box shape take form. Double-check that all joints are flush and square, as any misalignment here will be noticeable in the final product. A square shelf box will slide onto the frame much more easily and look professionally finished. This step is about building the initial integrity of your shelf’s aesthetic shell.
Next, I attached the long front piece, which completes the outer perimeter of the shelf box. This is where the aesthetic appeal really starts to come together. Again, wood glue and pocket hole screws are your best friends here. Align the front piece carefully with the side pieces, making sure the edges are perfectly flush. This attention to detail ensures a smooth, finished look without unsightly gaps. The Kreg Jig makes this process incredibly simple, creating strong, hidden joints from the inside.
With the front piece attached, your shelf box is nearly complete. The structural integrity provided by the pocket hole joinery is impressive, creating a solid and stable box that will endure daily use. Always remember to wipe away any excess glue with a damp cloth before it dries, as dried glue can prevent stain from absorbing evenly.
The final step in constructing the shelf box is adding the bottom 1×12 piece. This can be a little bit of a tight squeeze, especially if you have larger hands, as you’re working within the confines of the partially assembled box. However, with a bit of patience and strategic maneuvering, it’s easily manageable. If you find the space too restrictive, a few options include using a smaller, right-angle drill attachment, pre-drilling the pocket holes very carefully, or even enlisting a helper with smaller hands to assist in driving the final screws. Clamps can also be extremely helpful here to hold the bottom piece flush while you secure it. This step completes the enclosure, forming the hollow box that will later slide over your wall-mounted frame.
Finishing Touches: Staining and Distressing for Style
Once those beautiful boxes were built, it was time to add some character and color. I chose a new favorite stain color called “Ash” by Varathane, which I absolutely adore for its modern yet rustic appeal. This shade provides a sophisticated look that can complement a variety of decor styles. You can typically find Varathane products, including the Ash stain, at your local Home Depot. Before staining, it’s always a good idea to lightly sand the entire box with fine-grit sandpaper (around 180-220 grit) to ensure a smooth surface and optimal stain absorption. I applied the stain following the manufacturer’s instructions, ensuring an even coat, and then let it dry thoroughly while I moved on to attaching the frames to the wall. This allows the stain to cure properly, minimizing any risk of smudging during the final assembly.
Securely Mounting the Floating Shelf Frames to the Wall
The integrity of your floating shelves relies heavily on how securely the frames are attached to the wall. This step is critical for safety and stability. I began by locating the wall studs using a reliable stud finder. It’s imperative that your screws go directly into these studs for maximum holding power. I marked the center of each stud with a pencil, then held the frame up against the wall, using a level on top to ensure it was perfectly straight. Once the frame was level, I transferred the stud marks onto the frame itself. Then, using my drill with a small drill bit, I pre-drilled holes through the marked points on the frame. Pre-drilling is a crucial step as it prevents the wood from splitting, especially when using larger screws, and significantly eases the process of driving the screws into the wall studs.
Maintaining perfect levelness throughout the attachment process is paramount for floating shelves. I like to keep the level placed directly on top of the frame as I’m driving in the screws. This allows for real-time adjustments and ensures the frame remains perfectly straight and horizontal. Even a slight tilt can become very noticeable once the shelves are loaded with items, so this continuous checking is a small effort with a big payoff in aesthetic quality.
For robust attachment, I used 3.5-inch torx screws, which are excellent for their strong grip and reduced cam-out (stripping of the screw head). Standard wood screws of a similar length and gauge would also work effectively. To drive these long screws through the frame and deep into the wall studs, my amazingly awesome Ryobi Impact Driver was indispensable. An impact driver is a must-have tool for any serious DIYer; its powerful, rotational force makes driving long screws effortless, significantly reducing fatigue and ensuring a secure connection. I use mine frequently for various applications around the house, and it’s an incredibly powerful yet inexpensive addition to any tool collection, making tough jobs feel simple.
And there you have it – both robust braces securely attached to the wall, perfectly level and ready to support the beautiful stained shelf boxes. This foundational step is arguably the most important, ensuring the longevity and reliability of your DIY floating shelves. With these frames in place, the aesthetic part of the installation becomes much simpler and more gratifying.
Final Assembly: Sliding On and Securing the Shelf Boxes
Before attaching the stained boxes to the wall-mounted frames, I added a personal touch to enhance their character. I used my Ryobi Corner Cat sander to lightly distress the edges and corners of the boxes. This technique creates a beautifully worn, rustic look that perfectly complements the “shanty-chic” aesthetic I love. Distressing adds depth and visual interest, making the new shelves feel like they’ve been part of the home for years. It’s a small step that makes a big difference in the final look and feel of the shelves.
With the distressing complete and the stain fully dry, it was time for the satisfying moment of final assembly. I carefully fit each stained box over its corresponding wall-mounted frame. They should slide on snugly, a testament to the precise measurements and cuts made earlier. Once the box was perfectly seated over the frame, I secured it using 1.5-inch wood screws. These screws were driven through the bottom and top (or side, if preferred for concealment) of the shelf box and directly into the 2×4 frame underneath. Just like with the frame attachment, it is crucial to pre-drill holes for these screws as well. This prevents any splitting of the finished wood and ensures a clean, professional finish. Space your screws evenly for maximum hold and a polished appearance.
Once again, my trusty impact driver proved its worth for this final securing step. Its power and efficiency make quick work of driving screws, ensuring each box is firmly attached to its frame, providing a sturdy and reliable floating shelf that will hold up beautifully. The feeling of seeing the shelf come together, transforming from individual pieces of wood into a functional and stylish home accent, is truly unparalleled.
The Finished Look: Stylish and Functional Floating Shelves
DONE! The floating shelves are complete, perfectly installed, and ready to be adorned. I immediately loaded them with my favorite dishes, glassware, and a few decorative accents, and the transformation was instant. The dining room now feels elevated, organized, and effortlessly stylish. These DIY floating shelves not only provide valuable storage but also serve as a beautiful focal point, enhancing the overall aesthetic of the space. It’s incredibly satisfying to step back and admire a project that combines both form and function so seamlessly. Here are a few more shots of the finished look, showcasing how versatile and elegant these custom shelves truly are.
Thank you so much for joining me on this exciting DIY journey! It’s been a pleasure sharing the process of creating these custom floating shelves, and I truly hope this detailed guide inspires you to tackle your own home improvement projects. I cannot wait to show you the rest of the dining room as it comes together, revealing the complete vision for this refreshed space. Stay tuned for more updates and transformations!
If you found this tutorial helpful, I would LOVE for you to pin these plans and share them with all your friends and fellow DIY enthusiasts! Spreading the joy of woodworking and home customization is what it’s all about. Your support helps others discover the satisfaction of building something beautiful with their own hands. Thanks so much for being here!
Happy Building!
Whitney