
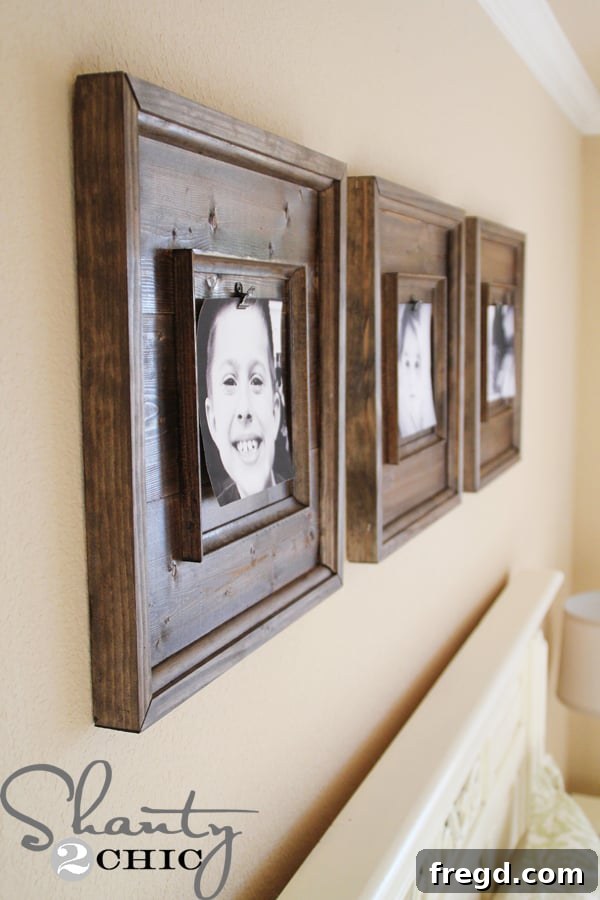
Build Your Own Beautiful & Budget-Friendly Wooden Picture Frames
Hey there, fellow DIY enthusiasts and home decor lovers! What an exciting journey it is to transform simple materials into something beautiful and functional for your home. This past weekend, I channeled my creative energy into crafting these absolutely charming and surprisingly massive picture frames. The best part? They were not only quick and easy to build, but each one cost a mere $15! Talk about getting a lot of bang for your buck!
If you’ve been looking for a budget-friendly way to add a personalized touch to your living space or perhaps a thoughtful handmade gift, then you’ve come to the right place. These rustic yet elegant wooden frames are perfect for showcasing cherished memories and can instantly elevate the aesthetic of any room. Forget expensive store-bought frames; with a few basic tools and a bit of enthusiasm, you can create custom pieces that reflect your unique style.
Why Choose DIY Picture Frames?
There’s immense satisfaction in creating something with your own hands, and DIY picture frames offer a multitude of benefits:
- Cost-Effective: As demonstrated by this project, you can achieve stunning results for a fraction of the cost of retail frames, especially for larger sizes.
- Customization: You have complete control over the size, style, wood type, and finish, ensuring the frame perfectly complements your decor and the artwork or photograph it will hold.
- Personal Touch: Handmade items add warmth and character to a home that mass-produced items often lack. Each frame tells a story, not just through the picture it holds, but also through the effort and love put into its creation.
- Skill Building: This project is an excellent opportunity to practice fundamental woodworking skills, from precise cuts to joinery and finishing techniques. It’s perfect for beginners looking to expand their DIY repertoire.
- Unique Gifts: A handmade picture frame, complete with a favorite photo, makes for an incredibly thoughtful and personal gift for friends and family.
Tools You’ll Need for This Project
Embarking on any woodworking project requires the right tools. For these DIY picture frames, while some specialized tools make the job quicker and easier, I’ll also suggest alternatives to ensure anyone can tackle this project. Safety should always be your top priority, so remember to wear appropriate eye and ear protection when operating power tools.
- Miter Saw (Compound Miter Saw Recommended): This is ideal for making precise angle cuts, crucial for the frame’s trim and moulding. A compound miter saw allows for both bevel and miter cuts, giving you versatility.
- Alternative: Hand Saw and Miter Box: Don’t own a power miter saw? No problem! For simple miter jobs like this, an inexpensive hand saw paired with a miter box will achieve excellent results. It might take a bit more effort, but the precision can be just as good.
- Kreg Jig Pocket Hole System: This ingenious tool allows you to drill strong, hidden joints quickly and easily. It’s fantastic for assembling the back panel of your frame, providing robust support without visible fasteners on the front.
- Brad Nailer (Battery-Powered Recommended): A brad nailer is incredibly useful for quickly and securely attaching trim and moulding without leaving large nail holes. A battery-powered model offers excellent portability and convenience.
- Measuring Tape and Pencil: Essential for accurate measurements and marking your cuts. “Measure twice, cut once” is the golden rule!
- Safety Glasses and Ear Protection: Non-negotiable for protecting your eyes from flying debris and your ears from loud machinery.
- Clamps: While not strictly listed, clamps are always helpful for holding pieces in place while glue dries or while fastening.
- Foam Brush: For applying wood stain evenly.
- Clean Cloths: For wiping off excess stain.
- Hot Glue Gun: For attaching the bull clips.
Materials List: Building Three Stunning Frames
This project is designed to be affordable and efficient. The following list is optimized for creating three large picture frames. Remember that wood dimensions can sometimes vary slightly, so always measure as you go!
- 2 – 1×6 inch White Wood Boards: These will form the sturdy back panel of your frames. White wood is generally affordable and takes stain well.
- 3 – 1×2 inch x 8 ft. Select Pine Boards: Used for the elegant outside trim. Select pine is chosen for its smooth finish and minimal knots, making it ideal for decorative elements.
- 17 ft. Quarter Round Moulding: This decorative moulding adds a subtle curve and professional finish around the inner edge of your frame.
- 10 ft. Cove Moulding: Another decorative moulding, the cove profile adds a concave, shadowed detail to the center of your frame.
- 1 1/4 inch Pocket Hole Screws: Specifically designed for Kreg Jig applications, these screws will create strong joints for your back panel.
- Gorilla Wood Glue (or similar strong wood adhesive): Crucial for reinforcing all joints, ensuring longevity and durability for your frames.
- Dark Walnut Wood Stain (or your preferred color/finish): To give your frames a rich, finished look.
- Bull Clips: These charming clips will hold your pictures in place, adding a unique, rustic-industrial touch. I found mine at Hobby Lobby.
- Sawtooth Hangers: For easily mounting your completed frames on the wall.
- Wall Anchors (if needed): To ensure secure hanging, especially for larger frames, depending on your wall type.
Step-by-Step Guide: Crafting Your DIY Picture Frames
Now that you have your tools and materials ready, let’s dive into the exciting part: building! Remember to take your time, measure carefully, and enjoy the process.
Step 1: Prepare the Back Panels – Cutting the 1×6 Boards
The foundation of each frame is its robust back panel. We’ll start by preparing the 1×6 white wood boards. For three frames, you will need a total of nine pieces.
Take your two 1×6 inch white wood boards and cut them into 9 pieces, each measuring 16 1/4 inches in length. Use your miter saw for these cuts to ensure they are perfectly square. If you’re using a hand saw and miter box, carefully align your board and make smooth, even cuts. Accuracy here ensures a flat and stable frame back.
Step 2: Drilling Pocket Holes for Strong Joints
Pocket holes are a game-changer for woodworking, offering incredibly strong and discreet joints. You’ll need your Kreg Jig Pocket Hole System for this step.
From your nine 1×6 boards, select six of them. For each of these six boards, drill pocket holes into both ends. The Kreg Jig system will guide you to set the appropriate depth and angle for your 1 1/4 inch pocket hole screws. Ensure the holes are drilled cleanly and accurately, as this will impact the strength and flushness of your assembled back panel.
Step 3: Assembling the Back Panel “Pallet”
Now it’s time to bring those 1×6 boards together to form the solid base for your picture frames. Each frame’s back panel will consist of three 1×6 boards.
Take one of the 1×6 boards that does not have pocket holes. This will be your central board. Then, take two of the boards with pocket holes. Align one pocket-holed board to each side of the central board. Use 1 1/4 inch pocket hole screws to join them, driving the screws from the pocket holes into the central board. Ensure your pieces are flush and square before tightening the screws. This process creates a sturdy, pallet-like structure that serves as the canvas for your frame.
Repeat this process until you have three complete back panels.
Step 4: Crafting the Elegant Outer Trim from 1×2 Pine
The outer trim defines the perimeter of your frame and adds a layer of visual interest. For this, we’ll use 1×2 inch select pine boards.
You purchased three 1×2 inch x 8 ft. select pine boards. You will need to make twelve 45-degree miter cuts, each measuring 18 inches from “long point to long point.” If you’re new to this term, “long point to long point” refers to the measurement taken from the longest edge on one mitered end of the board to the longest edge on the opposite mitered end. Because of the angle, the ends of your cut pieces will not be parallel. To achieve this, you’ll need to adjust your miter saw’s angle for each cut, sliding it from right to left (or vice-versa) to get the opposing angle for the other end of the piece. Precision here is paramount for perfectly fitting corners.
Step 5: Attaching the Outer Trim to the Back Panel
With your back panels and outer trim pieces ready, it’s time to assemble the main structure of your frames.
Apply a thin, continuous bead of Gorilla Wood Glue along the edges of your assembled 1×6 back panel where the 1×2 trim will sit. Carefully position one of your miter-cut 1×2 trim pieces, aligning the mitered corners perfectly. Once aligned, use your brad nailer to secure the 1×2 trim to the back panel. Drive brad nails approximately every 6-8 inches along the length of the trim piece. The wood glue provides strong, long-lasting adhesion, while the brad nails hold the pieces in place while the glue dries. Repeat this for all four sides of each frame, ensuring tight, flush mitered corners at every joint. For extra strength and a clean finish, you can wipe away any excess glue that squeezes out.
Step 6: Adding Decorative Moulding – Quarter Round
Now for the decorative elements that truly elevate the look of these frames! We’ll start with the quarter round moulding.
From your 17 feet of quarter round moulding, you’ll need to make twelve 45-degree miter cuts. Each piece should measure 16 1/4 inches from “long point to long point.” This size is designed to fit snugly inside the frame you’ve just built. A crucial tip for cutting moulding: you cannot use the mitered end of a scrap piece for the second cut on a new piece. Each end of a finished moulding piece needs to start with a fresh, square cut before applying the miter. This ensures accurate lengths and perfect corner joints. Take your time with these cuts for a flawless finish.
Step 7: Installing the Quarter Round Moulding
Once all your quarter round pieces are cut, it’s time to install them.
Apply a thin, even line of Gorilla Wood Glue along the inside edges of the 1×2 trim, precisely where it meets the 1×6 back panel. Carefully lay your pre-cut quarter round moulding pieces into this groove, ensuring that the 45-degree mitered corners meet perfectly. Press firmly to ensure good adhesion. You can use a few brad nails to secure it further if desired, though the glue typically holds very well. Wipe away any excess glue immediately.
Step 8: Adding Decorative Moulding – Cove Moulding
The final layer of decorative moulding is the cove moulding, which will create a central, framed effect.
From your 10 feet of cove moulding, cut twelve 45-degree miter pieces, each measuring 9 1/2 inches from “long point to long point.” Just like with the quarter round, remember the rule about making fresh cuts for each end of your moulding pieces. These shorter pieces will form a smaller square frame within the larger one, adding depth and a sophisticated touch to your design.
Step 9: Installing the Cove Moulding
With your cove moulding pieces perfectly cut, it’s time to secure them.
Apply a thin line of Gorilla Wood Glue to the back of each cove moulding piece. Carefully arrange these pieces in the center of the 1×6 back panel, forming a perfect square frame. Ensure all mitered corners meet seamlessly. Gently press them into place and allow the glue to dry completely. This might be a good time to use painter’s tape to hold them while the glue sets, or simply ensure they aren’t disturbed. The strong wood glue will create a lasting bond.
Step 10: The Art of Staining: Achieving a Rich Finish
Once all the glue has thoroughly dried and your frame structure is complete, it’s time for the magic of staining to bring out the wood’s natural beauty and give your frames their final character.
For these frames, a single coat of Dark Walnut stain was applied. Using a foam brush, apply the stain evenly over all visible wood surfaces of each frame, ensuring good coverage in all the nooks and crannies of the moulding. Allow the stain to penetrate the wood for approximately 5-10 minutes. This dwell time allows the wood to absorb the pigment. After this, take a clean, lint-free cloth and gently wipe off the excess stain. You don’t need to remove all of it; instead, use the cloth to blend the stain smoothly and achieve an even tone. If you prefer a lighter shade, wipe sooner; for a darker, richer hue, allow it to sit a bit longer before wiping. Ensure you work in a well-ventilated area and follow the stain manufacturer’s safety instructions. Once wiped, let the frames dry completely according to the product’s recommendations. For an alternative look, you could paint the frames or apply a clear protective coat instead of stain.
Step 11: Personalizing with Super Cute Bull Clips
To add a charming, functional, and slightly rustic touch, we’ll incorporate bull clips to hold your pictures.
I found these “super cute” bull clips at Hobby Lobby. Once your stained frames are completely dry and cured, take one bull clip for each frame. Using a hot glue gun, apply a generous dab of hot glue to the back of the bull clip. Carefully center the clip within the innermost square of your cove moulding and press it firmly into place. Hold it for a few seconds until the hot glue sets. The bull clips not only provide a unique way to display photos but also allow for easy swapping of pictures whenever you desire a change. Consider other hardware like small clothespins or even tiny eye hooks with string for different aesthetics.
Step 12: Displaying Your Cherished Memories
The moment of truth! Clip your favorite pictures onto the bull clips. The beauty of this design is how easily you can change out photos to suit the season, your mood, or simply update your display.
Step 13: Hanging Your Masterpiece Securely
To complete the project, ensure your beautiful new frames are securely displayed on your walls.
I used sawtooth hangers for an easy and reliable hanging solution. Attach one or two sawtooth hangers to the top back edge of each frame, ensuring they are level. For added security, especially if your walls are drywall or plaster, use appropriate wall anchors. These frames are substantial, and proper hanging hardware will prevent them from falling. Now, step back and admire your handiwork!
Customization & Creative Variations
The beauty of DIY lies in its flexibility. While these frames are stunning as is, here are some ideas to make them even more uniquely yours:
- Size and Shape: Adjust the dimensions of your 1×6 boards and trim to create frames of different sizes – from small, intimate squares to grand, rectangular showpieces.
- Wood Species: Experiment with different types of wood. Pine is cost-effective, but oak, maple, or even reclaimed pallet wood could offer entirely different textures and grains.
- Finishes: Beyond dark walnut stain, consider painting your frames a vibrant color, whitewashing them for a farmhouse look, or applying a distressed finish. A clear topcoat or lacquer will also offer added protection and a different sheen.
- Photo Display: Instead of bull clips, you could embed small clothesline wire across the opening for multiple photos, or use tiny decorative pushpins for a gallery wall effect.
- Purpose Beyond Photos: These sturdy frames could also hold small mirrors, cork boards, or even fabric swatches for an ever-changing art display.
Final Thoughts and Your Next Project
There you have it – a comprehensive guide to building your very own beautiful, budget-friendly, and completely customizable wooden picture frames! It’s truly amazing what you can create with some readily available materials and a willingness to get hands-on. These frames are more than just functional items; they are pieces of art that reflect your personal style and hold your most cherished memories.
I am absolutely in love with how these frames turned out, and at only $15 each for such substantial pieces, it’s a project that truly delivers value. I’m already planning to make more to adorn every wall in my home! I hope this detailed tutorial empowers you to embark on your own woodworking adventure.
If you enjoyed this DIY project and decide to build your own, I would absolutely love to see your creations and hear about your experience! Please feel free to share your thoughts, tips, or even photos of your finished frames. Don’t forget to spread the inspiration by pinning this project!
Thanks so much for stopping by and happy crafting!
~Ashley