
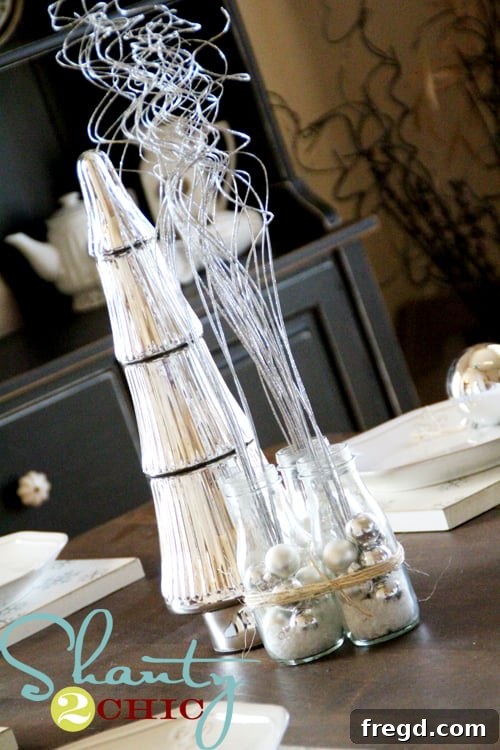
DIY Christmas Centerpiece: Transform Starbucks Bottles into Elegant Holiday Decor on a Budget
Hi friends! As the holiday season approaches, the quest for beautiful yet affordable decor becomes a cherished tradition. If you’re anything like me, you love adding a personal touch to your home without breaking the bank. Today, I’m thrilled to share a delightful and incredibly simple DIY project that will elevate your Christmas table: a stunning centerpiece crafted from humble Starbucks Frappuccino bottles. This project proves that captivating holiday decor doesn’t require a hefty investment, just a dash of creativity and a willingness to repurpose. Get ready to impress your guests with a chic, custom-made centerpiece that costs next to nothing!
Why Choose a DIY Christmas Centerpiece? The Benefits of Handmade Holiday Decor
There’s a unique satisfaction that comes with decorating your home with handmade items, especially during the holidays. Opting for a DIY Christmas centerpiece offers a multitude of benefits:
- Cost-Effectiveness: This project is a prime example of how you can achieve a high-end look without the high-end price tag. By repurposing materials and shopping smartly for accents, your budget goes a long way.
- Personalization: Store-bought decor is lovely, but nothing beats a piece that reflects your personal style and creativity. You have complete control over the colors, textures, and elements, ensuring your centerpiece perfectly complements your existing holiday theme.
- Eco-Friendliness: Upcycling glass bottles prevents them from ending up in landfills, contributing to a more sustainable holiday season. It’s a wonderful way to give new life to items that might otherwise be discarded.
- Unique Charm: Your DIY centerpiece will be one-of-a-kind, adding a distinctive charm and talking point to your festive gatherings.
- Fun and Rewarding Activity: Crafting can be a relaxing and enjoyable way to de-stress during the busy holiday season. It’s a rewarding process that culminates in a beautiful decoration you can proudly display.
The Inspiration: Repurposing Everyday Items for Festive Holiday Decor
The core of this elegant Christmas centerpiece lies in a simple, often overlooked item: the Starbucks Frappuccino bottle. These glass bottles have a lovely shape and sturdy build, making them perfect candidates for upcycling. Instead of tossing them after enjoying your favorite iced coffee treat, consider them a blank canvas for your next crafting adventure. This project is a testament to the power of repurposing, demonstrating how everyday items can be transformed into extraordinary holiday decorations with a little imagination.
My journey began, as many good projects do, with a delicious indulgence! I purchased a 4-pack of Starbucks Frappuccino bottles, knowing they would become the foundation of my inexpensive holiday project. Enjoying the contents is part of the fun, and then the real crafting begins!
Step-by-Step Guide: Crafting Your Elegant Christmas Centerpiece
Now, let’s dive into the simple steps to create this charming and budget-friendly Christmas centerpiece. You’ll be amazed at how quickly these bottles transform!
Step 1: Preparing Your Canvas – Cleaning and Stripping Labels
Once you’ve enjoyed your delightful Frappuccinos, it’s time to prepare the bottles. This step is crucial for achieving a clean, professional look for your DIY Christmas decor.
First, thoroughly rinse each bottle with warm, soapy water to remove any residual coffee and sugar. A bottle brush can be very helpful here to reach all the nooks and crannies. Rinse them again with clean water and allow them to air dry completely. Ensuring they are spotless and dry prevents any sticky residue or moisture issues later on.
Next comes the task of label removal. Starbucks labels, while pretty, aren’t designed to peel off easily. This is where a product like Goo Gone truly shines. Apply a small amount of Goo Gone directly onto the label and let it sit for a few minutes to penetrate the adhesive. Then, use a plastic scraper or even your fingernail to carefully peel and scrape away the label. Any stubborn residue can be removed with a bit more Goo Gone and a paper towel. Once the labels are gone, wash the bottles one last time with soap and water to remove any Goo Gone residue, ensuring they are perfectly clean and smooth for decorating.
Step 2: Infusing Festive Charm – Ornamentation and Sparkle
Now for the fun part: adding a little decor! This is where you can truly let your personality shine and create a centerpiece that reflects your unique style. I opted for a classic and elegant look, but the possibilities are endless.
I found these adorable “baby ornaments” at Michael’s, and they were an absolute steal at 50% off, making the entire box only $3! Small, lightweight ornaments are perfect for this project as they fit easily into the bottle openings and add just the right amount of festive sparkle. Look for miniature baubles, tiny pinecones, or small decorative beads. Craft stores are treasure troves for these kinds of accents, especially during holiday sales.
In addition to the ornaments, I incorporated some glittery stems, also from Michael’s. These were an incredible find, costing less than a dollar after the 50% sale! Glittery stems add height, texture, and a touch of glamorous shimmer to the arrangement. They catch the light beautifully and create a dynamic visual element. When selecting your stems, consider varying heights and textures to create visual interest. You could also use small sprigs of artificial berries, miniature pinecones on a wire, or even tiny faux flowers to match your holiday theme.
Step 3: A Winter Wonderland Touch – Adding Faux Snow
To truly capture a magical winter aesthetic, adding a touch of fake snow is a game-changer. This simple addition instantly transforms the bottles into miniature snow globes, adding texture and a dreamy, frosted look to your DIY Christmas centerpiece.
Carefully pour a small amount of fake snow into each bottle. You can use a funnel to make this process easier and prevent spills. There are various types of faux snow available – from fine iridescent flakes that shimmer gently to chunkier, more realistic snow that mimics freshly fallen powder. Choose the one that best suits your desired look. The snow will settle at the bottom, creating a whimsical base for your ornaments and stems. It also cleverly disguises the bottoms of your decorative elements, making the entire display look more cohesive and enchanting.
Add a little fake snow to each bottle, creating a charming winter scene within.
Step 4: Unifying the Elements – The Twine Finish
With your bottles filled and sparkling, the final step is to bring them all together into a cohesive display. Tying the bottles with twine adds a rustic, charming touch that beautifully contrasts with the glittery elements inside.
Arrange your bottles in a cluster, deciding on the best configuration for your table. I typically go for a linear arrangement with a slight variation in height if using different sized stems. Once satisfied with the arrangement, take a length of natural twine and wrap it several times around the cluster of bottles. Tie a neat bow or a secure knot to hold them firmly together. The twine not only provides structural integrity but also introduces an organic, textural element that enhances the overall aesthetic. For a different look, you could use a festive ribbon in red, silver, or gold, or even a piece of burlap for a more farmhouse-inspired feel. The goal is to create a unified and visually appealing ensemble.
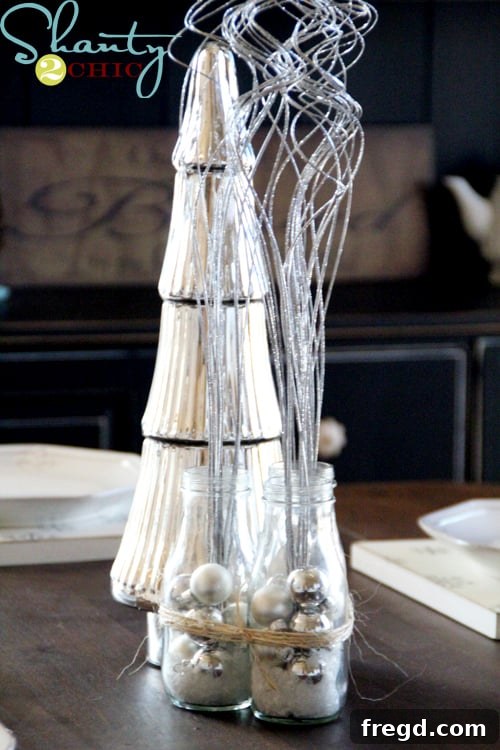
Styling Your Centerpiece: Beyond the Bottles
A beautiful centerpiece isn’t just about the main attraction; it’s also about how you style it within its environment. To complement these adorable, upcycled bottles, I paired them with a striking silver Christmas tree that I discovered at TJMaxx. The metallic sheen of the tree beautifully echoed the glittery elements in the bottles and added a modern, sophisticated touch to the festive display.
When styling your own centerpiece, think about what other elements can enhance its beauty without overshadowing it. Consider adding a festive table runner beneath your bottles, perhaps in a complementary color or with a subtle pattern. Fairy lights woven around the base or tiny LED candles can add a warm, inviting glow, especially during evening gatherings. Pinecones, fresh evergreen sprigs, or even a scattering of metallic confetti can further enhance the holiday magic. The key is to create layers of interest that draw the eye and make your table feel truly special.
Customization and Personalization Tips for Your Holiday Decor
While this specific design features a silver and white theme, the beauty of DIY lies in its adaptability. Don’t feel limited by my choices! Here are a few ideas to personalize your Starbucks bottle Christmas centerpiece:
- Color Schemes: Instead of white and silver, consider red and green for a traditional look, or perhaps blues and silvers for a frosty, elegant feel. You could even paint the bottles themselves with metallic spray paint for a completely different base.
- Filler Alternatives: Experiment with different fillers inside the bottles. Small cranberries and water, tiny fairy lights, pine needles, or even cinnamon sticks could create unique effects.
- Bottle Variations: While Starbucks bottles are fantastic, other glass bottles (like those from sparkling cider, juice, or even wine) could also be adapted. Just ensure they are thoroughly cleaned.
- Themed Accents: Match your ornaments and stems to a specific theme. Think woodland creatures for a rustic look, glittery snowflakes for a winter wonderland, or bright, playful baubles for a whimsical display.
- Beyond Christmas: These repurposed bottles aren’t just for Christmas! You could easily adapt them for other seasons or occasions by changing the internal decor – perhaps fresh flowers for spring, sand and shells for summer, or dried leaves and tiny pumpkins for fall.
Budget-Friendly Decorating: Smart Shopping for the Holidays
One of the most appealing aspects of this project is its incredible affordability. By leveraging sales and repurposing items, you can create stunning decor without a significant financial outlay. My ornaments and glittery stems were purchased at 50% off during a sale at Michael’s, making them incredibly cheap. Here are some tips for smart holiday decorating:
- Shop Sales: Always keep an eye out for seasonal sales at craft stores like Michael’s, Hobby Lobby, or Jo-Ann Fabrics. After-Christmas sales are also perfect for stocking up on next year’s supplies.
- Dollar Stores: Don’t underestimate the power of dollar stores! You can often find small ornaments, ribbons, faux snow, and other embellishments for a fraction of the cost.
- Thrift Stores: Secondhand stores can be a goldmine for unique vases, decorative items, or even materials you can repurpose.
- Use What You Have: Look around your home. Do you have old ribbons, spare buttons, or natural elements like pinecones from your yard? Many beautiful decorations can be made from items you already own.
- Coupons: Sign up for email lists from craft stores to receive coupons, which can significantly reduce the cost of your purchases.
Conclusion: Embrace the Joy of Handmade Holiday Decor
This was super easy to make, incredibly rewarding, and cost almost nothing! It’s a testament to the fact that with a little imagination, you can transform everyday items into truly special holiday decorations. The joy of creating something beautiful with your own hands, especially for such a special time of year, is immeasurable. I hope this project inspires you to look at everyday objects with fresh eyes and discover the endless possibilities for DIY decor. Give it a try, and let your creativity shine this holiday season!
Thanks so much for stopping by and happy crafting!
~Ashley