
Build Your Own: The Easiest DIY Modern Square Coffee Table
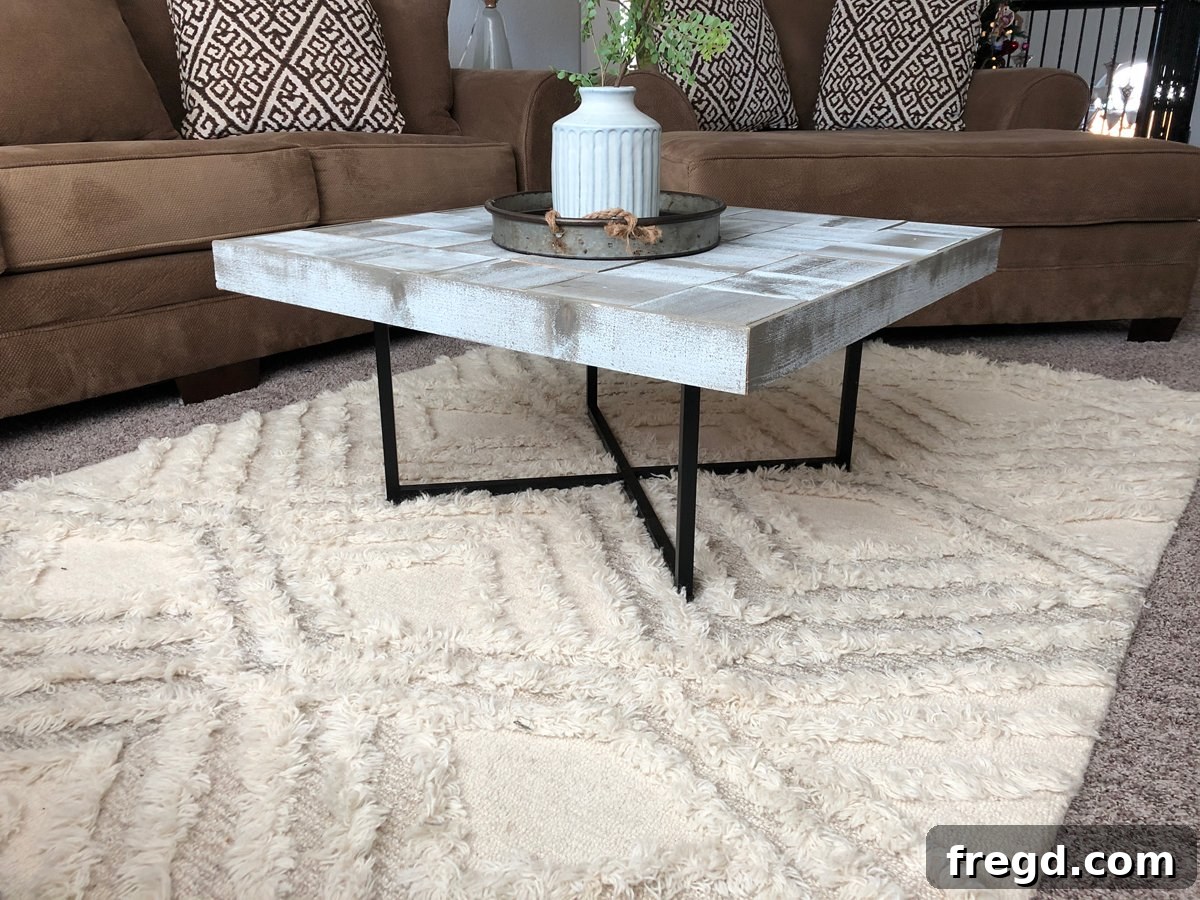
Hey friends! A few weeks ago, we had an absolute blast helping our sister decorate and furnish her fantastic new home, especially her charming upstairs loft space. Among the many exciting projects we tackled, we set out to create a unique centerpiece for her living area. We ended up building what might just be the cutest, most functional, and certainly the easiest DIY square coffee table you’ll ever encounter! We knew a square design would fit perfectly within her loft’s layout, providing both style and ample surface area, and we couldn’t be happier with the outcome.
For this project, we discovered an incredibly stylish and surprisingly affordable metal base on Amazon. This base truly inspired the modern industrial aesthetic of our coffee table. While the product typically includes its own top, we decided to use only the base, allowing us the creative freedom to craft a custom wooden top that perfectly matched our sister’s unique decor vision. You can find the exact metal base we used for this project and start your own creation HERE!
Before we dive into the detailed, step-by-step instructions, we highly recommend watching our comprehensive video tutorial. It offers invaluable visual guidance that complements these written plans perfectly, helping you envision each stage of the build.
Watch our step-by-step video guide to see exactly how we built this simple square coffee table!
This truly is one of the most straightforward woodworking projects, yet it yields a stunning piece of furniture that looks professionally made. The design is also incredibly versatile, allowing for extensive customization to fit seamlessly into virtually any interior design style. Whether you envision a modern minimalist piece, a rustic farmhouse accent, or an industrial statement, this table can be adapted to your taste. To help you get started with the tabletop construction, we’ve provided a free, printable plan that you can download HERE.
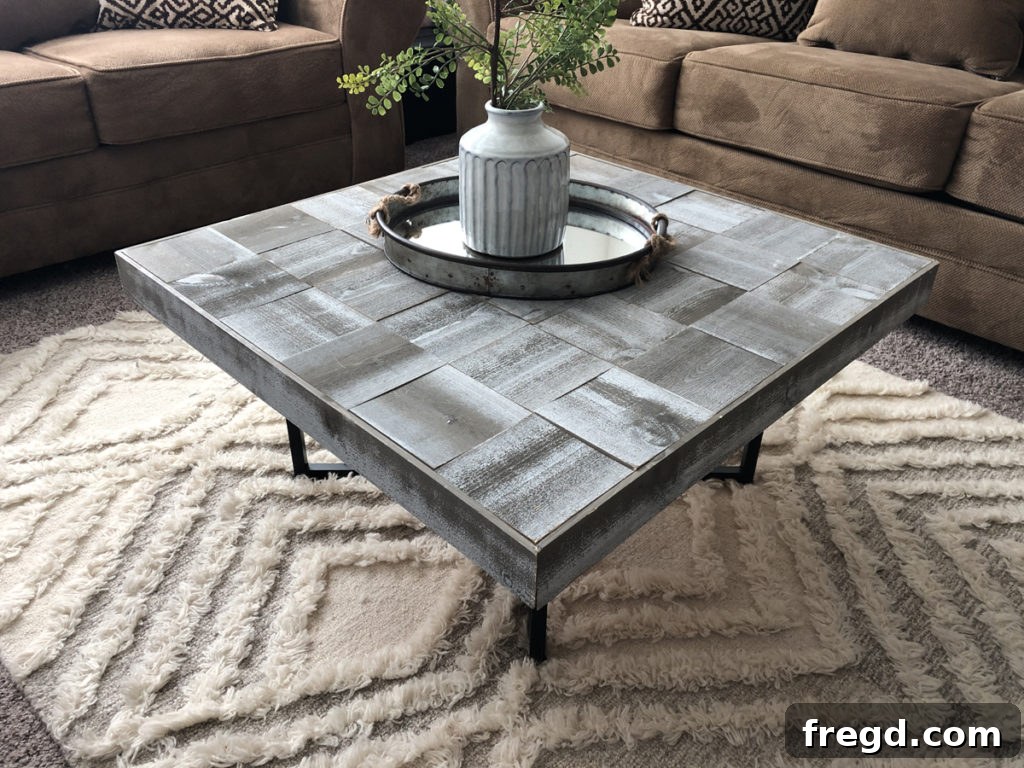
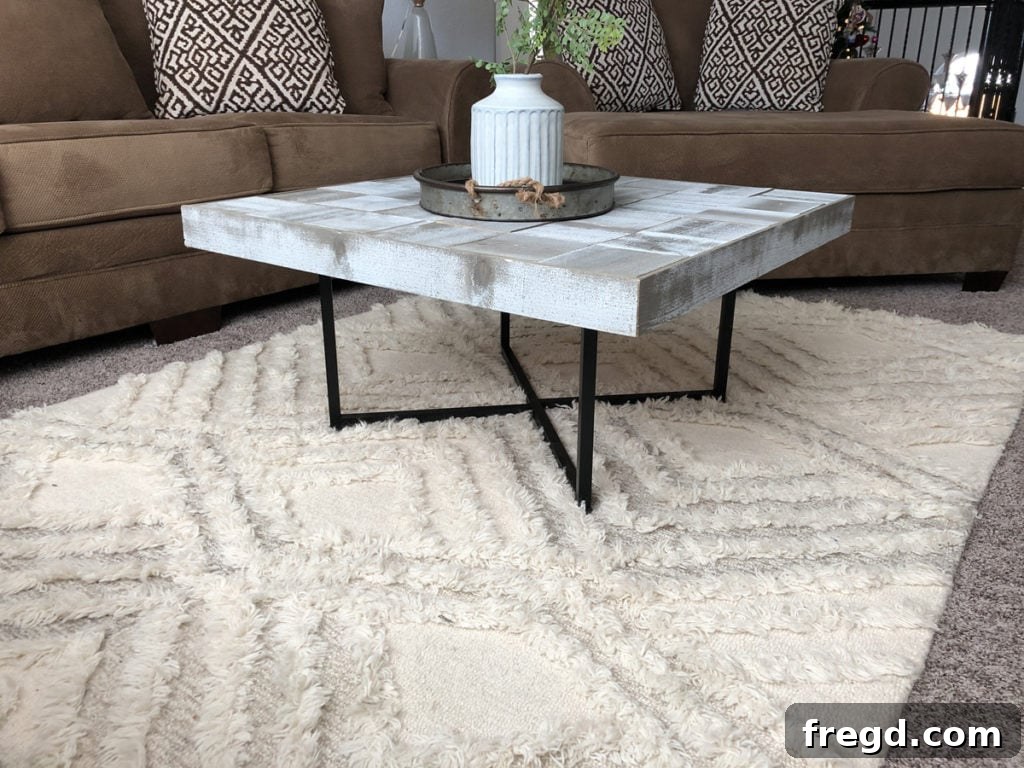
Table of Contents
Why Choose a DIY Square Coffee Table?
Building your own coffee table, especially a square design, offers a wealth of advantages that extend far beyond simple cost savings. A square coffee table is a remarkably versatile piece of furniture, capable of complementing diverse living room layouts. It’s particularly ideal for optimizing space in cozy corners, serving as a functional anchor with sectional sofas, or acting as a stylish central piece that encourages conversation and accessibility from multiple seating arrangements. For spaces like our sister’s new loft, a square design provided optimal use of space, allowing for easy movement around it while still offering an ample surface area for decor, beverages, and daily essentials.
Moreover, embracing a DIY project like this grants you complete creative control over every detail of your furniture. You get to select the precise type of wood, the exact dimensions to fit your space, and the perfect stain or paint color to match your existing interior palette. This level of personalization ensures that your new coffee table isn’t just another mass-produced item, but a truly unique reflection of your personal style. It becomes a bespoke piece that seamlessly integrates with your home decor, telling a story of craftsmanship and thoughtful design. Beyond the aesthetic and functional benefits, there’s an incredible sense of satisfaction and pride that comes from crafting something beautiful and functional with your own hands.
Materials and Tools You’ll Need
To ensure a smooth and enjoyable building experience, it’s always best to gather all your materials and tools before you begin. Having everything organized and within reach will make each step of this DIY coffee table project more efficient and less stressful.
Materials List:
- 3/4-inch Plywood: The foundation of your tabletop. Cut it to your desired square dimensions (e.g., 33″ x 33″ for our project). Opting for a standard grade is often sufficient and cost-effective.
- 1×6 Boards: These will form the decorative square pattern on your tabletop. You’ll need enough to cover your plywood base, cut into 5.5″ x 5.5″ squares. Pine is an excellent, affordable, and easy-to-work-with choice that takes stain beautifully.
- 1×3 Boards: Used for the protective and decorative trim around the tabletop. You’ll need two pieces cut to approximately 33″ long and two pieces cut to approximately 34.5″ long. These can be optionally ripped down to 2.5″ wide for a sleeker look.
- Wood Glue: A high-quality wood glue is essential for strong, lasting bonds between your wood pieces.
- 1.25-inch Brad Nails: Used with a brad nailer to secure pieces while the glue dries, adding structural integrity.
- Wood Stain or Paint: Your choice of color and finish to customize the look of your table.
- Wood Sealer or Polyurethane: A protective topcoat is crucial for durability, guarding against spills, scratches, and daily wear.
- Sandpaper: Various grits (e.g., 120-grit for initial smoothing, 180-grit for refining, and 220-grit or higher for a super smooth finish) are needed for preparation.
- Clean Rags or Brushes: For applying stain, paint, and sealer evenly.
- Metal Coffee Table Base: Or any alternative legs/base that suits your style. We highly recommend our Amazon pick for its modern appeal and affordability, found HERE.
- Screws: Appropriate size for securely attaching your chosen base to the wooden tabletop.
- Wood Putty (Optional): For filling any nail holes or minor imperfections before sanding and finishing.
Essential Tools:
- Circular Saw or Table Saw: For accurately cutting plywood and boards to size. Always prioritize safety with these tools!
- Miter Saw: Ideal for making precise crosscuts on your square pieces and trim boards, ensuring clean edges.
- Brad Nailer: (Electric or pneumatic) for quickly and securely attaching pieces with brad nails.
- Measuring Tape: For all your precise measurements.
- Pencil: For marking cuts and layouts.
- Carpenter’s Square: To ensure all your angles are perfectly square.
- Clamps: Invaluable for holding pieces firmly in place while wood glue sets, ensuring tight bonds.
- Orbital Sander: (or a sanding block for manual sanding) essential for smoothing wood surfaces before finishing.
- Safety Glasses and Ear Protection: Absolutely critical for personal safety when operating power tools.
- Drill: For pre-drilling pilot holes and attaching the metal base with screws.
Step 1: Preparing the Plywood Base
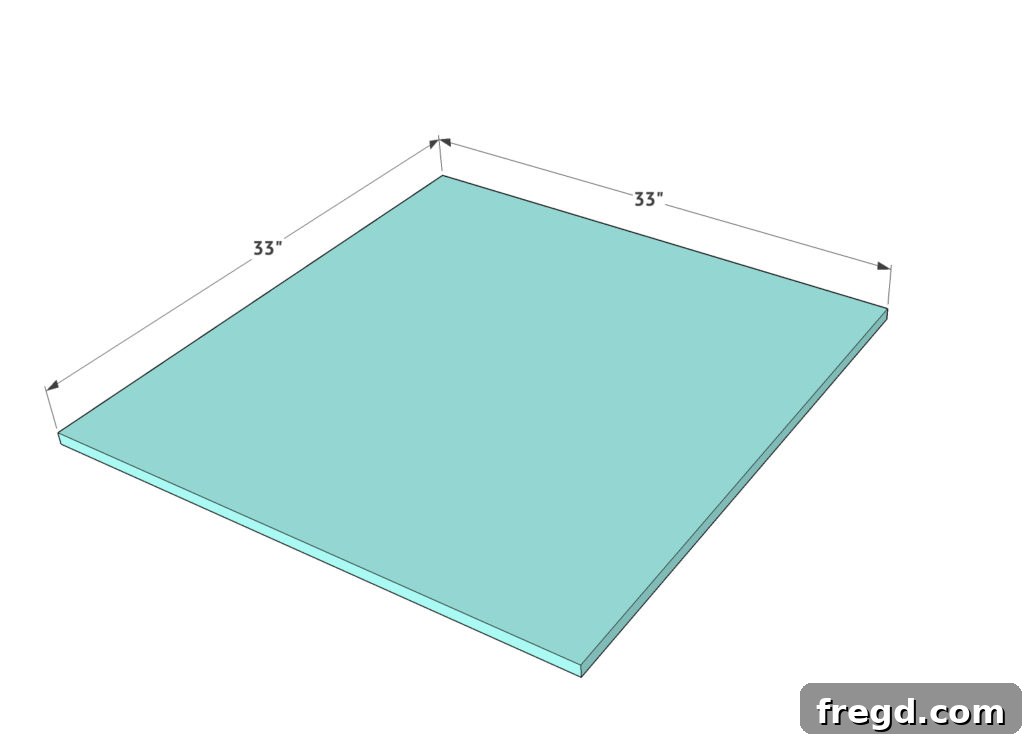
The journey to your beautiful DIY coffee table begins with a solid foundation: the plywood base. For this particular project, we opted for 3/4-inch plywood. This thickness strikes a perfect balance, providing excellent structural stability and durability without making the tabletop excessively heavy or cumbersome. We chose the most affordable plywood available at our local hardware store, demonstrating that you don’t need expensive materials to achieve a high-quality, custom look. The crucial element here is ensuring your plywood is cut precisely to your desired tabletop dimensions.
For a true square coffee table, your plywood piece should have equal length and width. For our design, we used a 33-inch by 33-inch piece. If you don’t own a table saw or circular saw, or simply prefer to save time, most hardware stores offer cutting services. This is a fantastic option to ensure perfectly straight and accurate cuts, which are vital for the overall structural integrity and aesthetic appeal of your finished table. Once you have your precisely cut plywood, take a moment to lightly sand all the edges. This removes any potential splinters or rough patches, preparing the base for the subsequent layers and making it safer to handle.
Step 2: Crafting and Attaching the Square Boards
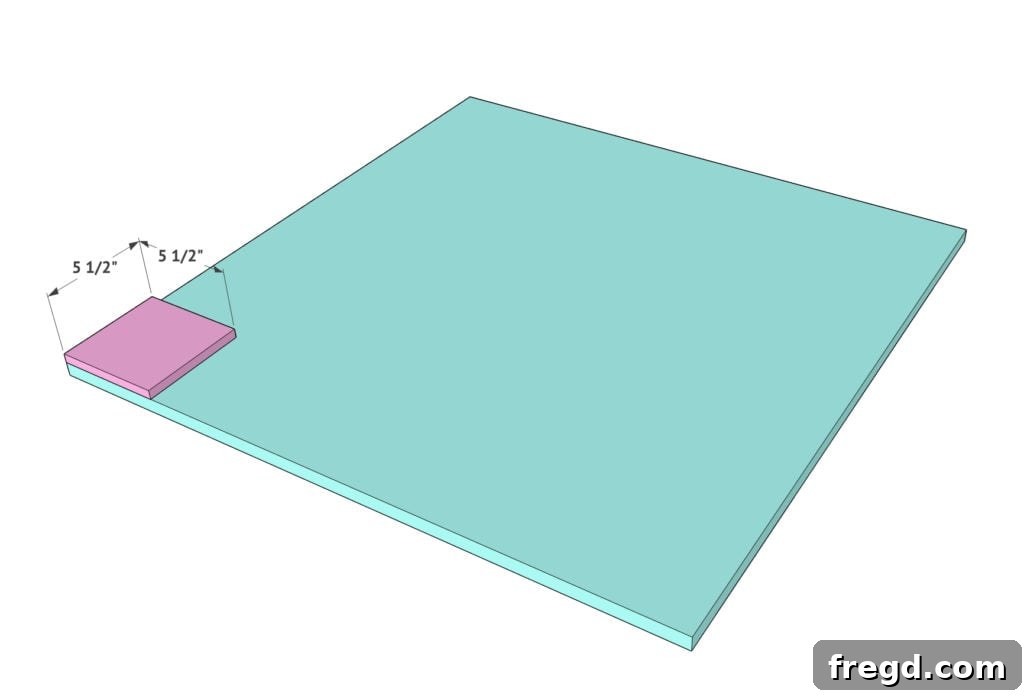
This is the step where your coffee table truly begins to take on its distinctive, patterned character. The top surface of the table is constructed from individual 1×6 boards, each carefully cut into 5.5-inch by 5.5-inch squares. The true beauty of this design lies in its incredible versatility when it comes to material choice. While we opted for readily available and budget-friendly 1×6 pine boards—which are easy to work with and beautifully absorb stain—you have the freedom to experiment. Consider using different wood types such as oak, maple, or even salvaged wood for a more bespoke, rustic, or vintage appeal. Each wood type will offer a unique grain, color, and texture, allowing for deep personalization.
Begin by using your miter saw or circular saw to accurately cut all your 1×6 boards into the specified 5.5-inch squares. Precision at this stage is absolutely crucial; even minor variations in size can lead to noticeable gaps or unevenness in your final tabletop surface. Once cut, it’s a good practice to arrange your squares on the plywood base in a dry run. This allows you to visualize the pattern, adjust any pieces, and ensure you have enough squares to cover the entire base. When you’re satisfied with the layout, start attaching the squares. Apply a consistent, but not overly excessive, amount of wood glue to the back of each square. Carefully position the square onto the plywood, ensuring it’s perfectly flush with the edges of the base and aligned seamlessly with its neighboring pieces. To provide strong, immediate hold while the glue cures, secure each square with a few 1.25-inch brad nails, strategically placed to minimize visibility. Promptly wipe away any excess glue that squeezes out with a damp cloth to maintain a clean finish.
Step 3: Completing the Square Pattern
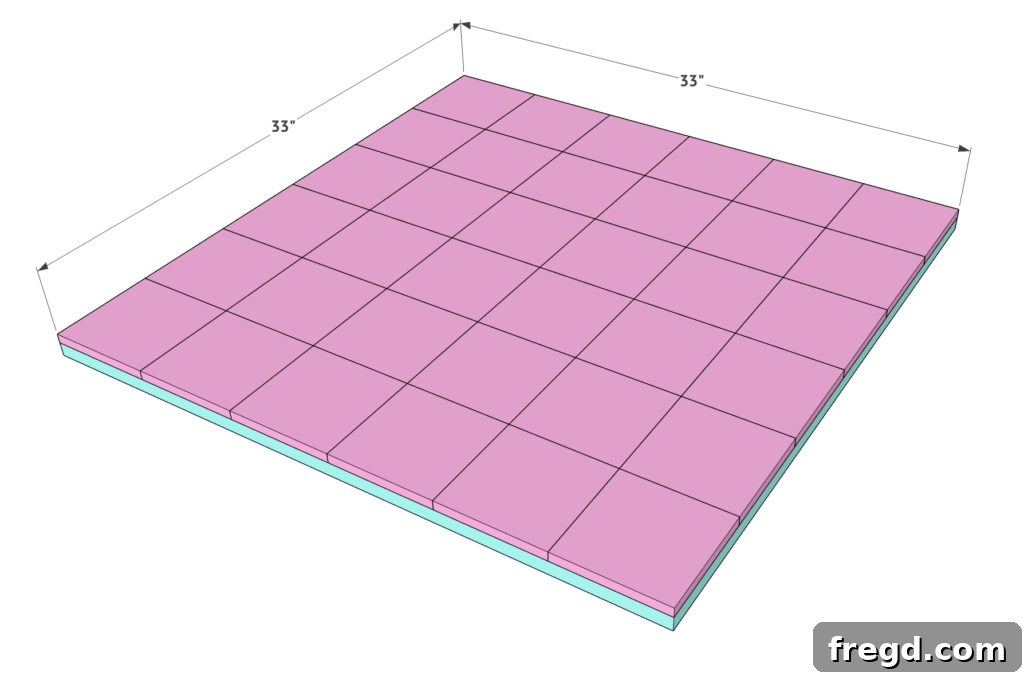
Continue the meticulous process of attaching the remaining square boards to the plywood base. This particular step demands both patience and a keen eye for detail. Work systematically across your tabletop, whether you choose to go row by row or in designated sections, to maintain a high level of consistency in your pattern. The ultimate goal here is to achieve a flawlessly seamless surface. To do this, it is absolutely critical to ensure that each individual board is perfectly flush with its adjacent pieces, and that there is no visible spacing whatsoever between any of the squares. Even minor gaps can disrupt the visual flow and accumulate dust or debris over time.
As you progress, periodically run your hand gently over the surface of the squares. This tactile check will help you detect any slightly raised edges or subtle gaps that might need immediate adjustment before the glue sets permanently. For enhanced stability, particularly if you are working with wood pieces that have slight natural warps, using woodworking clamps can be incredibly beneficial. Apply gentle pressure with clamps to hold the squares firmly in place while the wood glue begins to set and cure, ensuring a tight and robust bond. Take your time to carefully align each piece precisely before securing it with brad nails. A consistently installed pattern not only contributes significantly to a professional and polished aesthetic but also provides a wonderfully smooth and level surface, essential for any functional coffee table. Once all the squares are securely attached across the entire tabletop, it is imperative to allow the wood glue ample time to dry completely according to the manufacturer’s specific instructions, typically several hours or ideally overnight. This thorough curing period is absolutely crucial for establishing the long-term durability and structural integrity of your beautifully patterned tabletop.
Step 4: Adding the First Trim Pieces
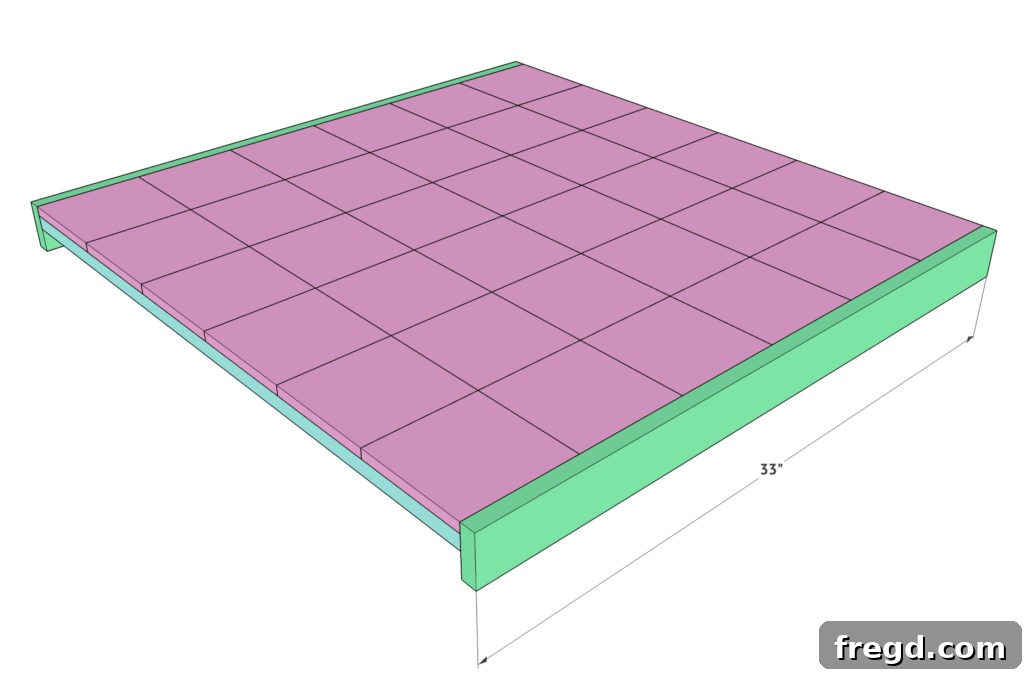
Now, we move on to adding the sophisticated finishing touch that truly elevates the overall appearance of your coffee table: the trim! For this project, we selected 1×3 boards. To achieve a more refined and streamlined look, we opted to rip these boards down to a precise 2.5 inches wide using a table saw. This step creates a cleaner, more tailored edge profile that enhances the modern aesthetic. However, if you don’t have access to a table saw, using standard 1×3 boards as they come will still provide an excellent finish and look great. The trim serves a dual purpose: it effectively conceals the exposed edges of the plywood base, creating a seamless transition, and it also imparts a substantial, framed appearance to the entire tabletop, giving it a more robust and finished feel.
Begin by cutting two of your 1×3 boards (or your pre-ripped 2.5-inch wide pieces) to a length of 33 inches each. These two pieces are designated for the opposite ends of your square tabletop. Before you permanently attach them, perform a dry fit to ensure they sit snugly and accurately along the edges. Next, apply a generous, continuous bead of wood glue along the exposed edge of the plywood and the outer edge of the square top where the trim will be positioned. Carefully place the first trim piece, ensuring it is perfectly flush with both the top surface of the wood squares and the side edge of the plywood base. Once positioned, secure it firmly in place using 1.25-inch brad nails, spacing them approximately every 6 to 8 inches for even distribution and strong hold. Repeat this exact process for the second 33-inch trim piece on the opposite side of the tabletop. To prevent any movement while the glue begins its curing process and to ensure the tightest possible bond, it’s highly recommended to use woodworking clamps to hold the trim pieces securely against the tabletop until the glue has partially set.
Step 5: Securing the Final Trim
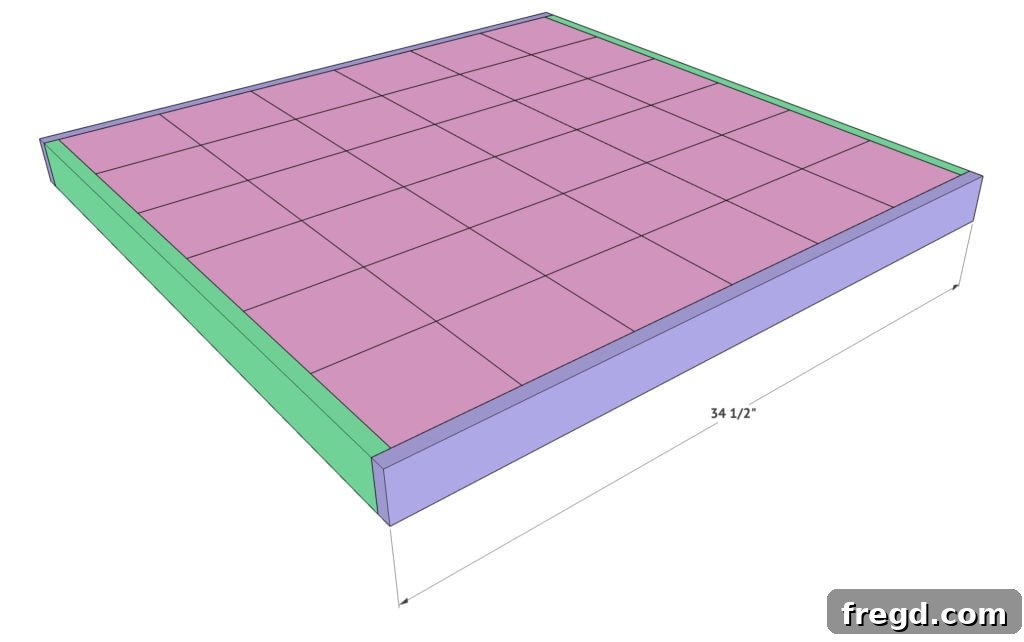
With the first two trim pieces now securely in position and adding structure, it’s time to complete the elegant frame around your coffee tabletop. For this concluding step of the trim installation, you will need to cut two additional 1×3 boards (or your 2.5-inch ripped pieces) to a length of 34.5 inches each. The slightly increased length of these final pieces is specifically designed to account for the thickness of the trim pieces you’ve already installed on the opposing sides. This ensures that when they are attached, they will meet perfectly, creating either a perfectly mitered corner (if you chose that style) or a clean, tight butt joint, depending on your preferred joinery. For the most seamless and robust appearance, we recommend butting these pieces snugly against the ends of the previously installed trim.
Apply a continuous bead of wood glue to the remaining exposed edges of the plywood base and the end grain of the first two trim pieces. Carefully position these two 34.5-inch trim pieces. It is crucial to ensure they are perfectly flush with the top surface of your square wooden top and that they form tight, clean corners where they meet the previously installed trim. Once accurately aligned, secure these final trim pieces firmly with 1.25-inch brad nails, maintaining the consistent spacing you used for the earlier trim pieces. With all four trim pieces now attached, your tabletop will boast a fully enclosed, beautifully framed, and polished appearance. It’s imperative to allow all the wood glue to cure completely and thoroughly before you proceed to any sanding, staining, or painting. A well-constructed trim not only significantly enhances the visual appeal of your DIY coffee table but also provides crucial protection to the edges of both your plywood base and the decorative square wood pieces from everyday wear and tear, ensuring its longevity and enduring beauty.
Finishing Your Coffee Table: Stain, Paint, & Protection
Once the construction of your tabletop is complete and you’ve allowed all the wood glue ample time to dry and cure thoroughly, it’s time for arguably the most exciting part: bringing your table to life with a beautiful finish! This is where your unique personal style and creativity truly get to shine through. The first and most critical step in achieving a professional-looking finish is thorough sanding. Begin by using 120-grit sandpaper to effectively smooth out any minor imperfections, level any uneven joints, and prepare the wood. If you’ve used wood putty to fill nail holes, ensure it’s fully dry before sanding. Follow this with 180-grit sandpaper for further refinement, and then conclude with 220-grit sandpaper (or even finer) for an incredibly smooth and luxurious feel. Always remember to sand diligently with the grain of the wood to prevent scratches, and after each grit, meticulously clean off all sanding dust using a tack cloth or a shop vacuum before moving to the next stage.
Staining Techniques:
If your vision for the coffee table leans towards a natural, warm wood aesthetic, then a wood stain is an excellent choice. Select a stain color that complements your home decor – lighter stains can evoke a modern, airy, or Scandinavian feel, while darker stains can create a rich, traditional, or striking industrial look. Apply your chosen stain according to the manufacturer’s specific instructions, typically using a clean rag, foam brush, or bristle brush. Work in small sections, wiping off any excess stain after a few minutes to control the depth of color. For softwoods like pine, consider applying a pre-stain conditioner beforehand. This helps to ensure a more even absorption of the stain and prevents unsightly blotchiness, resulting in a more uniform and professional finish.
Painting for a Solid Finish:
For those who prefer a vibrant solid color or a crisp, opaque finish, paint is the ideal option. To ensure optimal adhesion and a smooth, even color, it’s often advisable to apply a coat of wood primer first, especially when working with pine, which can sometimes have a tendency to bleed sap or show grain through lighter paints. Choose an interior paint that is specifically designed for furniture and high-traffic areas, opting for a durable finish such as satin, semi-gloss, or even a low-sheen matte, all of which are easier to clean and more resistant to daily wear. Apply several thin, even coats of paint, allowing adequate drying time between each coat as recommended by the paint manufacturer. Thin coats build up to a much smoother and more durable finish than one thick, heavy coat.
Sealing and Protection for Durability:
Regardless of whether you choose to stain or paint your coffee table, applying a high-quality sealer is an absolutely crucial step for ensuring its long-term durability and protection. A good quality polyurethane, lacquer, or even a tough water-based topcoat will create a robust barrier, safeguarding the wood from common household hazards like spills, minor scratches, and the general wear and tear of daily use. Apply several thin, even coats of your chosen sealer. For an incredibly smooth, professional-grade finish, lightly sand the entire surface with a very fine-grit sandpaper (220-grit or higher) between each coat. This subtle sanding creates a mechanical bond for the next coat and knocks down any dust nibs. Always adhere strictly to the product’s drying and recoating time recommendations. This protective layer is what will make your beautifully crafted DIY square coffee table not just a stunning piece of decor, but also a highly functional, resilient, and long-lasting centerpiece for many cherished moments to come.
Attaching the Metal Base
With your beautifully finished tabletop now dry and ready, the final structural step is to securely attach the metal base, bringing your DIY coffee table to its full, functional glory. The metal base we recommended from Amazon, and similar products, typically come equipped with pre-drilled holes and often include the necessary hardware for attachment, simplifying this process greatly. To begin, carefully flip your finished tabletop upside down and place it on a clean, protected surface, such as a moving blanket or soft cloth, to prevent any scratches to your new finish.
Next, gently position the metal base squarely onto the underside of the tabletop. It’s essential to ensure that the base is perfectly centered, both visually and dimensionally. Use a tape measure to verify that the base is equidistant from all four edges of the tabletop; this meticulous centering will ensure the table looks balanced and stable. Once you have the base precisely positioned, use a pencil to mark the locations of all the pre-drilled holes from the metal base onto the wooden underside of your tabletop. This step is crucial for accurate placement.
Before you insert any screws, it is highly recommended to pre-drill pilot holes into the wood at each marked location. Use a drill bit that is slightly smaller in diameter than the screws you will be using. Pre-drilling is a vital step that prevents the wood from splitting, especially when you are drilling close to the edges of the plywood or trim pieces. Finally, secure the metal base to the tabletop using the provided screws or appropriately sized wood screws. Tighten them firmly to ensure a stable connection, but be cautious not to over-tighten, which could strip the wood and compromise the hold. After carefully securing the base, gently flip your newly constructed DIY square coffee table upright, stand back, and admire your impressive handiwork! It’s now ready to be a stunning focal point in your home.
Customization Ideas for Your Square Coffee Table
The true beauty and immense satisfaction of building your own furniture lie in the virtually endless possibilities for customization. While we’ve provided you with a guide to create a simple, elegant, and modern industrial design, we strongly encourage you to unleash your creativity and infuse your unique personality into this DIY square coffee table. Here are some inspiring ideas to put your own spin on this project:
- Experiment with Different Wood Species: Instead of standard pine, consider using hardwoods like oak, walnut, cherry, or even exotic woods for a richer, more luxurious feel. Reclaimed barn wood or pallet wood could also add incredible character, texture, and a charming rustic appeal, making your table truly one-of-a-kind.
- Explore Alternate Patterns for the Top: While our design features a simple, clean grid, you could arrange the 5.5-inch square pieces in a variety of other captivating patterns. Think about a diagonal checkerboard, a subtle brick-like offset, or even a more intricate geometric design for a truly unique aesthetic.
- Implement a Two-Tone Finish: Get creative with contrasting finishes! For example, you could stain the central square pieces a deep, rich color and then paint the surrounding trim a crisp, contrasting white or a bold black for a dramatic and contemporary look. This creates visual interest and highlights the table’s structure.
- Embrace Distressing Techniques: If you’re aiming for a farmhouse, shabby chic, or vintage industrial vibe, consider distressing the finished wood. This can be achieved by lightly sanding edges, strategically scraping paint, or using a wire brush to create texture. Always seal it afterward to protect the distressed look.
- Integrate Additional Storage: While this specific design is minimalist, you could adapt it to include a small, discreet shelf underneath. This might involve integrating additional wooden supports and a smaller piece of plywood or a few slats just below the tabletop and above the metal base, perfect for magazines or remote controls.
- Select Different Base Styles: If a metal base doesn’t quite align with your personal style, the options are plentiful. You could build custom wooden legs, opt for sleek hairpin legs to achieve a mid-century modern look, or even scour flea markets for a unique vintage base that can be repurposed.
- Adjust Dimensions for Functionality: Don’t feel confined to our suggested dimensions. Easily scale the length and width up to create a larger, grander statement piece for a spacious living room, or scale it down to craft a charming, more intimate side table or bedside table.
Let your imagination run wild! This DIY coffee table project serves as a fantastic blank canvas for your personal style and creative vision. The only limit is your imagination!
Maintenance and Care for Your Wooden Coffee Table
To ensure that your beautiful, custom-built DIY square coffee table remains a cherished focal point and a functional piece in your home for many years to come, a little proactive care and consistent maintenance are essential. Wood furniture, especially items that see frequent use like a coffee table, will greatly benefit from regular attention and proper protective measures:
- Regular Cleaning and Dusting: Make it a habit to dust your coffee table at least once a week using a soft, dry, lint-free cloth. For any spills, particularly liquids, wipe them up immediately with a slightly damp cloth and then thoroughly dry the surface to prevent water marks or damage. Avoid using harsh chemical cleaners, as these can strip the protective finish and potentially damage the wood itself. A mild soap and water solution is usually sufficient for tougher spots, always followed by a good drying.
- Protect from Moisture and Heat: This is arguably one of the most important tips. Always use coasters for drinks (hot or cold) and trivets or hot pads for any warm dishes or containers. Direct exposure to moisture can lead to unsightly water rings, swelling, or even warping of the wood, while excessive heat can cause discoloration, bubbling of the finish, or permanent damage.
- Avoid Direct Sunlight Exposure: Prolonged and direct exposure to intense sunlight can cause the wood to fade unevenly, change color, or even dry out over time. If possible, position your coffee table away from direct sunbeams, or utilize blinds or curtains during peak daylight hours to minimize exposure.
- Maintain Consistent Humidity Levels: Wood is a natural, hygroscopic material, meaning it absorbs and releases moisture, causing it to expand and contract with fluctuations in humidity. Maintaining a relatively consistent humidity level in your home (ideally between 40-50%) can significantly help prevent issues like cracking, splitting, or warping of the wood, especially in climates with extreme seasonal changes.
- Periodic Re-sealing or Waxing: Over time, the protective sealer or topcoat on your coffee table will naturally wear down, particularly in areas that experience high contact or traffic. Depending on the level of use, you might consider reapplying a thin coat of polyurethane, a furniture wax, or a furniture polish every few years. This will refresh the protection, restore the shine, and help maintain the table’s original beauty.
- Gentle and Mindful Use: While your handcrafted table is sturdy, it’s wise to avoid dragging heavy items across its surface, which can cause scratches, or using it as a stepping stool. Treat your table with the care and respect it deserves as a custom-built, functional piece of art.
By diligently following these simple yet effective care tips, your custom-built wooden coffee table will retain its beauty, functionality, and structural integrity for countless cherished moments and many years to come, truly becoming a timeless piece in your home.
Conclusion
And there you have it – a truly stunning, custom-built DIY square coffee table that’s not only incredibly stylish but also a magnificent testament to your own crafting skills and determination! We genuinely hope this comprehensive and detailed guide has empowered you to tackle this project with unwavering confidence and immense pride. There’s an unparalleled and deeply rewarding experience that comes with creating functional and beautiful furniture with your own hands, offering both practical savings and the profound joy of personally enhancing and customizing your living space.
This simple square coffee table, with its perfect blend of modern industrial appeal thanks to the robust metal base and the inherent warmth and character of its wooden top, is destined to become a captivating conversation starter in your home. It’s a piece that reflects thoughtful design and personal effort. Always remember, the inherent beauty of any DIY project lies in its remarkable adaptability and the freedom it provides. So, please feel encouraged to experiment with different finishes, explore various wood types, or even adjust the dimensions to truly make this exquisite piece uniquely your own, perfectly tailored to your aesthetic and functional needs.
Don’t forget to revisit our video tutorial for a helpful visual walkthrough of each step, and be sure to download the free printable plans to ensure maximum accuracy in your measurements and cuts. If you do undertake this project and build this fantastic table, we would absolutely love to see your incredible creations! Share your photos and tag us on your social media platforms. Happy building, and may you thoroughly enjoy your beautiful new centerpiece for years to come!