
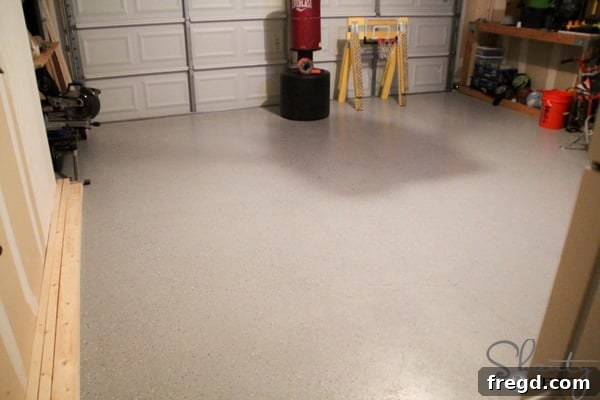
Transforming a neglected space can be incredibly rewarding, and today, I’m thrilled to share a project that revitalized one of the most hardworking areas of my home: the garage. What was once a stained, uninviting concrete slab has been completely transformed into a vibrant, functional space, thanks to an incredibly simple solution. Not only did I discover a remarkably easy cure for my once-horrid garage floor, but the results have exceeded all expectations, inspiring a complete overhaul of the entire area. This isn’t just about covering up a mess; it’s about creating a durable, aesthetically pleasing, and highly functional foundation for all future DIY endeavors and family activities.
For years, my garage floor bore the testament of countless DIY projects. Four years, to be precise, of painting, staining, woodworking, and general creative chaos had lent itself to a truly hideous concrete canvas. My rationale always seemed sound: “It’s just a slab of concrete, it’s outside, it’s *supposed* to get dirty, right?” This comforting narrative served me well until the visual evidence became too overwhelming to ignore. The accumulated spills, drips, and permanent marks began to detract significantly from my vision of a beautiful, organized garage. I longed for a space with neat shelving, efficient storage solutions, and a pristine, inspiring workshop area where creativity could flourish without the distraction of a perpetually grimy floor. The dream of a beautiful garage seemed distant, even impossible, with a surface so profoundly covered in the history of my craft. I didn’t know how I was going to accomplish this grand transformation until a fortuitous discovery changed everything.
Discovering the Solution: Rust-Oleum Garage Floor Epoxy Shield
My search for a durable, aesthetically pleasing, and DIY-friendly concrete floor coating led me straight to the Rust-Oleum Garage Floor Epoxy Shield. It was precisely what my sad, stained floor desperately needed, and to my pleasant surprise, the application process was incredibly straightforward! This product instantly caught my attention because it promised professional-grade results without requiring specialized skills or equipment. The kit arrived complete with a very easy-to-understand instruction manual and even an instructional DVD, providing clear visual guidance through every step. A helpful graph was included to determine the optimal setting time based on the ambient temperature, a crucial detail for ensuring proper curing and longevity. The epoxy itself is available in two classic color options: Gray Gloss and Tan Gloss. For my garage, I opted for the sleek and modern Gray Gloss, which perfectly complemented my vision for a clean, contemporary workspace. For a standard two-car garage, I found that two cases of this high-quality epoxy were precisely what I needed to achieve full coverage and a flawless finish.
Essential Preparation for a Lasting Finish
The secret to any successful epoxy application lies in thorough preparation. Skipping this crucial step can lead to adhesion issues and a less-than-perfect, short-lived finish. The first task on my list was to meticulously inspect the entire garage floor for any oil spots, grease stains, or loose, chipping paint. While I was fortunate enough to have minimal oil spots, I did have several areas where old paint had started to peel or flake. These loose fragments had to be completely removed to ensure the epoxy would bond directly and securely to the concrete. A sturdy putty knife proved invaluable for scraping up these stubborn bits, creating a clean, uniform surface.
The Etching Process: Don’t Be Intimidated!
Next came the etching, a step that initially sounded intimidating but turned out to be remarkably simple and effective. The etching process is vital because it creates a slightly rougher surface on the concrete, allowing the epoxy to penetrate and adhere much more strongly. To begin, I filled a standard watering can with water and mixed in the provided etching salt according to the instructions. The mixture was then sprinkled evenly onto the garage floor. Armed with a wire-bristle brush, which I wisely attached to an extension pole for ease and back-saving comfort, I began scrubbing. Starting from the back of the garage and working my way towards the front, I could hear the distinct fizzing sound as the salt reacted with the concrete. This effervescent action is precisely what you want – it signifies that the etching agent is actively cleaning the concrete surface, removing dirt, grime, and any remaining loose particles, while simultaneously creating the ideal profile for the epoxy. After thorough scrubbing, the spent etching solution, along with any loosened debris, was easily pushed out the garage door using a squeegee. This left a clean, damp, and perfectly prepped surface ready for the next stage.
As you can observe in the image, the right side of my garage floor had just undergone the etching process. It appears damp, indicating it has been thoroughly cleaned and prepared. A critical part of the process is allowing this etched surface to dry completely before any epoxy application begins. Any residual moisture can compromise the adhesion of the epoxy, leading to bubbling or peeling down the line. A clever strategy I employed, which significantly eased the logistical challenge, was to work on one side of the garage at a time. Our garage, like many, was filled with a considerable amount of accumulated items. Rather than undertaking the monumental task of clearing out the entire space and finding temporary storage for everything over a weekend, we simply pushed all our belongings to one side. This allowed us to focus entirely on preparing and coating the exposed half, making the project much more manageable for a single person.
The Epoxy Application: Where the Transformation Begins
Now, for the most exciting part – the actual application of the Rust-Oleum Garage Floor Epoxy! This two-part epoxy system comes in two distinct cans, clearly labeled “A” and “B.” The process is straightforward: simply pour the contents of can “A” into can “B.” Once combined, it’s crucial to mix them thoroughly according to the instruction manual. After mixing, allow the epoxy to “set” or activate for the suggested time, which, as noted earlier, can vary depending on the outdoor temperature. This activation period is essential for the chemical reaction to begin, ensuring the epoxy cures properly and delivers its maximum durability and protective qualities. Always consult your manual for the precise mixing and waiting times.
Gathering Your Tools for a Smooth Process
Once the epoxy mixture has properly set, it’s time to get down to business! Before you start, ensure you have all your application supplies readily accessible. You’ll need a good quality nap roller, preferably one designed for epoxy or concrete coatings, attached to an extension pole to save your back. An angled paintbrush is essential for precision work, especially around the perimeter. A paint pan for the epoxy and several small, disposable cups are also necessary. I found these small cups particularly useful for separating the decorative confetti chips, which allowed for a much more even and controlled distribution across the floor, preventing clumps and ensuring a professional finish.
Edging: The First Step in Application
Begin the actual application by using your angled brush to carefully paint the epoxy along the entire perimeter of the garage. I deliberately let the epoxy run up the side of the wall a small amount – perhaps half an inch – to ensure that the edges were fully covered and sealed. This creates a clean, finished line and provides comprehensive protection. You’ll have approximately 15 minutes, give or take, to complete the edging before the epoxy starts to set too much, so it’s important to work efficiently but not frantically. I tackled this entire floor project by myself, without any additional help, which serves as a testament to its manageability. Don’t let perceived time constraints intimidate you; with a steady pace, it is most definitely a comfortable one-person job!
Rolling the Epoxy and Adding Confetti Chips
Once the perimeter is complete, switch to your nap roller attached to the extension pole and begin to roll the epoxy onto the main floor area. This part truly is akin to painting a large wall. Start at the very back of the garage and work your way systematically towards the front, ensuring you don’t paint yourself into a corner! The recommended technique involves rolling out a manageable 4’x4′ section of epoxy. Immediately after coating a section, lightly sprinkle it with the decorative confetti chips. My preferred method for even dispersion was to grab a small handful of chips at a time and toss them upwards, about three feet above the section I had just rolled. This allows them to “rain down” naturally and spread out precisely where desired, creating a uniform, flecked appearance. As you can see, I maintained my strategy of working on only one side of the garage floor at a time. After applying the epoxy and chips to the first half, I allowed it to dry overnight. Always consult your instruction manual for the suggested drying time based on the ambient temperature. Once the first side was sufficiently cured, I simply moved all our stored items to the newly finished side and began the entire preparation and application process on the remaining half. This two-phase approach made the project far less disruptive and more organized.
The Grand Reveal: A Transformed Garage
And here it is – the finished product! A beautiful, glossy, and incredibly durable garage floor that completely transformed the space. The difference is night and day. What was once an eyesore is now a point of pride, inviting and functional. What’s particularly wonderful is how this transformation has impacted our family life. Our garage, once purely utilitarian, has now become somewhat of an extension of our home’s living space – a sort of “playroom” for the kids! On days with inclement weather, they spend hours in here, riding scooters, playing games, and generally enjoying the clean, bright environment. This unexpected bonus highlights the versatility and value of a properly finished concrete floor.
Beyond Aesthetics: Functionality and Value
From my perspective as a DIY enthusiast, this garage floor renovation has been a game-changer. I absolutely love it because I no longer feel like I’m stepping into a dirty, “outside” environment when I head to the garage for a building project. The clean, professional finish elevates the entire workspace, making it more enjoyable and inspiring to create. This Rust-Oleum Garage Floor Epoxy Shield not only provides exceptional aesthetic improvement but also offers superior protection against stains, spills, and everyday wear and tear, significantly extending the life of the concrete. The fact that I was able to cover up my hideously stained garage floor for approximately $150 makes this an incredibly cost-effective home improvement project, delivering immense value for the investment. This single transformation has ignited a passion for further enhancements. I simply cannot wait to deck out the rest of the garage with new storage solutions, dedicated workspaces, and even better lighting, creating the ultimate functional and beautiful creative hub. If you’re looking to refresh your home, starting with a durable and attractive concrete floor coating like this Rust-Oleum epoxy is an excellent choice for immediate impact and long-term benefits.
Considering how easy and impactful this project was, I highly recommend exploring garage floor epoxy for your own home. It truly transforms the space into a functional, beautiful extension of your living area.