
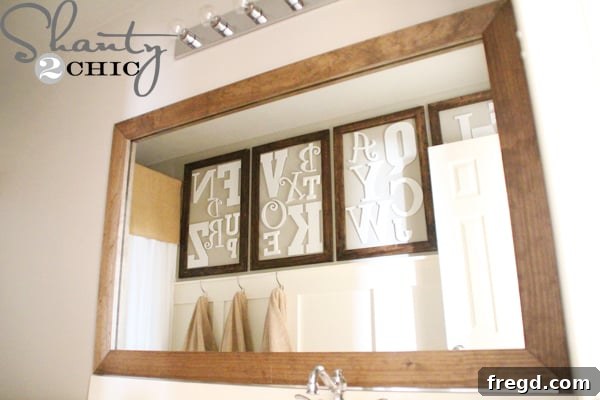
Do you find yourself gazing at your bathroom mirror, wishing it had more character? Many homeowners, including myself, are familiar with those ubiquitous, builder-grade mirrors – large, functional, but utterly devoid of personality. They serve their purpose, yet they often leave the bathroom feeling unfinished or uninspired. If you’re tired of that bland reflection and ready for a stunning transformation without commitment, you’ve come to the right place. This week, I experienced a creative breakthrough and discovered an incredibly simple, budget-friendly, and non-permanent method to elevate the look of my kids’ bathroom mirror. The absolute best part? It’s completely reversible, leaving no damage behind. This makes it a perfect solution for the indecisive decorator (like me!) or for renters who need stylish upgrades without violating their lease agreements.
Embarking on a DIY project can often feel daunting, especially when thinking about costs and complexity. However, this non-permanent mirror frame project challenges those notions by being both affordable and straightforward. For my approximately 4-foot-long mirror, I only needed two 1×4 boards, each 8 feet long. To ensure a professional finish and perfectly straight lines, I chose to invest a little more in select pine. This choice minimized warping and provided a smooth surface for staining. While you could opt for more premium woods like oak for an even grander statement, the select pine proved to be an excellent balance of quality and cost-effectiveness. The total expenditure for all the necessary lumber to create this entire custom mirror frame was an astonishingly low $20! This project truly proves that you don’t need a massive budget to achieve a high-end, custom look in your home.
Transform Your Bathroom: A DIY Non-Permanent Mirror Frame Tutorial
Are you ready to give your plain bathroom mirror a remarkable upgrade? This step-by-step guide will walk you through creating a beautiful, non-permanent wooden frame that adds warmth, style, and a touch of custom elegance to any bathroom. Let’s dive into the details and get started on this incredibly rewarding home improvement hack!
Materials You’ll Need:
- Two 1×4 boards (8 feet long each, or adjust based on your mirror dimensions)
- Wood Stain (e.g., Rust-Oleum Dark Walnut)
- Polyurethane (matte finish recommended for bathrooms)
- Clean cloths for wiping stain
- Small bowl of water for water popping technique
- 3M Command Strips (Large size, 4 sets per package, ensure sufficient weight capacity)
- Optional: Thin plastic mirror clips (if your existing clips are too thick for the frame)
Tools Required:
- Miter Saw or Handsaw with Miter Box
- Measuring Tape
- Pencil
- Safety Glasses
- Kreg Jig (for pocket holes)
- Drill
- Brad brush for polyurethane application
- Optional: Wood glue and clamps (if not using Kreg Jig)
Step 1: Precise Measurements and Miter Cuts
The foundation of a professional-looking frame lies in accurate measurements and precise cuts. Begin by carefully measuring the length and width of your mirror. It’s crucial not to simply copy my measurements, as every mirror can vary slightly. Instead, measure your own mirror precisely. For a seamless frame, all cuts will be mitered at a 45-degree angle. I recommend adding approximately an inch to your overall length and width measurements to account for the mitered corners. When measuring for miter cuts, think from the ‘short point’ of one end of your board to the ‘short point’ of the other end. This ensures the outer edges of your frame meet perfectly at the corners.
I absolutely adore my miter saw for its smooth, accurate cuts, which made this part of the project incredibly easy. If you own a miter saw, it will make quick work of these angled cuts. However, if you don’t have access to one, don’t fret! A reliable handsaw paired with a miter box is an excellent alternative for smaller projects like this. This combination allows you to achieve precise 45-degree angles manually and is a versatile tool to have in your DIY arsenal for many future endeavors.
Step 2: The Art of Water Popping for a Superior Finish
Now, let’s talk about achieving that flawless stain finish. I recently learned a brilliant technique called “water popping,” which dramatically enhances the quality of your stained wood. This method works by gently raising the grain of the wood, allowing it to absorb stain more deeply and evenly, resulting in a richer color and a smoother final appearance.
To perform water popping, simply take a clean cloth, dip it into a bowl of clean water, and wring out any excess until it’s just damp. Then, lightly wipe down all the surfaces of your wood boards where you intend to apply stain. As the water dries, it will cause the wood fibers to stand up slightly, effectively opening the pores. This creates a thirsty surface ready to soak up the stain. A crucial tip: Once you’ve applied the water popping technique, avoid touching the boards directly with your bare hands until they are completely dry. The natural oils from your skin can create uneven spots or resist the stain, compromising your beautiful finish. Patience here will pay off!
Step 3: Staining for Depth and Elegance
With your boards perfectly cut and prepped with water popping, it’s time to add some color. For this project, I chose my absolute favorite: Rust-Oleum Dark Walnut stain. This rich, deep hue instantly adds warmth and sophistication, transforming plain pine into something truly luxurious. Apply a single, even coat of stain. After letting it sit for about five minutes, use a clean, dry cloth to gently wipe off the excess. The goal isn’t to remove all the stain, but rather to evenly distribute it and remove any pooling, allowing the wood’s natural grain to shine through beautifully.
Since this frame will be adorning a mirror, there’s a vital step not to overlook: stain both sides of your boards. If you only stain the front, the unfinished back might be visible through the mirror’s reflection, creating an unpolished and distracting look. Staining both sides ensures a consistent, finished appearance from every angle, preventing any nagging imperfections that would surely drive you crazy!
With those beautiful cuts, we’re almost ready to assemble! But first, let’s ensure the stain has fully dried.
Step 4: Protecting Your Masterpiece with Polyurethane
Once both sides of your stained boards are completely dry to the touch, it’s time for the all-important protective layer: polyurethane. Since this frame will reside in a bathroom, an environment often prone to humidity and occasional splashes, protecting the wood finish is absolutely essential. I chose a matte finish polyurethane, which provides durable protection without adding an overly glossy sheen, preserving the natural look of the stained wood. Apply one even coat using a quality bristle brush. Ensure thorough coverage, paying attention to all edges and corners. This protective layer will shield your beautiful frame from moisture, wear, and tear, ensuring it looks fantastic for years to come.
Step 5: Assembling the Frame with Kreg Jig Pocket Holes
Now that your wood pieces are stained and protected, it’s time to bring them together to form your custom frame. For strong, concealed joints, I highly recommend using a Kreg Jig to drill pocket holes. This tool makes assembly incredibly straightforward and results in a very robust frame. Begin by drilling pocket holes into the ends of your shorter frame pieces. To do this, simply place the board securely in your Kreg Jig, ensuring the mitered angle rests flat against the base. The Kreg Jig will guide your drill bit to create angled holes, as perfectly illustrated in the provided picture. These angled holes allow you to join the pieces with screws from the back, creating a strong joint without visible fasteners on the front of your frame.
If you don’t own a Kreg Jig, you can still assemble your frame effectively. Alternatives include using wood glue in conjunction with clamps, allowing ample drying time for a strong bond. You could also reinforce these glued joints with small finishing nails or brad nails, carefully filling the tiny holes afterward for a smooth finish. Regardless of your chosen method, ensure the corners meet perfectly at a 90-degree angle to maintain the integrity of your frame.
Step 6: The Non-Permanent Installation with 3M Command Strips
Here’s where the magic truly happens, bringing the “non-permanent” aspect of this project to life. As someone who appreciates flexibility in decor, the thought of permanently gluing a frame to my mirror was completely unappealing. That’s precisely when I had my “light bulb moment” – 3M Command Strips! These ingenious strips are absolutely perfect for this application. They provide a strong hold while allowing for easy removal without damaging the mirror surface, which is ideal for renters or those who love to change things up frequently.
I used one package containing four sets of large Command Strips. These strips are designed to hold up to 16 pounds, which is more than sufficient for a lightweight wooden frame like this. Simply follow the detailed instructions on the back of the Command Strips packaging for proper application to your mirror and frame. For best adhesion, I highly recommend waiting at least 24 hours after applying the polyurethane to ensure the finish is completely dry and cured before attaching the Command Strips. This ensures optimal bonding and prevents any issues with the strips peeling off the freshly finished wood.
A Note on Mirror Clips:
Before installing your beautiful new frame, you might need to address your existing mirror clips. I removed all of my original mirror clips to ensure a perfectly flush fit for the frame. My mirrors were already very secure, so this wasn’t an issue for me. However, if you’re concerned about removing your clips or if they provide essential support for your mirror, you can easily purchase very thin plastic mirror clips at The Home Depot or similar hardware stores. These thinner clips can be installed discreetly behind the mirror, and your new wooden frame will fit perfectly over them without obstruction, ensuring both safety and aesthetics.
The Stunning Transformation: Before and After
It’s truly amazing what a difference a simple DIY project can make. Take a look at the before picture to see the stark contrast. My kids’ bathroom mirror went from a plain, builder-grade fixture to a custom, elegant focal point that ties the entire room together.
Here’s the before:
And now, behold the after!
I absolutely adore, love, love the outcome! The added warmth of the wood, the custom feel, and the enhanced character of the bathroom are simply fantastic. And the absolute best part? If I ever decide to change my mind, or if a new trend catches my eye, I can simply pop the frame off the mirror and gently pull down the Command Strips, leaving the mirror perfectly intact and damage-free. It’s the ultimate flexible upgrade. I honestly can’t believe I didn’t tackle this project sooner!
Conclusion: Elevate Your Space with Ease
This DIY non-permanent mirror frame project is a testament to how simple, inexpensive modifications can yield incredibly impactful results. You don’t need advanced carpentry skills or a large budget to bring a touch of custom elegance to your home. This project offers a fantastic way to personalize your bathroom, add a sense of luxury, and solve the common problem of boring builder-grade mirrors – all without any permanent commitment. It’s a perfect solution for homeowners and renters alike, allowing you to experiment with style and enjoy a refreshed space.
Thank you so much for stopping by and checking out this exciting transformation! I hope this detailed tutorial inspires you to tackle your own bathroom mirror upgrade. If you love this idea and found it helpful, I would be thrilled if you would share it on Pinterest or with friends who might also appreciate a clever home decor hack. Happy DIYing!
~Ashley