
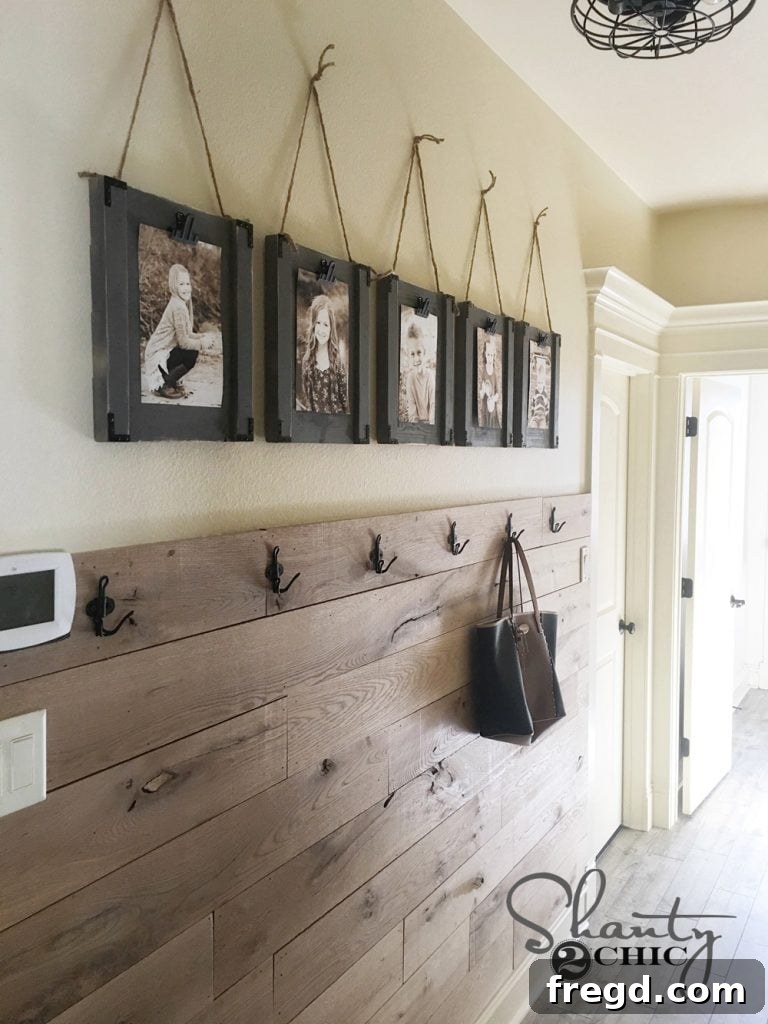
Craft Your Own Rustic Hanging Photo Frames: A Timeless DIY Project
Welcome to our latest DIY creative project! As someone who loves to capture and display precious family moments, I’m always searching for innovative and easy ways to showcase photographs. Over the years, we’ve explored numerous clip frame designs, but this particular hanging plank frame stands out as a true favorite for its simplicity, charm, and effortless photo updates. It’s perfect for anyone wanting to add a touch of personalized rustic elegance to their home decor. Before we dive into the step-by-step written guide, make sure to watch our comprehensive video tutorial for a visual walkthrough of the entire process. You can access it directly by clicking HERE or by playing the embedded video below!
Transform Your Walls with These Charming DIY Photo Frames
Just look at how incredibly charming these finished frames are! They offer a delightful blend of rustic appeal and modern functionality, making them an ideal addition to any room, from a cozy living area to a vibrant children’s playroom. Imagine effortlessly rotating your favorite family snapshots, children’s artwork, or cherished memories without the hassle of traditional framing. This project not only provides a beautiful display solution but also allows you to infuse your personal style into your living space, creating a truly unique focal point.
Why Choose DIY Hanging Photo Frames?
Beyond their undeniable aesthetic appeal, these DIY hanging photo frames offer several practical advantages that make them a superior choice for displaying your cherished images. First and foremost, they provide an incredibly easy way to update your picture collection. Unlike traditional frames that require you to remove backings and secure new photos, these clip frames allow for a quick swap of images in mere seconds. This flexibility is invaluable for families with growing children, as it means you can continuously refresh your display with the latest milestones and memories. Moreover, the rustic, handcrafted look adds a unique character to your home that store-bought frames often lack. Each frame you create will carry the personal touch of your effort, making it more meaningful. They are also highly customizable; you can choose different wood types, paint colors, and distressing levels to match your existing home decor perfectly. This project is not only fun and rewarding but also results in a durable and stylish display solution that you’ll be proud to showcase.
Gather Your Materials and Tools for This Engaging Project
Before embarking on any woodworking project, thorough preparation is key. Having all your materials and tools laid out and ready will streamline the process and prevent interruptions. For these DIY hanging photo frames, we’ve carefully selected components that ensure both durability and aesthetic appeal. The good news is that most of these items are readily available at your local hardware store or online, making this an accessible project for most DIY enthusiasts.
Essential Materials:
- Wood Boards: You’ll need planks that can be cut into the specific dimensions outlined in our free plans. Pine is an excellent choice for its affordability and ease of working, but you could also opt for oak or maple for a more premium finish.
- Wood Glue: A strong woodworking adhesive is crucial for bonding the planks securely. We recommend a high-quality wood glue that provides a lasting hold.
- 5/8″ Brad Nails: These small nails, used with a brad nailer, offer additional reinforcement and ensure the frame holds its structure firmly.
- Spray Paint (Rust-Oleum Granite and Black): We opted for Rust-Oleum’s “Granite” spray paint for the main frame, which gives a sophisticated, textured stone-like finish. For the metal corners, a simple black spray paint provides a classic contrast. Feel free to experiment with colors that match your decor!
- Rough Grit Sandpaper: Essential for distressing the edges and corners of the finished frames, giving them that desired rustic, worn look.
- Metal Clips: These are the star of the show for holding your photos. We found ours HERE on Amazon, but any similar clip that can be securely attached will work.
- Super Glue Gel: For attaching the metal clips, a strong, quick-drying adhesive like Super Glue Gel is indispensable. Its gel consistency helps prevent dripping and ensures a firm bond. We recommend this specific Super Glue Gel here.
- Twine (Optional): A small length of twine can be added as a decorative touch, enhancing the rustic feel and providing an alternative hanging method.
Tools You’ll Need:
- Miter Saw: This tool is central to achieving precise and clean cuts for your wooden planks. While other saws can be used, a miter saw significantly simplifies the cutting process and ensures professional-looking results. It’s one of the three tools highlighted in our 3 Tool Project Ebook.
- Brad Nailer: A pneumatic or electric brad nailer makes quick work of securing the planks together with minimal effort, providing a clean finish compared to hammering nails manually.
Step-by-Step Tutorial: Building Your Hanging Photo Frames
With your materials and tools at the ready, let’s begin the exciting process of constructing your very own hanging photo frames. Each step is designed to be straightforward, ensuring a rewarding experience even for those new to woodworking. Always prioritize safety, especially when using power tools, and wear appropriate protective gear like safety glasses.
1. Precision Cutting: The Foundation of Your Frame
The first and most critical step in building durable and attractive frames is making accurate cuts. We provide detailed measurements and instructions to ensure your pieces fit together perfectly. You can easily download and print the FREE PLANS by clicking HERE. Using a miter saw, as featured in our 3 Tool Project Ebook, will give you clean, straight edges, essential for a professional finish. Carefully measure and cut all your wooden planks according to the plans. Double-check your measurements before making each cut to avoid errors and wasted material. Remember, precision here translates directly to a well-aligned and sturdy final product.
Here are the specified cuts for creating a single frame, ensuring all pieces fit perfectly:
2. Assembling the Frame Base: Gluing and Nailing
Once your cuts are complete, you’re ready to assemble the main structure of the frame. Lay the four 12-inch boards side by side on a flat, clean surface. Ensure they are perfectly aligned and flush, as this will be the face of your frame. A slight gap between the planks is normal and adds to the rustic aesthetic. Next, apply a generous but not excessive line of wood glue down each end of the aligned boards, across all four planks. This glue will act as the primary bonding agent, creating a strong, lasting connection. The next step involves reinforcing this bond. Take your two smaller side boards and attach them down both ends of the aligned planks. Use your brad nailer to secure them in place with 5/8-inch brad nails. Apply several nails along each side piece, ensuring they penetrate both the side piece and the main planks, providing robust structural integrity. This combination of glue and nails creates an incredibly strong and durable frame that will hold up over time.
Start by lining up your four 12-inch boards side by side, ensuring a consistent and even arrangement:
Apply a continuous line of wood glue across the ends of the aligned planks to ensure a strong bond:
Secure the smaller cross-boards to the ends using a brad nailer, reinforcing the glue bond:
At this stage, your frame will begin to take shape, resembling a solid wooden canvas:
3. Adding the Finish: Painting for Style
With the frame assembled and the glue fully cured, it’s time to add the personality with paint. We chose Rust-Oleum’s “Granite” spray paint, which delivers an impressive textured finish that mimics natural stone. This particular paint offers excellent coverage and durability, making it perfect for an item that will be handled frequently. Apply the spray paint in light, even coats, keeping the can moving to avoid drips and ensure a smooth, consistent finish. Allow each coat to dry thoroughly according to the manufacturer’s instructions before applying the next. You may need two to three coats to achieve full coverage and the desired depth of color and texture. Once painted, set the frames aside in a well-ventilated area to dry completely. This phase is where your frames truly begin to come to life, taking on their distinct character.
We achieved this fantastic textured look using Rust-Oleum’s “Granite” spray paint, readily available at Home Depot:
4. Customizing Metal Corners for a Cohesive Look
While the main frames were drying, we turned our attention to the small metal corner braces. These braces add a decorative and protective element to the frames. To ensure a cohesive and polished look, we decided to paint them to match our chosen photo clips. Our clips were black, so a black spray paint was the perfect choice for the corners. Lay the metal corners out on a protected surface and apply light, even coats of black spray paint. Given their small size, be careful not to overspray to avoid drips. Allow them to dry completely. This small detail significantly contributes to the overall finished aesthetic, tying all the components together beautifully.
5. Distressing for Rustic Charm
Once your painted frames are thoroughly dry and cured, it’s time to add that authentic rustic touch through distressing. Using a piece of rough grit sandpaper, lightly scuff the edges and corners of the frame. The goal is to gently remove small amounts of paint, allowing the natural wood beneath to show through, simulating years of wear and tear. This technique adds depth, character, and an aged feel to your frames. Be subtle and strategic; you want to create a naturally worn look, not a damaged one. Stand back frequently to assess your work and stop once you achieve the desired level of distressing. This step truly enhances the rustic appeal and makes each frame feel unique and handcrafted.
6. Attaching Photo Clips Securely
Now for the mechanism that makes these frames so practical – the photo clips! We sourced our sturdy metal clips HERE on Amazon. For attaching them, the right adhesive is crucial. We consistently achieve excellent results using Super Glue Gel. Its thicker consistency prevents it from running, making application neat and precise. Apply a small dot of Super Glue Gel to the back of each clip, then firmly press it onto the desired location on your frame. We recommend spacing them evenly across the top edge of the frame, depending on how many photos you wish to display. Hold each clip in place for a few seconds to ensure initial adhesion, then allow the glue to cure fully according to its instructions. A strong bond here is essential for securely holding your photos.
For a reliable and strong bond, we highly recommend this specific Super Glue Gel:
7. Adding Decorative Touches and Hanging Your Frames
With the clips securely in place and all adhesives dry, your frames are almost complete! To enhance their rustic character, we added a length of natural twine to each frame. This simple addition provides an extra layer of visual interest and softens the overall look. You can thread it through small holes drilled in the top corners or simply tie it around the ends of the frame. Finally, it’s time to hang your beautiful creations! Choose a prominent wall where these frames can truly shine, perhaps in a hallway, living room, or even a nursery. Use appropriate wall anchors and hooks to ensure they are securely mounted. Step back and admire your handiwork – a personalized and charming display for your most cherished memories.
Customization Ideas to Make Them Uniquely Yours
One of the greatest joys of DIY projects is the freedom to customize. While our “Granite” and distressed look offers a timeless appeal, don’t hesitate to experiment! Consider using different paint colors – perhaps a soft pastel for a nursery, a vibrant hue for a modern space, or a rich wood stain to highlight the natural grain. You could also explore various types of clips, from mini clothespins for a whimsical touch to larger, more industrial-style clips for an edgy look. Add small decorative elements like stenciled patterns, carved initials, or even small metal embellishments for extra flair. The size of the frames can also be adjusted; create a gallery wall with frames of varying dimensions for a dynamic display. Let your imagination guide you to create frames that perfectly reflect your unique style and home decor.
Your Finished Masterpieces Await!
And there you have it – your stunning, handcrafted hanging photo frames are all finished up and ready to adorn your walls! This project is not just about creating a functional item; it’s about infusing your home with warmth, personality, and cherished memories. The ease of updating photos means your display will always feel fresh and relevant, evolving with your family’s story. We hope you found this tutorial inspiring and straightforward. It’s a truly rewarding experience to create something beautiful with your own hands, especially when it helps preserve precious moments. Don’t forget to share your finished projects with us – we love seeing your creativity come to life!