
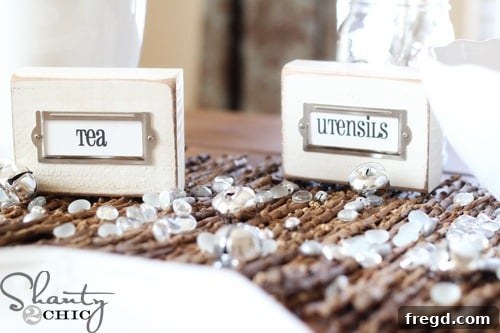
DIY Rustic Wooden Block Place Card Holders: Elevate Your Holiday Table with Handmade Charm
Welcome, fellow DIY enthusiasts, to Day 7 of our exciting “12 Days of Christmas” series! As the festive season twinkles brighter and holiday gatherings fill our calendars, there’s no better time to infuse your home with handmade charm. Today, we’re diving into a project that’s not only incredibly easy and budget-friendly but also adds a significant touch of rustic elegance to your Christmas celebrations: DIY Wooden Block Place Card Holders. Get ready to transform simple materials into captivating table decor that will impress your guests and make your holiday meals even more special.
Why These DIY Wooden Block Place Card Holders Are a Must-Make for Your Holidays
Imagine your holiday dinner table, beautifully set, with each guest’s name charmingly displayed, or perhaps your buffet spread, clearly labeled with delightful descriptions for each dish. That’s the magic these simple yet elegant wooden block holders bring to your festive gatherings. They are not just functional; they are a statement piece, adding a layer of thoughtful detail that elevates your entire decor. What’s even better? They look incredibly sophisticated, giving the impression of hours of meticulous crafting, when in reality, they’re astonishingly quick, effortless, and remarkably affordable to create. 
In a world of mass-produced decorations, a touch of handmade warmth resonates deeply. These versatile label holders allow you to personalize your space and celebrate the season with a unique, rustic flair. Whether you’re hosting an intimate family dinner or a grand Christmas party, these wooden blocks are guaranteed to be a conversation starter and a testament to your creative spirit. Let’s get started on crafting these adorable additions to your holiday home!
Crafting Your Own Rustic Wooden Label Holders: A Step-by-Step Guide
Ready to create these charming accent pieces? Gather your materials, and let’s embark on this simple yet rewarding DIY journey. Even if you’re a beginner to woodworking, you’ll find these steps incredibly straightforward and enjoyable.
Step 1: Gathering Your Materials – The Foundation
The core of this project is a single piece of lumber. You’ll need to purchase one 2×4 (measuring approximately 8 feet long) from your local hardware store. A standard 2×4 is ideal for creating sturdy blocks that have a substantial feel. When selecting your wood, look for pieces that are relatively straight and free from major knots or defects, although a few imperfections can add to the rustic charm we’re aiming for.
Step 2: Precision Cutting – Preparing Your Blocks
Once you have your 2×4, it’s time to cut it into individual blocks. For this project, you’ll want to cut your 2×4 into blocks that are roughly 3.5 inches in length. This size provides a stable base and a good surface area for distressing and painting. An 8-foot 2×4 will yield plenty of blocks for a large gathering or for multiple decorative displays.
For cutting, a miter saw or even a simple handsaw can be used effectively. If you’re new to woodworking, investing in an inexpensive, easy-to-use saw is a fantastic way to start building your DIY tool collection. Always prioritize safety when using any cutting tools: wear appropriate eye protection and ensure your workpiece is securely clamped before making any cuts. The beauty of this project is that absolute perfection isn’t necessary; minor variations in size can actually enhance the handmade, rustic aesthetic.
Step 3: A Fresh Canvas – Painting Your Blocks
Now that your blocks are cut, it’s time to add a base coat of color. I highly recommend using Rust-Oleum Heirloom White spray paint. This particular shade provides a beautiful, soft, and slightly off-white finish that serves as the perfect foundation for our rustic look. Apply two thin, even coats, allowing sufficient drying time between each application as per the product instructions. Spray painting in a well-ventilated area is crucial, and laying down a drop cloth or newspaper will protect your work surface. The goal here is a smooth, consistent base that will peek through after distressing.
Step 4: Embracing the Worn Look – Distressing the Edges
The distressing step is where the magic truly happens, transforming a plain painted block into a vintage-inspired treasure. For this, I use 80-grit sandpaper, ideally with a 3M sanding block for easier handling and even pressure. Gently sand the edges and corners of each block, revealing hints of the raw wood underneath. The goal isn’t to remove all the paint but to create a naturally worn, loved appearance. Focus on areas where natural wear and tear would typically occur. This step adds character and depth, giving your blocks that coveted shabby-chic appeal.
Step 5: Adding Depth with Stain – The Rustic Finish
Following the distressing, a single coat of Rust-Oleum Early American Stain will deepen the rustic effect and tie the look together. Apply a small amount of stain with a foam brush, focusing on the distressed edges but not worrying if some gets onto the painted surfaces. In fact, this is often desirable as it adds an authentic aged patina. Allow the stain to sit for about five minutes, then wipe away any excess with a clean, lint-free cloth. You’ll notice how the stain seeps into the distressed areas and subtly tones down the white paint, creating a beautifully aged and warm finish. Don’t be afraid if the stain spreads a little – those happy accidents often enhance the overall distressed aesthetic!
Step 6: Attaching the Card Holders – Functional Elegance
The final touch for your wooden blocks is to attach the card holders. I’ve personally found that certain card holders work exceptionally well for these blocks, and I’ve reordered them for various projects over time due to their quality and perfect fit. These holders typically come with small screws, making attachment straightforward. Position the holder centered on the top of your block and secure it firmly. A pilot hole drilled with a small bit beforehand can make this step even easier and prevent the wood from splitting, though with soft lumber like pine, it’s often not strictly necessary. Once attached, your functional and beautiful wooden block holders are ready for their labels! 
Unleash Your Creativity: Versatile Uses for Your Wooden Block Holders
The true beauty of these DIY wooden block holders lies in their incredible versatility. While perfect for place cards, their utility extends far beyond the dinner table. They are truly adaptable and can be used to add a touch of charming organization and festive decoration all around your home, not just during the holidays but throughout the year!
Elegant Place Settings and Buffet Labels
For Christmas parties and festive feasts, these holders shine brightest. Use them to designate seating arrangements, making each guest feel special with a personalized place card. Alternatively, they are fantastic for labeling dishes on a buffet spread, helping guests navigate through your delicious offerings with ease and elegance. Imagine “Roasted Turkey,” “Cranberry Sauce,” or “Grandma’s Secret Stuffing” beautifully displayed next to each serving dish. It adds a professional yet homey touch that your guests will surely appreciate. 
Seasonal Home Decor and Displays
Beyond dining, these holders can serve as charming elements in your seasonal decor. Display festive messages like “Joy to the World,” “Peace on Earth,” or “Merry Christmas” on your mantelpiece, bookshelf, or entry table. They can also hold small holiday cards, cherished family photos, or even inspiring quotes, creating a warm and inviting atmosphere. Their rustic design makes them a perfect fit for a farmhouse, shabby chic, or traditional Christmas theme. 
Unique Photo Props and Personalized Gifts
Looking for a creative prop for your family photos? These wooden blocks can hold signs with years, family names, or festive greetings, adding a personalized touch to your holiday portraits. They also make wonderful, thoughtful gifts! Imagine gifting a set of these handmade holders with personalized messages to friends, family, or even as hostess gifts. It’s a gift that carries sentiment and encourages their own creative expression. The possibilities are truly endless; let your imagination be your guide! 
To help you get started with these fantastic uses, I’ve also provided some convenient printables. These are the very same designs I created for my own use, and I’m delighted to share them with you to simplify your decorating and hosting endeavors. Simply print, cut, and insert them into your newly crafted wooden block holders!
Download Your Exclusive Holiday Printables
To make your decorating even easier and more delightful, I’ve curated and provided the very same printable labels I use for my own wooden block holders. These custom-designed labels are perfect for various occasions and themes. Simply click on the links below to download and print them for your convenience!
I genuinely hope these printables, combined with your newly crafted wooden block holders, bring an extra layer of joy and ease to your holiday preparations! 
Join the Festive Fun: The 12 Days of Christmas Blog Hop & Exciting Giveaway!
This wonderful DIY project is just one part of a larger, incredibly inspiring collaboration! We’ve teamed up with a group of truly fabulous bloggers to bring you an entire “12 Days of Christmas” series, each day featuring new ideas and festive creations. We encourage you to hop over and explore all the incredible projects shared by these talented individuals – you’re sure to find even more inspiration for your holiday season!
An Exclusive Holiday Giveaway!
And as a special thank you for joining us today, you’ve stumbled upon an exciting opportunity! You’ve found today’s “12 Days of Christmas” Giveaway! We believe in spreading holiday cheer, and what better way than with some fantastic prizes?
Today’s lucky winner will receive a beautiful set of these very own Wooden Block Label Holders, lovingly handmade by me! Imagine adding these unique, rustic pieces to your holiday decor without lifting a finger! But the generosity doesn’t stop there. Our wonderful friends at Rust-Oleum are also joining the festive spirit!
They are generously contributing a full case of Rust-Oleum Heirloom White Spray Paint to the winner! This means you’ll not only get a beautiful handmade prize but also the supplies to embark on your own creative projects. How exciting is that?
To enter this fantastic giveaway, please follow the instructions below. The winner will be announced on Day 13 during our special linky party, so be sure to check back! If you have any questions about entering, don’t hesitate to ask. Good luck, and happy crafting!
a Rafflecopter giveaway